

The Easy Crochet Sunflower Table Runner Pattern adds a warm, handmade touch to your dining table with beautiful sunflower motifs, cream-colored backgrounds, and leafy green details. This project is a lovely way to decorate your home for fall or brighten your space year-round. In this guide, you’ll learn which yarn and crochet hook to choose, how to create the sunflower motifs, and how to join them into a finished table runner. With clear instructions and basic crochet skills, you can create a decorative piece for your own home or as a thoughtful handmade gift.

Table of Contents
Materials for an Easy Crochet Sunflower Table Runner
Before starting your Easy Crochet Sunflower Table Runner Pattern, gather the yarn, crochet hook, and basic tools you’ll need to create the sunflower motifs and connect them into a finished runner. Using the right yarn colors will help each sunflower stand out against the cream background, while a consistent stitch tension will keep the motifs neat and even.
Materials and Tools
| Material or Tool | Recommended Type | Purpose |
|---|---|---|
| Yellow yarn | Worsted-weight yarn | Creates the sunflower petals |
| Brown yarn | Worsted-weight yarn | Forms the sunflower center |
| Cream yarn | Worsted-weight yarn | Creates the background and connects the motifs |
| Green yarn | Worsted-weight yarn | Adds leaves and decorative details |
| Crochet hook | 4.0–5.0 mm, depending on the yarn | Works the stitches and motifs |
| Yarn needle | Blunt-tipped tapestry needle | Weaves in ends and joins pieces |
| Scissors | Small, sharp scissors | Cuts yarn neatly |
| Stitch markers | Optional | Marks the beginning of rounds |
| Measuring tape | Flexible measuring tape | Checks motif size and finished dimensions |
Yarn tip: Choose yarns with a similar thickness and texture so the sunflower motifs fit together evenly. Cotton yarn is a good option for a table runner because it creates defined stitches and holds its shape well. Acrylic yarn can also work if you prefer a softer, budget-friendly alternative.
Finished Size and Motif Planning
The finished dimensions depend on the size of your sunflower motifs and how you arrange them. For a rectangular table runner, arrange the motifs in rows and columns, then measure the combined width and length before adding the final border.
| Design Detail | Suggested Starting Point |
|---|---|
| Motif shape | Square sunflower motifs |
| Motif arrangement | 3 motifs wide × 5 motifs long |
| Number of motifs | 15 |
| Motif size | Approximately 6–7 inches square |
| Estimated runner size before edging | 18–21 inches wide × 30–35 inches long |
| Border | One or two rounds of single crochet |
| Difficulty level | Beginner to intermediate |
These measurements are estimates, not fixed dimensions. Your actual results will depend on your yarn, hook size, stitch tension, and joining method.
For example, if each finished motif measures 6.5 inches square and you arrange 3 motifs across and 5 down, the runner will measure approximately 19.5 inches wide × 32.5 inches long before joining adjustments and edging.
Make one complete motif first and measure it before crocheting the remaining pieces. This simple step helps you estimate the final size and determine whether you need more or fewer motifs for your table.

How to Crochet the Sunflower Motifs
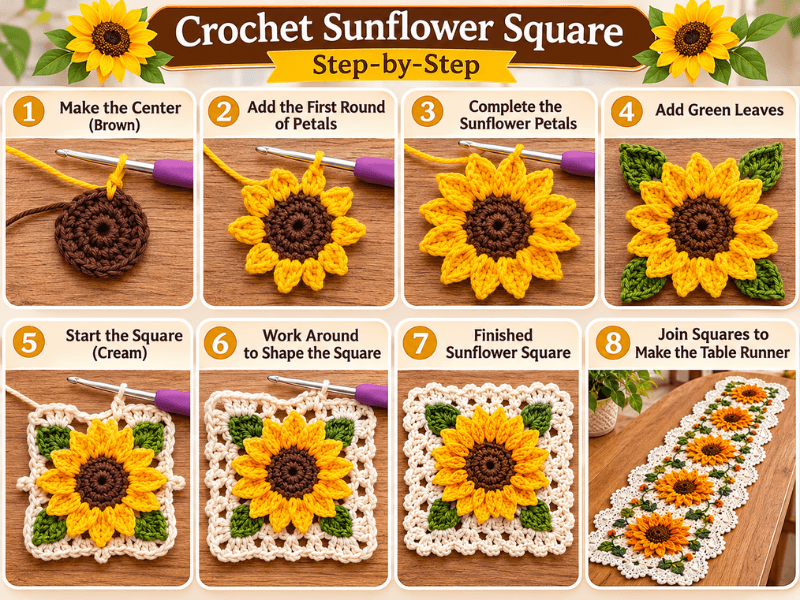
The sunflower motifs are the main feature of this Easy Crochet Sunflower Table Runner Pattern. Each square combines a brown center, bright yellow petals, and a cream-colored background to create a classic sunflower design. Once you finish the individual motifs, you can join them together to form a beautiful table runner.
Before starting, check your yarn label for the recommended hook size and make sure your stitches are consistent. Keeping each motif the same size will make joining the squares much easier.
Step 1: Create the Sunflower Center
Start with brown yarn to make the center of the sunflower. You can begin with a magic ring or use the starting method you prefer. Work the stitches into the ring, then gently tighten it to close the center.
Keep the center flat as you crochet. If it begins to curl, your stitches may be too tight. If it becomes wavy, you may need to adjust your tension.
Step 2: Add the Yellow Petals
Attach the yellow yarn around the brown center to create the sunflower petals. Work the petal stitches evenly around the center, following your chosen stitch pattern.
For a full sunflower appearance, aim for evenly spaced petals that have a similar length and shape. The exact number of petals will depend on the pattern you use.
Helpful tip: Count your stitches as you work around the center. Consistent spacing helps the sunflower look balanced and makes it easier to build the square around it.
Step 3: Crochet the Cream Background
Once the petals are complete, attach the cream yarn and work around the sunflower to create a square. The background frames the flower and helps each motif connect neatly with the others.
Pay attention to the corners. If your chosen pattern uses chain spaces or multiple stitches to form the corners, keep them consistent on every motif. This will help the squares lie flat when assembled.
Step 4: Add Green Leaf Details
If your chosen design includes green leaves, add them around the sunflower using green yarn. Position the leaves evenly so they complement the yellow petals without making the motif look crowded.
Depending on the design, the leaves can be crocheted directly into the motif or made separately and attached afterward. Use the same method for every square to keep the overall design consistent.
Step 5: Check the Motif Size
After completing the first sunflower square, measure it before making the remaining motifs. For the suggested layout of three motifs across and five motifs long, aim for each finished square to measure approximately 6–7 inches.
| Measurement | Suggested Size |
|---|---|
| Width of each motif | 6–7 inches |
| Height of each motif | 6–7 inches |
| Motifs across | 3 |
| Motifs long | 5 |
| Total motifs | 15 |
| Approximate runner size before edging | 18–21 × 30–35 inches |
These measurements are estimates. Your finished dimensions will depend on your yarn, hook size, stitch tension, joining method, and border.
Step 6: Make the Remaining Motifs
Once you are happy with the first square, use it as a reference for the remaining motifs. Check the dimensions regularly instead of waiting until all 15 squares are finished.
Lay the completed squares on a flat surface and compare their sizes. If one square is noticeably larger or smaller, adjust your tension or hook size before continuing.
Important: Finish the first motif completely before making the rest. This gives you a chance to check the flower design, square shape, and finished measurements before committing to the full table runner.
How to Join the Sunflower Crochet Squares
Once all 15 sunflower motifs are complete, the next step is joining them to create your Easy Crochet Sunflower Table Runner Pattern. A neat joining method helps the runner lie flat and gives the finished piece a clean, professional appearance.
Before joining the squares, weave in any loose yarn ends and arrange the motifs in your preferred order. If some sunflowers have slightly different colors or leaf placements, take a moment to balance the design across the runner.
Step 1: Arrange the Motifs
Place the sunflower squares on a flat surface in three columns and five rows. Make sure the flowers face the same direction and that the cream-colored edges line up.
| Layout Detail | Recommendation |
|---|---|
| Number of columns | 3 |
| Number of rows | 5 |
| Total squares | 15 |
| Approximate motif size | 6–7 inches |
| Main joining color | Cream or another matching background color |
Try different arrangements before joining the squares permanently. This makes it easier to create a balanced pattern and avoid placing similar color combinations next to each other.
Step 2: Choose a Joining Method
There are several ways to join crochet squares. The best choice depends on the finish you want and your comfort level with crochet techniques.
| Joining Method | Appearance | Best For |
|---|---|---|
| Single crochet join | Slightly raised seam | A sturdy, decorative finish |
| Slip stitch join | Neat, defined seam | A relatively quick assembly |
| Whip stitch | Subtle seam when worked carefully | A softer, less bulky join |
| Mattress stitch | Nearly invisible seam with suitable edges | A smooth, seamless appearance |
For a sunflower table runner with cream-colored backgrounds, a single crochet join using cream yarn is a practical option. It creates a consistent border between the motifs and complements the background color.
Step 3: Join the Squares in Rows
Begin by joining the three squares in the first row. Place two motifs together with their edges aligned, then work your chosen joining method through the corresponding stitches along one side.
Continue until all three squares in that row are connected. Repeat the process for the remaining four rows.
Helpful tip: Avoid pulling the joining yarn too tightly. Tight seams can cause the table runner to pucker, while loose joins may leave visible gaps.
Step 4: Connect the Rows
After joining the squares horizontally, connect the five rows to complete the main body of the runner.
Align the edges carefully and check that the corners meet neatly. If your motifs have corner chain spaces, make sure the corresponding corners line up before securing the seam.
Lay the joined piece flat after completing each row connection. This helps you identify uneven areas while they are still easy to correct.
Step 5: Check the Finished Shape
When all the motifs are joined, spread the table runner on a flat surface and check its overall shape.
| What to Check | What to Look For |
|---|---|
| Outer edges | Straight and even |
| Seams | Secure, without large gaps |
| Corners | Aligned neatly |
| Surface | Lies flat without excessive curling |
| Motif arrangement | Flowers face the same direction |
| Loose ends | Woven in securely |
If the runner looks uneven, gently arrange it by hand before moving on to the border. Blocking may also help improve the shape, depending on the yarn fiber and care instructions.
Once the squares are securely joined and the runner lies flat, you are ready to add the finishing border.
How to Crochet the Border for Your Sunflower Table Runner
Adding a border is the finishing touch that brings your Easy Crochet Sunflower Table Runner Pattern together. A neat edge frames the sunflower motifs, covers small imperfections along the outer seams, and gives the runner a more polished appearance.
For a coordinated look, use cream yarn to match the background of your sunflower squares. You can also choose green yarn for a botanical accent or yellow yarn to highlight the sunflower petals.
Step 1: Choose Your Border Style
Before starting, decide how you want the outer edge to look. A simple border works especially well when the sunflower motifs already provide plenty of detail.
| Border Style | Appearance | Difficulty |
|---|---|---|
| Single crochet border | Simple, clean, and compact | Beginner |
| Half double crochet border | Slightly taller with a soft texture | Beginner |
| Shell stitch border | Decorative scalloped edge | Beginner to intermediate |
| Picot border | Small, delicate decorative points | Intermediate |
Recommended option: A single crochet border is a reliable choice for this table runner. It creates a tidy frame without distracting from the sunflower motifs.
Step 2: Attach the Border Yarn
Choose your border color and attach the yarn at one corner of the table runner. If you are using cream yarn, the border will blend naturally with the background of the squares.
Work a chain stitch if needed to begin your chosen border pattern. Then crochet evenly around the entire outside edge.
Keep your stitches consistent as you move along the sides. The number of stitches needed will depend on your motif construction and the joining method you used.
Step 3: Work the First Border Round
For a simple single crochet border, work single crochet stitches around the outer edge.
Pay special attention to the corners. Add enough stitches in each corner to help the fabric turn smoothly without pulling or bunching. The exact number will depend on your stitch pattern and tension.
| Area | What to Do |
|---|---|
| Straight edges | Distribute stitches evenly |
| Outer corners | Add extra stitches as needed to turn smoothly |
| Joining points | Check for gaps and keep the edge consistent |
| Yarn ends | Secure and weave them in neatly |
Helpful tip: If the border pulls the fabric inward, you may need more stitches along the edge. If it becomes wavy, try using fewer stitches. Make small adjustments and check that the runner lies flat.
Step 4: Add Another Round if Desired
One round may be enough for a delicate finish. If you prefer a more defined frame, add a second round using the same stitch or a contrasting color.
For example, you could crochet the first round in cream and the second round in green. This creates a subtle botanical effect that complements the sunflower design.
Avoid making the border too wide if you want the flowers to remain the main focus.
Step 5: Finish and Secure the Border
When you reach the starting point, join the round neatly according to your chosen method. Cut the yarn, leaving a tail long enough to weave in securely.
Use a tapestry needle to hide the loose end within nearby stitches. Repeat this process for any remaining yarn ends.
Lay the completed table runner flat and check that all four corners look even. If necessary, gently adjust the fabric before blocking.
Final Border Measurements
The border will increase the overall dimensions of the table runner slightly.
| Feature | Estimated Measurement |
|---|---|
| Motif layout | 3 squares wide × 5 squares long |
| Number of motifs | 15 |
| Approximate size before edging | 18–21 × 30–35 inches |
| Border width | Depends on the number of rounds and stitch choice |
| Final dimensions | Measure after completing the border |
These dimensions are estimates rather than fixed pattern measurements. Your actual results will depend on the finished size of your squares, joining seams, yarn, hook, and tension.
Once the border is complete, your sunflower table runner is ready for its final finishing touches.
You can find more crochet on my Facebook page and my Pinterest profile.
Frequently Asked Questions
Is the sunflower table runner suitable for beginners?
Yes, this project can be suitable for beginners who already know basic crochet stitches, such as chain stitches and single crochet. Working with individual sunflower motifs also makes the project easier to manage. Take your time with the first square and use it as a guide for the remaining motifs.
How many sunflower motifs do I need for a table runner?
For the suggested design, you will need 15 sunflower motifs arranged in three columns and five rows. This layout creates a rectangular table runner. You can make a shorter runner with fewer rows or a longer one by adding more motifs.
What size should each crochet sunflower square be?
Each square should measure approximately 6–7 inches on each side. Keeping the motifs consistent helps the finished table runner maintain a neat rectangular shape. Measure your first completed square before making the remaining motifs.
What type of yarn is best for a crochet sunflower table runner?
Cotton yarn is a good choice because it provides clear stitch definition and creates a structured fabric. Worsted-weight cotton yarn is a practical option for a decorative table runner. Acrylic yarn can also work if you prefer a budget-friendly alternative. Always check the yarn label for care instructions and recommended hook size.
How much yarn do I need for this project?
The amount of yarn depends on the size of your motifs, the number of border rounds, your stitch tension, and the yarn weight. You will generally need yellow yarn for the petals, brown yarn for the sunflower centers, cream yarn for the background, and green yarn for the leaves.
Because the exact pattern and stitch counts have not been specified, a reliable total yardage cannot be calculated yet. Make one complete motif first, record the yarn used for each color, and use that information to estimate the amount needed for all 15 motifs. Purchase a little extra yarn to allow for joining and edging.
What crochet hook size should I use?
A 4.0–5.0 mm crochet hook is a reasonable starting range for many worsted-weight yarns. However, the best size depends on your yarn and tension. Check the yarn label and crochet a test motif to see whether the stitches create a firm, even fabric.
How do I keep my sunflower crochet squares the same size?
Use the same yarn brand, yarn weight, hook size, and stitch pattern for every square. Count your stitches carefully and measure the motifs as you work. If a square becomes noticeably larger or smaller, adjust your tension before continuing.
What is the easiest way to join crochet sunflower squares?
Single crochet joining is a practical option for beginners because it creates a sturdy, slightly raised seam. Slip stitch joining and whip stitching are alternatives. Choose a method that complements your design and use it consistently throughout the table runner.
How can I stop my crochet table runner from curling?
Curling can result from tight stitches, uneven edges, or an unsuitable stitch count. Check that your motifs lie flat before joining them and avoid pulling the yarn too tightly when assembling the squares. A carefully worked border may help improve the outer edges. Blocking can also help, provided it is suitable for your yarn fiber.
How do I wash and care for a crochet sunflower table runner?
Follow the care instructions on your yarn label. Cotton and acrylic yarns may have different washing and drying requirements. If machine washing is permitted, place the runner in a laundry bag and use a gentle cycle. Otherwise, hand-wash it carefully and reshape it flat to dry. Avoid high heat unless the yarn label specifically permits it.
Can I customize the size of the sunflower table runner?
Yes. You can change the length by adding or removing rows of motifs, or change the width by using more or fewer columns. For example, a layout of two columns and four rows uses eight motifs, while a layout of three columns and six rows uses 18 motifs. Remember that changing the number of squares will also change the finished dimensions and yarn requirements.
How can I make the sunflower table runner look more decorative?
Choose colors that complement your home decor and keep the sunflower centers, petals, and background consistent. A cream border creates a subtle finish, while a green border adds a botanical touch. You can also use a shell-stitch edge for a more decorative appearance without changing the main sunflower motifs.
Conclusion
The Easy Crochet Sunflower Table Runner Pattern is a beautiful way to bring warmth, color, and handmade charm to your home. With its cheerful yellow petals, rich brown centers, and cream-colored background, this sunflower design makes a lovely decoration for your dining table throughout the year.
By creating individual sunflower motifs, joining them together, and adding a neat crochet border, you can make a table runner that suits your personal style and home decor. Customize the colors, adjust the number of squares, or experiment with a decorative edging to create a unique finished piece.
Whether you are making this project for your own home or as a thoughtful handmade gift, take your time and enjoy every stitch. Gather your favorite yarn and crochet hook, start with your first sunflower square, and watch your beautiful table runner come together one motif at a time!

2 thoughts on “Easy Crochet Sunflower Table Runner Pattern”