

Crochet Maple Leaf Free Pattern is a simple way to create beautiful autumn decorations using just a small amount of yarn. With its distinctive pointed edges and recognizable leaf shape, this project is perfect for decorating wreaths, garlands, table settings, or handmade gifts. Suitable for crocheters who know basic stitches, this tutorial guides you through choosing the right materials, shaping the leaf, and creating a neat stem. You’ll also find helpful tips for adjusting the size and choosing colors to match your seasonal decor.

Table of Contents
Materials and Measurements for a Crochet Maple Leaf
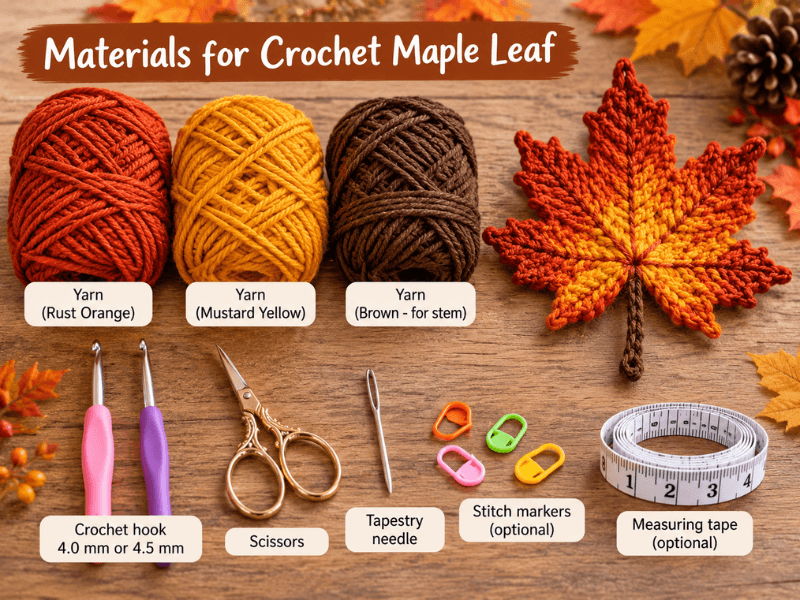
Before starting your Crochet Maple Leaf Free Pattern, prepare your yarn, crochet hook, and basic tools. Choosing the right materials will help you create a leaf with clearly defined points, a neat outline, and a shape that works well for autumn decorations. This beginner-friendly project uses a small amount of yarn, making it a practical way to use leftover yarn from other crochet projects.
1. Materials and Tools
You only need a few basic supplies to crochet a decorative maple leaf.
| Material | Recommended Type | Quantity |
|---|---|---|
| Main yarn | Worsted-weight yarn, Category 4 | 10–20 yards (9–18 meters) |
| Accent yarn | Contrasting autumn color, optional | 5–10 yards (4.5–9 meters) |
| Crochet hook | 4.0 mm (G-6) or 4.5 mm (7) | 1 |
| Scissors | Small, sharp scissors | 1 pair |
| Tapestry needle | Blunt yarn needle | 1 |
| Stitch markers | Optional | 1–2 |
| Measuring tape | Optional | 1 |
Estimated total yarn: Approximately 15–30 yards (14–27 meters) for one medium-sized leaf, depending on the stitch pattern, yarn thickness, and finished dimensions.
If you plan to make several leaves for a garland or wreath, prepare extra yarn in two or three complementary colors.
2. What Yarn Is Best for Crocheting Maple Leaves?
Worsted-weight acrylic and cotton yarn are both suitable choices. Acrylic yarn is affordable and available in many autumn shades, while cotton yarn offers crisp stitch definition and a slightly firmer finish.
| Yarn Type | Advantages | Best Use |
|---|---|---|
| Worsted-weight acrylic | Lightweight, affordable, and available in many colors | Garlands, wreaths, and seasonal decorations |
| Cotton yarn | Clear stitch definition and a firm texture | Appliqués, table decorations, and coasters |
| Cotton-acrylic blend | Combines softness with good stitch definition | General decorative projects |
| DK-weight yarn | Creates a smaller, lighter leaf | Clothing embellishments and delicate accessories |
Recommended Autumn Colors
For a traditional fall appearance, consider these color combinations:
- Classic Maple: Rust orange with a golden-yellow border.
- Autumn Red: Deep red with a dark-brown stem.
- Golden Fall: Mustard yellow with burnt-orange details.
- Natural Woodland: Warm brown with a cream accent.
- Mixed Autumn: Orange, burgundy, mustard, and brown leaves made from the same pattern.
Using different colors allows you to create a coordinated set of leaves without changing the basic pattern.
3. Finished Measurements and Yarn Requirements
The finished size depends on your yarn weight, hook size, tension, and the number of stitches used to shape each lobe.
| Leaf Size | Approximate Width | Approximate Height | Estimated Yarn per Leaf |
|---|---|---|---|
| Small | 3–4 inches (7.5–10 cm) | 3–4 inches (7.5–10 cm) | 8–15 yards (7–14 meters) |
| Medium | 4–6 inches (10–15 cm) | 4–6 inches (10–15 cm) | 15–30 yards (14–27 meters) |
| Large | 6–8 inches (15–20 cm) | 6–8 inches (15–20 cm) | 30–45 yards (27–41 meters) |
These measurements are estimates rather than guaranteed dimensions. The pointed tips and stem can affect the overall height and width.
How Much Yarn Do You Need for Multiple Leaves?
If you’re making several leaves for a seasonal project, use the following estimates to plan your supplies.
| Number of Leaves | Estimated Total Yarn |
|---|---|
| 1 medium leaf | 15–30 yards (14–27 meters) |
| 3 medium leaves | 45–90 yards (41–82 meters) |
| 5 medium leaves | 75–150 yards (69–137 meters) |
| 10 medium leaves | 150–300 yards (137–274 meters) |
These estimates assume each leaf uses approximately 15–30 yards. Keep a little extra yarn available if you plan to add contrasting borders or longer stems.
4. Choosing the Right Crochet Hook
For worsted-weight yarn, start with a 4.0 mm or 4.5 mm crochet hook. Both sizes can work well for decorative leaves, but your choice will affect the texture and finished dimensions.
| Hook Size | Expected Result | Suitable Use |
|---|---|---|
| 3.5 mm (E-4) | Tighter, denser stitches | Small leaves or thinner yarn |
| 4.0 mm (G-6) | Firm stitches with clear definition | Medium decorative leaves |
| 4.5 mm (7) | Slightly looser stitches | Standard worsted-weight projects |
| 5.0 mm (H-8) | Softer, more open fabric | Larger leaves with a relaxed texture |
If your leaf curls at the edges, check your tension and stitch placement before changing hook sizes. A smaller hook may help if the fabric is too loose, while a larger hook may make tight stitches easier to work.
5. Crochet Abbreviations
This pattern uses standard US crochet terminology.
| Abbreviation | Meaning |
|---|---|
| ch | Chain |
| sl st | Slip stitch |
| sc | Single crochet |
| hdc | Half double crochet |
| dc | Double crochet |
| tr | Treble crochet |
| st / sts | Stitch / stitches |
| sp | Space |
| rep | Repeat |
Beginner Tips Before Starting
- Keep your foundation chain even, but avoid pulling it too tightly.
- Use stitch markers to identify important shaping points.
- Remember that treble crochet stitches are taller than double crochet stitches, which are taller than half double crochet and single crochet stitches.
- Count your stitches when working symmetrical sections.
- Leave a yarn tail long enough to weave in securely with a tapestry needle.
Understanding these basic stitches will make it easier to shape the pointed lobes and create a recognizable maple leaf.
With your materials ready and your yarn colors selected, you’re prepared to begin the step-by-step crochet maple leaf pattern.

Step-by-Step Crochet Maple Leaf Pattern
This crochet maple leaf pattern uses basic crochet stitches and a combination of taller stitches to create pointed lobes that resemble a real maple leaf. Work with worsted-weight yarn and a 4.0 mm or 4.5 mm crochet hook for a medium-sized decorative leaf. Keep your stitches even, and use stitch markers if you need help identifying the center and shaping points.
Step 1: Create the Center Chain
Using your main yarn color, make a slip knot and chain 10 stitches. This chain forms the central foundation for the leaf.
- Foundation: Ch 10.
- Keep the chain relaxed but even.
- Do not pull the yarn too tightly, as you will work stitches along both sides of the chain.
The foundation chain creates the central structure from which the leaf lobes will be shaped.
Step 2: Crochet Along the First Side
Work along one side of the foundation chain, using a mixture of short and tall stitches to begin shaping the first section of the leaf.
| Stitch | Suggested Placement |
|---|---|
| Sl st | First chain near the hook |
| Sc | Next 2 chains |
| Hdc | Next 2 chains |
| Dc | Next 2 chains |
| Tr | Remaining chains toward the end |
The stitch heights create a gradual slope. Short stitches form the narrower inner area, while taller stitches help build the outer point.
Tip: The exact placement may need adjusting to suit your chain length and tension. Keep the stitches close enough together to prevent large gaps.
Step 3: Form the First Point
At the end of the foundation chain, create the first pointed section by working a combination of taller stitches into the final chain.
- Work 2 double crochet stitches into the final chain.
- Work 2 treble crochet stitches into the same chain.
- Chain 2 to create a small pointed tip.
- Work another 2 treble crochet stitches into that chain.
- Finish with 2 double crochet stitches in the same area.
This combination creates a more pronounced point. If the tip looks too rounded, check that the chain space is not too loose and that the taller stitches are grouped closely together.
Step 4: Crochet Along the Opposite Side
Turn your work so you can crochet into the unused loops on the other side of the foundation chain. Repeat a similar sequence of stitches, working from the outer point back toward the center.
| Stitch Type | Purpose |
|---|---|
| Treble crochet | Builds height near the outer point |
| Double crochet | Creates a gradual slope |
| Half double crochet | Transitions toward the inner area |
| Single crochet | Forms a compact edge |
| Slip stitch | Helps define the narrow center |
Work slowly and compare both sides as you go. A balanced leaf should have a recognizable central axis, although small differences are normal in handmade pieces.
Step 5: Shape the Remaining Leaf Lobes
Maple leaves have several distinctive points. To create a more recognizable silhouette, add smaller lobes around the central section using chain spaces and taller stitches.
For each additional lobe:
- Slip stitch to the area where the next lobe should begin.
- Chain 2 to establish a small starting space.
- Work a combination of single, half double, double, and treble crochet stitches to form one sloping side.
- At the outer tip, work a small cluster of taller stitches and a short chain.
- Work down the opposite side using gradually shorter stitches.
- Slip stitch back toward the central area before beginning the next lobe.
Repeat the shaping process until the leaf has the number of points you want. For a classic maple-leaf appearance, aim for five main points, including the central and side lobes.
Important: The exact stitch counts and placement for each lobe determine the final shape. Treat the sequence above as a shaping guide and adjust the placement to keep the points balanced.
Step 6: Create the Leaf Stem
The stem gives the leaf a finished look and makes it easier to attach to seasonal decorations.
- Join the yarn at the bottom center of the leaf.
- Chain 5–7 stitches, depending on your preferred stem length.
- Slip stitch back along the chain toward the leaf.
- Fasten off, leaving a short tail for securing the yarn.
- Use a tapestry needle to weave in the loose ends.
For a sturdier stem, crochet over a short strand of yarn while making the chain or work a second row of slip stitches along it.
Step 7: Add a Contrasting Edge (Optional)
A contrasting border can make the leaf points stand out. Choose a shade such as golden yellow, dark brown, or deep red.
- Join the accent yarn at the base of the stem.
- Work single crochet stitches around the outer edge.
- Add 2–3 single crochet stitches near each pointed tip if needed to keep the border flat.
- Use slip stitches in narrow valleys between the lobes.
- Join neatly and fasten off.
Avoid adding too many stitches around the tips, as excess stitches can make the leaf curl or look ruffled.
Step 8: Finish and Shape the Leaf
Finishing helps the leaf lie flat and makes the stitch definition easier to see.
- Weave in all loose yarn ends using a tapestry needle.
- Gently arrange the pointed lobes with your fingers.
- Lay the leaf on a flat surface and smooth the edges.
- If needed, lightly dampen the piece and allow it to dry flat.
- Avoid excessive heat, especially when working with acrylic yarn.
Final Size Check
Compare your finished leaf with the approximate measurements below.
| Size | Approximate Width | Approximate Height |
|---|---|---|
| Small | 3–4 inches (7.5–10 cm) | 3–4 inches (7.5–10 cm) |
| Medium | 4–6 inches (10–15 cm) | 4–6 inches (10–15 cm) |
| Large | 6–8 inches (15–20 cm) | 6–8 inches (15–20 cm) |
Your final dimensions may vary depending on yarn weight, hook size, stitch tension, and how many lobes you create.
Your crochet maple leaf is now ready to use as a seasonal embellishment, a garland decoration, or part of a handmade autumn arrangement.
Tips for a Perfect Crochet Maple Leaf
Creating a beautiful crochet maple leaf depends on more than choosing the right yarn and hook. Consistent tension, balanced stitches, and careful shaping help the leaf develop its characteristic pointed edges. These practical tips will help you improve the appearance of your finished leaf, whether you’re making a small appliqué or a larger decoration for your autumn home.
1. Keep Your Stitch Tension Consistent
Consistent tension helps the leaf maintain a balanced shape. If some stitches are too tight while others are too loose, the edges may curl or the pointed sections may look uneven.
- Keep your yarn tension comfortable throughout the project.
- Avoid pulling slip stitches too tightly.
- Make sure taller stitches have enough height to form the outer points.
- Check both sides of the leaf as you work.
Tip: If your leaf looks stiff or curls inward, try a slightly larger hook. If the fabric looks too loose and the points lose their shape, try a smaller hook.
2. Create Clearly Defined Leaf Points
The pointed lobes are the most recognizable feature of a maple leaf. Combining different stitch heights helps create these points and the curved sections between them.
| Technique | Purpose |
|---|---|
| Single crochet | Creates short, compact edges |
| Half double crochet | Forms a gradual transition |
| Double crochet | Adds height to the outer sections |
| Treble crochet | Creates taller, more pronounced points |
| Slip stitch | Helps define narrow sections between lobes |
Work gradually from shorter stitches to taller stitches as you approach a point, then decrease the stitch height as you work back toward the center. This helps produce a more natural leaf outline.
3. Choose Colors That Complement Each Other
Autumn-inspired colors give crochet maple leaves a seasonal appearance. You can use one color for a simple design or combine two colors for extra definition.
| Color Combination | Overall Look | Suggested Use |
|---|---|---|
| Rust orange and mustard yellow | Warm and traditional | Autumn garlands |
| Burgundy and cream | Elegant and understated | Table decorations |
| Burnt orange and dark brown | Natural woodland style | Wreaths and centerpieces |
| Golden yellow and red | Bright seasonal colors | Wall decorations |
| Sage green and tan | Soft, natural appearance | Everyday home decor |
For a neat finish, use a contrasting yarn for the border or stem rather than introducing too many colors into a small leaf.
4. Prevent Curling and Uneven Edges
A crochet maple leaf may curl if the stitches are too tight, the stitch placement is uneven, or the fabric has not been shaped properly.
Try these adjustments:
- Check that the foundation chain is not tighter than the rest of the work.
- Count stitches around each lobe to maintain balanced shaping.
- Avoid adding extra stitches randomly along the edges.
- Smooth the leaf gently with your fingers after fastening off.
- Lightly dampen the finished leaf if the yarn allows it, then leave it flat to dry.
Avoid excessive heat, particularly with acrylic yarn, because it can damage the fibers.
5. Make the Leaf More Durable
If you plan to use your crochet maple leaves on a wreath, garland, or frequently handled accessory, secure the finishing details carefully.
- Weave yarn ends through several stitches on the wrong side.
- Secure the stem so it does not loosen with handling.
- Use a tapestry needle to reinforce any weak joins.
- Avoid leaving long loose strands where they could catch on other objects.
For decorations that will be handled often, cotton yarn can provide clear stitch definition and a firm texture.
6. Adjust the Leaf Size
You can create different sizes without completely changing the design.
| Desired Result | Suggested Adjustment |
|---|---|
| Smaller leaf | Use DK-weight yarn and a 3.5–4.0 mm hook |
| Medium leaf | Use worsted-weight yarn and a 4.0–4.5 mm hook |
| Larger leaf | Use thicker yarn and a suitable larger hook |
| Firmer leaf | Use a smaller hook while maintaining comfortable tension |
| Softer leaf | Use a slightly larger hook and avoid overly tight stitches |
Changing the yarn and hook may affect the size of the pointed sections, so compare the shape as you work rather than relying only on measurements.
7. Common Mistakes to Avoid
| Common Mistake | Why It Happens | How to Improve It |
|---|---|---|
| Rounded leaf points | Not enough height at the outer tips | Use taller stitches near the points |
| Curled edges | Tight tension or uneven stitch placement | Relax your tension and check the stitch count |
| Uneven lobes | Different stitch counts on similar sections | Count stitches and compare both sides |
| Loose stem | Ends are not secured properly | Weave in the ends and reinforce the join |
| Gaps between stitches | Loose tension or skipped stitches | Check each stitch before moving to the next |
| Leaf looks too small | Fine yarn or a small hook | Try thicker yarn or a larger hook |
A little unevenness is normal in handmade crochet. Focus on creating a recognizable maple-leaf shape with secure finishing rather than making every stitch identical.
With consistent tension, well-defined points, and carefully secured ends, your crochet maple leaf will be ready for a variety of seasonal decorations and handmade projects.
You can find more crochet on my Facebook page and my Pinterest profile.
Frequently Asked Questions About Crochet Maple Leaves
1. How do you crochet a maple leaf for beginners?
To crochet a maple leaf for beginners, start with a foundation chain and use basic stitches such as single crochet, half double crochet, double crochet, and treble crochet to shape the leaf. Taller stitches help form the pointed lobes, while shorter stitches create the narrow sections between them. Use a 4.0 mm or 4.5 mm crochet hook with worsted-weight yarn, and work carefully to keep the points balanced. Finish by adding a small crocheted stem and weaving in all loose ends.
2. What yarn is best for crocheting maple leaves?
Worsted-weight acrylic yarn and cotton yarn are both excellent choices for crocheting maple leaves. Acrylic yarn is affordable, comes in a wide range of autumn colors, and works well for wreaths and garlands. Cotton yarn offers crisp stitch definition and a firmer texture, making it suitable for appliqués and table decorations. Rust orange, burgundy, mustard yellow, and brown are popular color choices for autumn-inspired leaves. For a medium leaf, prepare approximately 15–30 yards of yarn.
3. How much yarn do you need to crochet a maple leaf?
A medium-sized crochet maple leaf typically requires approximately 15–30 yards (14–27 meters) of yarn, depending on the yarn weight, hook size, stitch pattern, and finished dimensions. Smaller leaves may use 8–15 yards, while larger leaves can require 30–45 yards or more.
| Leaf Size | Estimated Yarn |
|---|---|
| Small | 8–15 yards (7–14 meters) |
| Medium | 15–30 yards (14–27 meters) |
| Large | 30–45 yards (27–41 meters) |
If you plan to add a contrasting border or a longer stem, keep extra yarn available to complete the finishing details.
4. What can you make with crochet maple leaves?
Crochet maple leaves are versatile decorations for autumn and everyday craft projects. You can use them to decorate wreaths, create seasonal garlands, embellish scarves and bags, or add handmade details to gifts. Smaller leaves can also be attached to table decorations, napkin rings, greeting cards, and crochet accessories.
| Project Idea | How to Use Crochet Maple Leaves |
|---|---|
| Autumn wreath | Attach several leaves around a decorative wreath base |
| Seasonal garland | Join leaves with yarn or a crocheted chain |
| Table decoration | Arrange leaves around a centerpiece or use them as decorative accents |
| Scarves and bags | Sew a leaf onto the finished item as an appliqué |
| Handmade gifts | Attach a small leaf to gift wrapping or a handmade card |
| Home decor | Combine leaves in different autumn colors for a seasonal display |
For a coordinated look, crochet leaves in rust orange, golden yellow, burgundy, and brown, then combine different sizes to create depth and visual interest.
Conclusion
This Crochet Maple Leaf Free Pattern is a simple and creative way to make beautiful handmade decorations for autumn and beyond. With basic crochet stitches, a small amount of yarn, and a few shaping techniques, you can create colorful leaves for wreaths, garlands, table settings, and personalized gifts. Experiment with different yarn colors and sizes to match your favorite seasonal decor. Whether you’re a beginner practicing new stitches or an experienced crocheter using leftover yarn, these crochet maple leaves are a practical project that adds a handmade touch to any space.
