
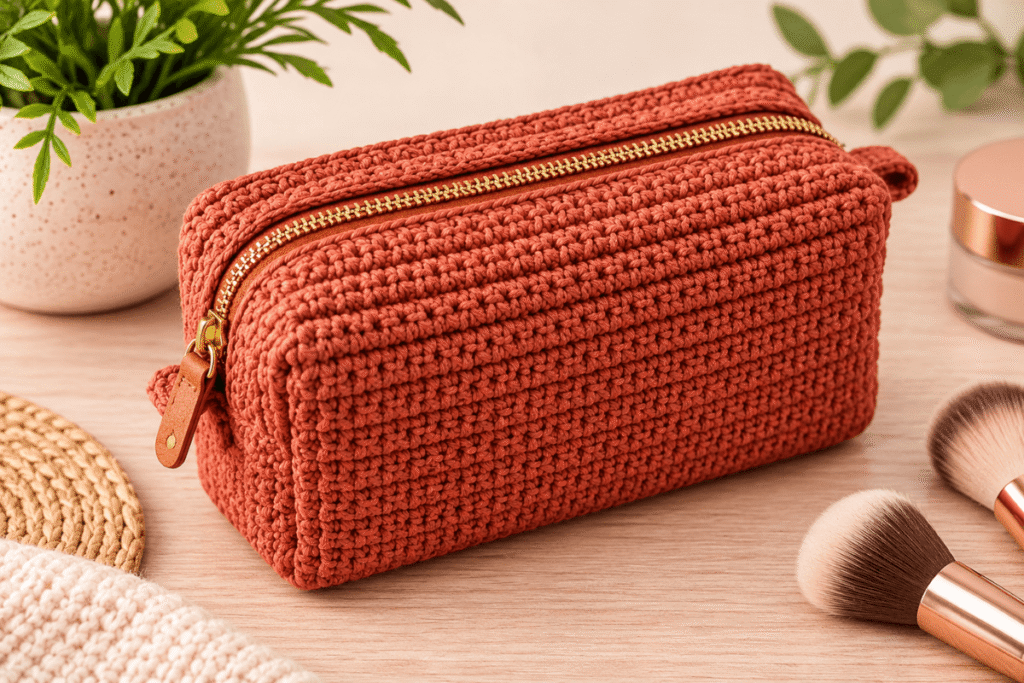
Crochet Makeup Pouch Pattern: Handmade Cosmetic Bag DIY Idea is a practical project for creating a reusable pouch to organize makeup, skincare essentials, or small travel items. With basic crochet stitches and a few everyday supplies, you can make a compact cosmetic bag that suits your style. This beginner-friendly tutorial walks you through choosing the right yarn and hook, crocheting the pouch, joining the seams, and adding a zipper. You’ll also find helpful tips for customizing the size, colors, and finish of your handmade bag.

Table of Contents
Why Make a Crochet Makeup Pouch?
A crochet makeup pouch is a useful project that combines everyday storage with the charm of handmade accessories. Whether you need a place for lipstick, mascara, brushes, or small skincare products, a crocheted cosmetic bag can help keep everything organized. Best of all, you can adjust its dimensions, choose your favorite colors, and add a zipper or lining to suit your needs. With a straightforward design, this project is also a great way to practice basic crochet skills while making something practical.
Benefits of a Handmade Crochet Cosmetic Bag
Making your own crochet cosmetic bag allows you to choose the size, texture, and colors instead of settling for a store-bought design. In addition, a handmade pouch can be customized to fit the products you use most often.
Here are some practical benefits to consider:
| Benefit | Why It Matters |
|---|---|
| Customizable size | You can make a small pouch for everyday essentials or a larger bag for travel. |
| Personalized colors | Choose neutral shades, soft pastels, or bold colors to match your style. |
| Reusable design | A well-made pouch can be used repeatedly and cleaned according to the yarn’s care instructions. |
| Flexible construction | Add a zipper, fabric lining, or decorative border to suit your needs. |
| Handmade gift potential | A finished cosmetic bag makes a thoughtful gift for birthdays, holidays, or special occasions. |
| Skill development | The project helps you practice stitch consistency, shaping, and finishing techniques. |
Another advantage is that you can use leftover yarn from previous projects, provided you have enough for the pouch and any decorative details. However, choose yarn that is durable and easy to care for, especially if you plan to carry makeup products that could leak or leave stains.
Is a Crochet Makeup Pouch Pattern Suitable for Beginners?
Yes, a simple crochet makeup pouch pattern is suitable for beginners who know how to make a foundation chain and work basic stitches. One of the easiest designs starts with a rectangular crochet panel that is folded and joined along the sides. This construction keeps the shaping straightforward and makes it easier to adjust the finished size.
For this project, you do not need advanced crochet techniques. The main skills are working evenly across rows, counting stitches, keeping the edges straight, and securing loose yarn ends. Adding a zipper or fabric lining requires a little extra care, but both can be completed by hand without a sewing machine.
Before starting, it helps to understand the basic skills involved:
| Crochet Skill | Purpose in This Project | Difficulty |
|---|---|---|
| Foundation chain | Establishes the width of the pouch. | Easy |
| Single crochet | Creates a firm fabric suitable for a small bag. | Easy |
| Turning chains | Helps you begin each new row correctly. | Easy |
| Stitch counting | Keeps the panel consistent in width. | Easy |
| Joining seams | Connects the sides to form the pouch. | Easy to moderate |
| Weaving in ends | Secures loose yarn for a neat finish. | Easy |
| Hand-sewing a zipper | Adds a secure closure to the opening. | Moderate |
If you are completely new to crochet, practice a few rows of single crochet before beginning the pouch. This small preparation step helps you recognize each stitch and maintain consistent tension throughout the project.

Creative Ways to Use Your Crochet Makeup Pouch
Although the main purpose of this project is to store cosmetics, a handmade pouch can serve several other functions. Its versatility makes it useful at home, in a handbag, or inside a suitcase.
| Pouch Style | Suggested Use | Recommended Size |
|---|---|---|
| Mini pouch | Lip balm, lipstick, or small beauty essentials | 4 × 3 inches |
| Everyday makeup pouch | Mascara, concealer, lipstick, and compact powder | 7 × 5 inches |
| Travel cosmetic bag | Several makeup products and small skincare items | 9 × 6 inches |
| Toiletry pouch | Travel-size toiletries and personal care items | 10 × 7 inches |
| Small accessory pouch | Earbuds, hair ties, jewelry, or other small items | 5 × 4 inches |
These dimensions are starting points rather than strict rules. Your finished pouch may be slightly smaller or larger depending on the yarn, hook size, stitch pattern, and individual tension.
For example, a compact pouch works well for a few everyday essentials, while a wider design provides more room for brushes and travel-size products. You can also make a matching set in different sizes using the same yarn colors and stitch pattern.
Keep in mind that crochet fabric may have small gaps between stitches. If you plan to store loose makeup items, jewelry, or anything that could slip through the openings, consider adding a fabric lining. A lining can also provide an extra layer between your cosmetics and the yarn.
With the right dimensions and a suitable closure, your crochet makeup pouch can become a practical everyday accessory that reflects your personal style.
Materials Needed for Your Crochet Makeup Pouch Pattern
Before starting your crochet makeup pouch pattern, gather all the materials you need to make the project easier and more enjoyable. Choosing the right yarn, crochet hook, and closure will affect the pouch’s size, texture, and durability. Fortunately, you don’t need expensive supplies to create a beautiful handmade cosmetic bag. A few basic crochet tools and some carefully selected materials are enough to get started.
Choosing the Best Yarn for a Crochet Cosmetic Bag
The yarn you choose plays an important role in how your finished makeup pouch looks and feels. Ideally, select a yarn that creates a firm fabric, holds its shape, and is easy to maintain. Cotton yarn is a popular choice because it offers good stitch definition and comes in a wide range of colors.
However, other yarn types may also work well, depending on the style and purpose of your bag.
| Yarn Type | Main Benefits | Possible Drawbacks | Best For |
|---|---|---|---|
| 100% cotton | Durable, breathable, and easy to work with | Can feel less stretchy than other fibers | Everyday cosmetic pouches |
| Cotton blend | Combines cotton with other fibers for a different texture or flexibility | Properties vary by blend | Decorative and practical bags |
| Acrylic | Affordable, widely available, and offered in many colors | May stretch or pill depending on the yarn | Colorful, budget-friendly pouches |
| Mercerized cotton | Smooth finish, attractive stitch definition, and a slight sheen | Can feel firmer than some other yarns | Polished cosmetic bags |
| Recycled cotton blend | Can offer an alternative use for reclaimed fibers | Texture and durability depend on the product | Casual, handmade accessories |
For a first project, medium-weight cotton yarn is a practical starting point. It creates a reasonably structured fabric without being too difficult to handle. Additionally, cotton stitches are usually easy to see, which can help beginners keep track of their work.
Choose a yarn color that suits your preferences and the pouch’s intended use. Cream, beige, and soft pink create a subtle look, while mustard yellow, sage green, or navy blue can make the finished accessory stand out.
Helpful tip: Check the yarn label before purchasing. It usually includes the recommended hook size, yarn weight, fiber content, and care instructions. These details help you choose suitable materials and understand how to care for the finished pouch.
Selecting the Right Crochet Hook
Your crochet hook affects the density of the fabric and the final dimensions of your makeup pouch. A hook that is too large may create loose stitches through which small items can escape. On the other hand, a hook that is too small can make the fabric stiff and difficult to work with.
For medium-weight cotton yarn, a hook around 4 mm to 5 mm is a reasonable starting point. Nevertheless, always check the yarn label and make a small gauge swatch before beginning.
| Yarn Weight | Suggested Hook Range | Suitability for a Makeup Pouch |
|---|---|---|
| Fingering or light yarn | 2.5–3.5 mm | Fine, lightweight pouches |
| DK or light-medium yarn | 3.5–4.5 mm | Smaller, detailed designs |
| Worsted or medium-weight yarn | 4–5.5 mm | Everyday cosmetic bags |
| Bulky yarn | 5.5–8 mm | Thick, textured pouches |
These ranges are general guidelines, not strict rules. The recommended hook can vary according to the yarn manufacturer, stitch pattern, and the firmness you want for the finished fabric.
An ergonomic hook with a comfortable handle can also make longer crochet sessions easier. If you’re a beginner, choose a hook that feels comfortable in your hand and allows you to see each stitch clearly.
Essential Supplies for a Handmade Cosmetic Bag
In addition to yarn and a crochet hook, a few simple tools will help you complete the project neatly. Preparing everything beforehand means you won’t have to stop repeatedly to look for missing supplies.
| Material or Tool | Quantity | Purpose |
|---|---|---|
| Cotton yarn | 1 small skein, approximately 50–100 g | Creates the main pouch |
| Crochet hook | 1 | Works the crochet stitches |
| Scissors | 1 pair | Cuts yarn cleanly |
| Yarn needle | 1 | Weaves in loose ends and helps with assembly |
| Stitch markers | 2–4 | Marks important stitches or positions |
| Measuring tape | 1 | Checks the width and height |
| Zipper | 1, sized to the opening | Keeps cosmetics securely inside |
| Sewing needle and matching thread | 1 set | Attaches the zipper or lining by hand |
| Lining fabric | Optional | Covers the inside of the pouch |
| Buttons or decorative yarn | Optional | Adds a personalized finishing touch |
The amount of yarn you’ll need depends on the dimensions, stitch pattern, and thickness of your chosen yarn. A small pouch may use less than 50 g, while a larger design or a textured stitch pattern may require more. Therefore, having a little extra yarn is useful, especially if you plan to add a decorative border.
For the zipper, measure the finished opening rather than choosing one based only on the estimated pouch size. A zipper that is too long can be difficult to position neatly, while one that is too short may leave part of the opening unsecured.
If you decide to add a lining, select a lightweight, tightly woven fabric that complements the yarn. Cotton fabric is a practical option because it is available in many colors and prints.
Understanding Crochet Abbreviations and Basic Stitches
Most crochet patterns use abbreviations to keep instructions short and easy to follow. Before starting this crochet makeup pouch pattern, familiarize yourself with the basic US crochet terms used in the tutorial.
| Abbreviation | Meaning | How It Is Used |
|---|---|---|
| ch | Chain | Creates the foundation for the crochet panel |
| sc | Single crochet | Produces a firm, compact fabric |
| hdc | Half double crochet | Creates a slightly taller stitch |
| sl st | Slip stitch | Joins stitches or completes certain finishing steps |
| st | Stitch | Refers to an individual stitch |
| sts | Stitches | Refers to multiple stitches |
| rep | Repeat | Tells you to work the same sequence again |
| FO | Fasten off | Secures the yarn when the work is complete |
| BLO | Back loop only | Creates a ribbed or textured effect |
| RS | Right side | Refers to the intended outside of the fabric |
| WS | Wrong side | Refers to the inside of the fabric |
Important: This tutorial uses US crochet terminology. In US patterns, a single crochet stitch is called a double crochet in UK terminology, so checking the pattern’s terminology before starting can prevent confusion.
If you’re new to crochet, practice making a chain and several rows of single crochet before working on the actual pouch. Count your stitches at the end of each row to make sure the panel maintains a consistent width.
Once your materials are ready and you understand the basic abbreviations, you’re prepared to plan the pouch dimensions and begin crocheting the main panel.
You can find more crochet on my Facebook page and my Pinterest profile.
Frequently Asked Questions About Crochet Makeup Pouch Patterns
How Do You Crochet a Makeup Pouch for Beginners?
To crochet a makeup pouch as a beginner, start with medium-weight cotton yarn, a suitable crochet hook, scissors, and a yarn needle. A simple rectangular design is one of the easiest options because it requires minimal shaping and uses basic stitches.
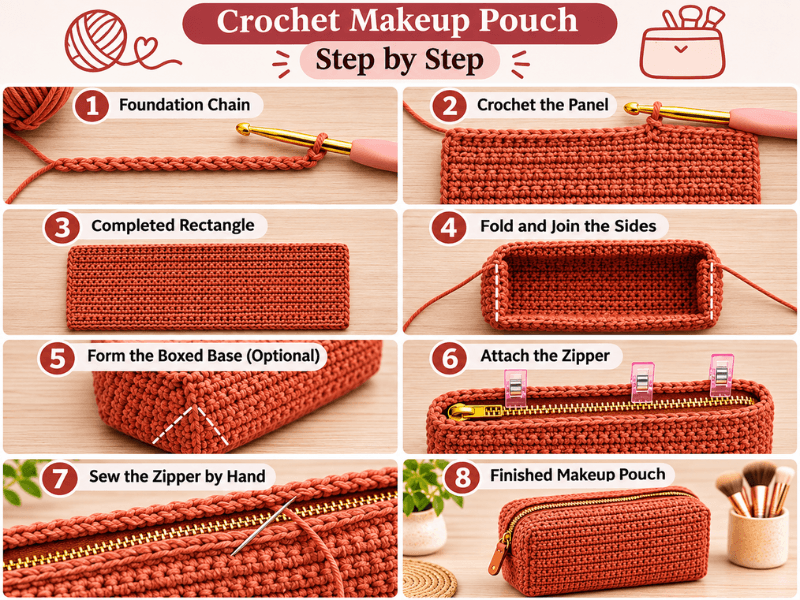
First, create a foundation chain that matches your desired pouch width. Next, work rows of single crochet until the panel reaches the required height. Keep your stitches consistent and count them at the end of each row to maintain straight edges. Once the panel is complete, fasten off the yarn and weave in the loose ends.
Fold the rectangle into a pouch shape, then join the side edges using a yarn needle or crochet stitches. Finally, add a zipper, button, or another suitable closure.
| Step | What to Do | Helpful Tip |
|---|---|---|
| 1 | Gather your materials | Cotton yarn is a practical starting choice. |
| 2 | Make a foundation chain | Check the width before continuing. |
| 3 | Crochet the main panel | Count stitches to keep the edges straight. |
| 4 | Finish the rectangle | Measure the panel before assembly. |
| 5 | Join the side seams | Keep the edges aligned for a neat shape. |
| 6 | Add a closure | Hand-sew a zipper or choose a simpler fastening. |
For your first project, choose a straightforward stitch pattern rather than a complicated texture. Once you become comfortable with the basic construction, you can experiment with stripes, decorative borders, or crochet flowers.
What Yarn Is Best for a Crochet Cosmetic Bag?
Cotton yarn is one of the best starting choices for a crochet cosmetic bag because it creates clearly defined stitches and produces a practical fabric for everyday use. It is available in different weights and colors, making it suitable for both simple and decorative designs.
Medium-weight cotton yarn works particularly well for many beginner-friendly pouches. However, cotton blends can also be suitable, depending on their fiber content and the structure you want. If you prefer a smooth, slightly shiny finish, mercerized cotton is another option.
| Yarn Type | Main Advantage | Best Use |
|---|---|---|
| 100% cotton | Good stitch definition and a practical texture | Everyday makeup pouches |
| Mercerized cotton | Smooth finish with a slight sheen | Decorative cosmetic bags |
| Cotton blend | Offers different combinations of texture and flexibility | Customized pouch designs |
| Acrylic yarn | Affordable and available in many colors | Budget-friendly projects |
When choosing yarn, consider how the finished bag will be used. A tightly crocheted fabric is generally more suitable for storing small cosmetics than one with large gaps between stitches. Additionally, a fabric lining can help prevent small items from slipping through the crochet stitches.
Always check the yarn label for washing instructions and recommended hook size. Before starting the complete project, make a small gauge swatch to see how the yarn behaves with your chosen hook.
How Do You Add a Zipper to a Crochet Makeup Pouch?
You can add a zipper to a crochet makeup pouch by positioning it along the opening and sewing it securely to the crochet fabric. Hand-sewing is a practical method because it allows you to control the placement and adjust the stitches as you work.
First, choose a zipper that fits the pouch opening. If necessary, finish the top edge of the crochet panel before attaching it. Next, place the zipper behind the opening and use sewing clips or pins to hold everything in position. Make sure both sides are aligned and that the zipper opens and closes smoothly.
Using a needle and matching thread, sew along the zipper tape with small, even stitches. Work carefully to avoid pulling the crochet fabric too tightly, as this can make the opening look uneven.
| Step | Action | What to Check |
|---|---|---|
| 1 | Measure the opening | The zipper should fit the available width. |
| 2 | Position the zipper | Center it along the opening. |
| 3 | Secure it temporarily | Use clips or pins to prevent shifting. |
| 4 | Sew the first side | Keep stitches small and evenly spaced. |
| 5 | Sew the second side | Check that both sides remain aligned. |
| 6 | Test the zipper | Open and close it several times. |
For a more polished finish, you can sew a fabric lining into the pouch and attach the zipper to the lining before joining it to the crochet exterior. This method can hide raw fabric edges and give the inside a cleaner appearance.
Take your time during this stage, especially if you’re new to sewing. A properly aligned zipper helps the pouch close neatly and keeps your cosmetics secure.
Can You Make a Crochet Makeup Pouch Without a Sewing Machine?
Yes, you can make a crochet makeup pouch without a sewing machine. In fact, hand-sewing is a convenient option for small handmade accessories because it gives you greater control over the seams and finishing details.
If you want a zipper closure, you can attach the zipper by hand using a sewing needle and thread. Secure it with clips or pins first, then sew through the zipper tape and carefully catch the crochet fabric without making the stitches too tight.
Alternatively, choose a closure that requires little or no sewing. A crocheted drawstring, a button loop, or a simple flap can work well, depending on the pouch design.
| Closure Type | Sewing Machine Needed? | Main Benefit |
|---|---|---|
| Hand-sewn zipper | No | Provides a secure, familiar closure |
| Crochet drawstring | No, although finishing may require a yarn needle | Simple and flexible |
| Button with a crochet loop | No machine required | Easy to customize |
| Crochet flap | No machine required | Creates a simple, finished opening |
| Zipper with fabric lining | No, if assembled by hand | Provides a more finished interior |
If you plan to include a lining, cut the fabric to fit inside the pouch, leaving enough allowance for the seams. You can sew the fabric pieces together by hand and then attach the lining to the crochet exterior.
For beginners, a button closure or drawstring may be the easiest option. However, if you prefer the appearance and security of a zipper, hand-sewing can achieve a neat result with patience and careful placement.
Whichever closure you choose, check that it works comfortably and suits the items you intend to carry. A well-finished pouch doesn’t require specialized equipment; the right materials and careful assembly are enough to create a useful handmade cosmetic bag.
Conclusion: Create Your Own Handmade Crochet Cosmetic Bag
This crochet makeup pouch pattern is a practical way to create a handmade accessory that combines style and everyday usefulness. With basic crochet stitches, suitable yarn, and a few simple tools, you can make a cosmetic bag that fits your needs without requiring advanced skills or a sewing machine.
Start with a simple rectangular panel, join the sides carefully, and choose a closure that works for your design. For an extra polished finish, consider adding a zipper, fabric lining, or decorative border. You can also experiment with different colors, textures, and sizes to create a pouch that reflects your personal style.
Whether you’re making one for yourself, organizing your travel essentials, or creating a thoughtful handmade gift, this project offers plenty of room for creativity. Once you’ve finished your first pouch, try making another in a different size or color combination.
Ready to start crocheting? Save this tutorial on Pinterest so you can easily find it when you’re ready to begin, and share your favorite color combinations or design ideas in the comments!

1 thought on “Crochet Makeup Pouch Pattern: 5 Easy DIY Tips”