
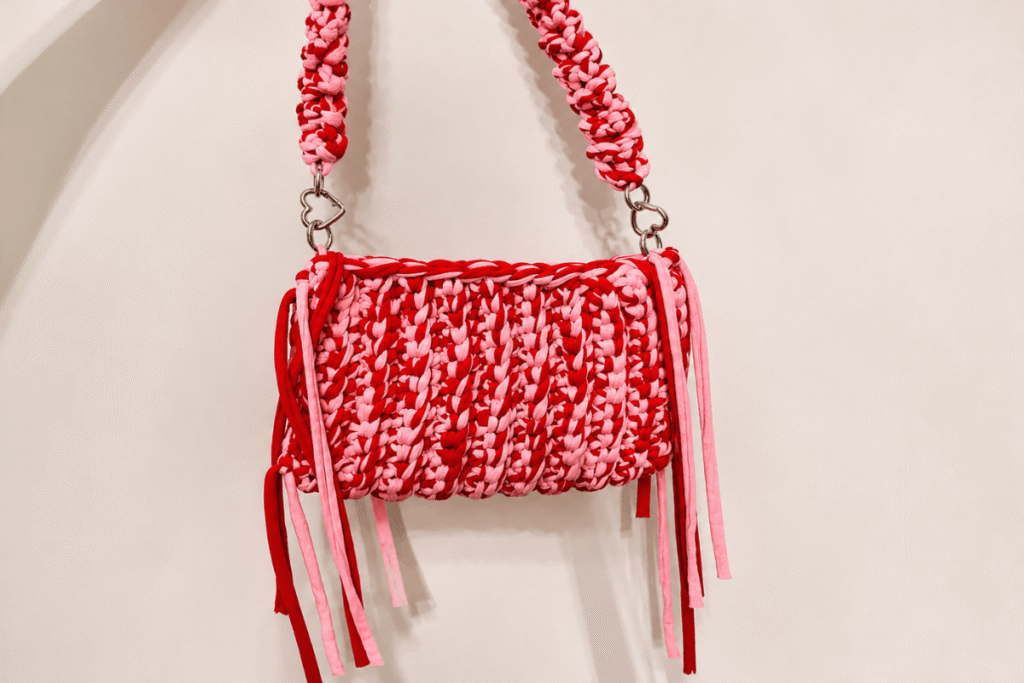
Chunky Crochet Shoulder Bag Pattern with Fringe Details is a stylish project that combines thick, textured stitches with playful fringe for a handmade accessory that stands out. This bag is perfect for carrying everyday essentials and adds a bold touch to casual outfits. In this guide, you’ll learn how to create the bag step by step, from building the main body to attaching the strap and adding the fringe. With chunky yarn, basic crochet skills, and a few simple techniques, you can make a practical bag with a unique finish.
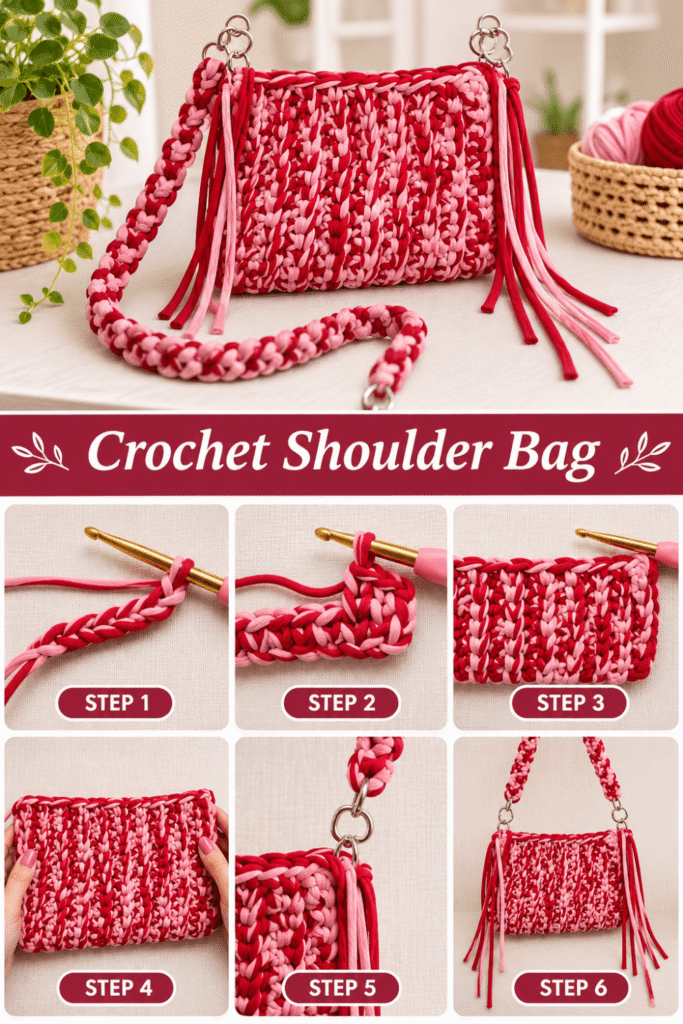
Table of Contents
Materials and Supplies
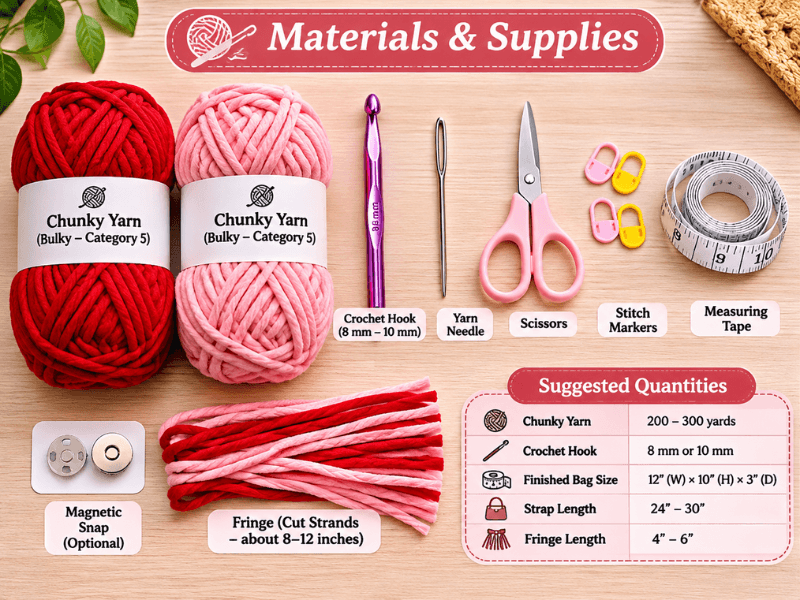
Before starting your Chunky Crochet Shoulder Bag Pattern with Fringe Details, gather the materials and tools listed below. Choosing a sturdy yarn and the right hook will help you create a bag that holds its shape while keeping the stitches neat and defined.
Materials List
| Material | Recommended Size or Type | Quantity | Purpose |
|---|---|---|---|
| Chunky yarn | Bulky (Category 5) or Super Bulky (Category 6) | 200–300 yards | Creates the thick, textured bag body |
| Crochet hook | 8 mm for Category 5 yarn or 10 mm for Category 6 yarn | 1 | Works the main stitches |
| Yarn needle | Large-eye tapestry needle | 1 | Weaves in loose ends and secures the fringe |
| Scissors | Sharp craft scissors | 1 pair | Cuts yarn and trims fringe evenly |
| Stitch markers | Removable markers | 2–4 | Marks the beginning of rounds or important points |
| Measuring tape | Flexible sewing tape | 1 | Checks the bag’s dimensions and strap length |
| Optional magnetic snap | Small bag closure | 1 | Helps keep the bag securely closed |
Yarn quantities are estimates for a medium-sized shoulder bag. The amount needed will depend on your yarn weight, stitch pattern, bag dimensions, and strap length.
Choosing the Right Yarn
For a structured shoulder bag, choose a durable yarn that resists stretching. Cotton yarn offers good stitch definition and strength, while a cotton-acrylic blend can provide a softer feel. If you prefer a chunky, cozy appearance, bulky or super bulky yarn creates prominent stitches and helps the project work up faster.
Avoid yarn that is excessively soft or stretchy if you want the bag to maintain its shape when carrying everyday essentials.
Suggested Finished Dimensions
These measurements provide a useful starting point for a medium-sized shoulder bag. You can adjust them to suit your needs.
| Bag Component | Suggested Measurement |
|---|---|
| Bag width | 12 inches |
| Bag height | 10 inches |
| Bag depth | 3 inches |
| Shoulder strap length | 24–30 inches |
| Fringe length | 4–6 inches |
The finished dimensions may vary depending on your yarn, hook size, and tension. Measure your work as you go to achieve the fit and proportions you prefer.
Skill Level and Techniques
This project is best suited to advanced beginners who are comfortable making a foundation chain, working basic crochet stitches, and counting stitches. You will also practice shaping the bag, creating a sturdy strap, and attaching fringe along the lower edge.
If you are new to crochet, take your time with the first few rows and check the width regularly. Keeping your stitch count consistent will help the bag develop an even shape.
Gauge and Finished Measurements
Before starting your Chunky Crochet Shoulder Bag Pattern with Fringe Details, check your stitch tension to make sure the bag reaches the intended size. Chunky yarn creates a thick, textured fabric, so small differences in tension can affect the final measurements.
Finished Bag Measurements
| Part | Approximate Measurement |
|---|---|
| Bag width | 12 inches |
| Bag height | 10 inches |
| Bag depth | 3 inches |
| Shoulder strap length | 24–30 inches |
| Fringe length | 4–6 inches |
These measurements create a medium-sized shoulder bag suitable for carrying everyday essentials such as a wallet, phone, keys, and a small notebook. The final size may vary depending on your yarn, hook, and stitch tension.
Suggested Gauge
For this project, aim for approximately 8–10 single crochet stitches across 4 inches using bulky or super bulky yarn. This is a starting estimate rather than a fixed gauge, because yarn thickness and hook size can vary between brands.
Make a small swatch before beginning. If your stitches are too tight, try a larger hook. If the fabric is too loose, use a smaller hook. The finished fabric should feel sturdy enough to support the bag’s contents without becoming stiff.
Abbreviations Used in This Pattern
| Abbreviation | Meaning |
|---|---|
| ch | Chain |
| sc | Single crochet |
| sl st | Slip stitch |
| st | Stitch |
| sts | Stitches |
| rep | Repeat |
| RS | Right side |
| WS | Wrong side |
This pattern uses US crochet terminology.
Step-by-Step Chunky Crochet Shoulder Bag Pattern
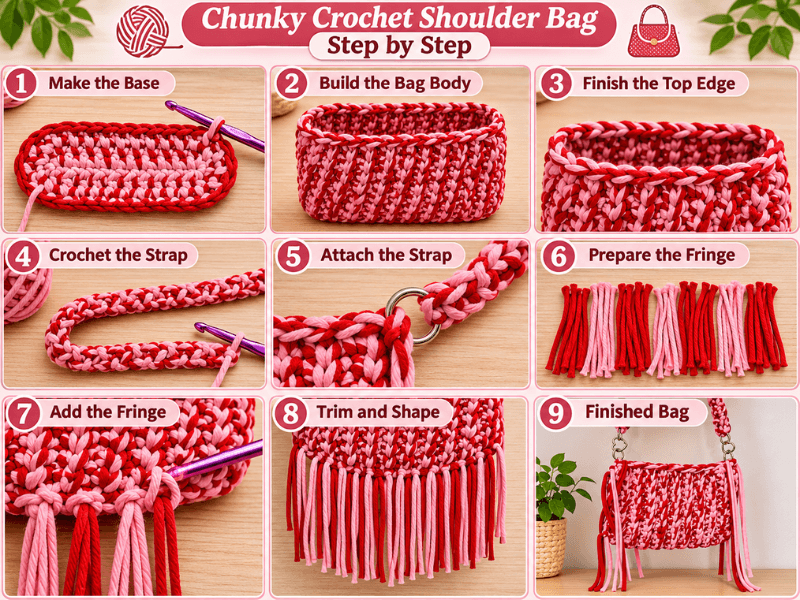
Step 1: Create the Bag Base
Using your chunky yarn and an 8 mm or 10 mm crochet hook, make a foundation chain long enough to measure approximately 12 inches. The exact number of chains will depend on your yarn and tension, so measure the chain instead of relying on a fixed stitch count.
Round 1: Work single crochet stitches along the foundation chain. When you reach the final chain, work three single crochet stitches into it to turn the corner. Continue working single crochet stitches along the opposite side of the foundation chain, then work two single crochet stitches into the remaining end stitch. Join with a slip stitch if you are working in joined rounds.
Round 2: Chain one, then work single crochet stitches around the base. Place two single crochet stitches in each of the three stitches at both rounded ends to help the base expand evenly. Adjust the increases if needed to keep the base flat.
Continue adding rounds until the base measures approximately 12 inches long and 3 inches wide, or until it reaches the proportions you prefer.
Helpful tip: If the base starts curling upward, you may need more increases. If the edges become wavy, reduce the number of increases.
Step 2: Crochet the Bag Body
Once the base reaches the desired size, begin building the sides of the bag.
Round 1: Chain one and work one single crochet stitch into each stitch around the base. Work into the back loop only for this round if you want a clearly defined edge between the base and the sides.
Following rounds: Work one single crochet stitch into each stitch around, without adding increases. Continue until the bag body measures approximately 10 inches high from the bottom.
For a simple, modern texture, keep your stitches consistent throughout the body. You can also alternate between regular single crochet and back-loop single crochet rounds to create subtle horizontal ridges.
Join each round with a slip stitch if you prefer a visible seam. Alternatively, work in continuous rounds and use a stitch marker to identify the beginning of each round.
Step 3: Shape and Finish the Top Edge
When the bag reaches the desired height, finish the top edge with one round of single crochet stitches. This creates a firmer opening and helps the bag maintain its shape.
Join with a slip stitch, cut the yarn, and pull the tail through the final loop. Use a yarn needle to weave in the loose end securely on the inside of the bag.
Check that the top edge is even before adding the strap. If you want a closure, you can sew a small magnetic snap near the center of the opening, following the closure manufacturer’s instructions.
Step 4: Make the Shoulder Strap
The strap should be comfortable to carry and sturdy enough to support the bag.
- Make a foundation chain that measures approximately 24–30 inches, depending on your preferred shoulder length.
- Work one single crochet stitch into the second chain from the hook and into each remaining chain.
- Chain one, turn, and work one single crochet stitch across the row.
- Repeat until the strap reaches approximately 1.5–2 inches wide, if you prefer a wider strap.
- Fasten off, leaving a long yarn tail at each end for sewing.
For a simpler, narrower strap, make a foundation chain to your desired length and work a few rows of single crochet until the strap is approximately 1 inch wide.
Lay the strap flat before attaching it to make sure it is not twisted. If you want extra strength, crochet a second strip and sew the two strips together.
Step 5: Attach the Shoulder Strap
Position one end of the strap on the inside of the bag, approximately 2 inches from the side seam. Use stitch markers to hold it in place. Attach the other end at the opposite side, checking that both ends sit at the same height.
Using a yarn needle and a long length of matching yarn, sew each strap end securely to the bag. Stitch around the entire edge of each strap end, then add several reinforcing stitches through the center.
Gently pull on the strap to check that the attachment points feel secure. For a bag intended to carry heavier items, consider adding a fabric lining or reinforcing the strap attachment areas with sturdy fabric.
Step 6: Prepare the Fringe
Cut several lengths of yarn, each approximately 8–12 inches long. When folded in half and attached to the bag, each piece will create fringe measuring roughly 4–6 inches, depending on how you trim it.
For an even finish, wrap the yarn around a piece of cardboard measuring 8–12 inches long. Cut along one edge to create lengths of similar size.
Prepare enough strands to decorate the lower edge of the bag. The quantity depends on how closely you want the fringe spaced. Start with a small amount and add more until you achieve the look you want.
Step 7: Add the Fringe Details
Fold one yarn strand in half to create a loop. Insert your crochet hook through a stitch along the lower edge of the bag, catch the folded loop, and pull it partway through the stitch.
Pass the loose ends through the loop and pull gently to secure the fringe. Repeat along the lower edge, spacing the strands evenly.
For a fuller bohemian look, attach fringe to every other stitch. For a lighter, more minimal design, leave one or two stitches between each fringe section.
Once all the fringe is attached, lay the bag flat and trim the ends to an even length of approximately 4–6 inches.
Step 8: Final Finishing
Weave in any remaining yarn tails and check the bag for loose stitches. Gently shape the body with your hands and make sure the base lies flat.
If you prefer a more structured bag, add a simple fabric lining or a removable base insert. Avoid placing heavy items inside until you have checked the strap and its attachment points.
Your chunky crochet shoulder bag is now ready to use. The thick stitches give it a cozy texture, while the fringe adds movement and a relaxed handmade style.
Tips for a Neat and Durable Crochet Bag
A few simple techniques can make your Chunky Crochet Shoulder Bag Pattern with Fringe Details look more polished and help it hold its shape. Since chunky yarn creates a thick fabric, consistent tension and secure finishing are especially important.
Keep Your Stitches Even
Try to maintain the same tension throughout the bag. Tight stitches can make the fabric stiff, while loose stitches may leave gaps that allow small items to slip through. If your bag looks uneven, pause occasionally to check the stitch height and overall shape.
Choose Yarn That Holds Its Shape
Cotton and cotton-blend yarns are useful choices for crochet bags because they generally provide good stitch definition and structure. Acrylic and wool-blend yarns can also work, especially when you prefer a softer, cozier texture.
For a bag that will carry everyday essentials, choose a yarn that feels sturdy rather than overly stretchy. Always check the yarn label for fiber content and care instructions.
Reinforce the Strap Attachments
The strap receives much of the weight when the bag is carried. Sew both ends securely to the bag using matching yarn and a yarn needle. Add extra stitches around the edges and through the center of each attachment point.
For additional support, consider sewing a fabric lining inside the bag. A lining can help prevent small items from pushing through the crochet stitches and can reduce stretching during regular use.
Make the Fringe Look Consistent
Cut the fringe strands to similar lengths before attaching them. After securing all the strands, hang the bag naturally and trim the fringe so the bottom edge looks even.
Avoid pulling the fringe knots too tightly, as this can distort the fabric along the bottom of the bag.
Customization Ideas for Your Chunky Crochet Shoulder Bag
One of the best things about making your own crochet bag is the freedom to customize the colors, texture, and finishing details.
| Design Idea | How to Customize It | Best Style |
|---|---|---|
| Neutral tones | Use cream, beige, taupe, or oatmeal yarn | Minimalist and everyday |
| Bold colors | Choose mustard yellow, burgundy, or forest green | Statement accessory |
| Two-tone design | Use one color for the body and another for the fringe | Modern and playful |
| Textured body | Alternate regular and back-loop single crochet rounds | Ribbed appearance |
| Short fringe | Trim the fringe to 2–3 inches | Subtle decorative finish |
| Long fringe | Use fringe measuring 6–8 inches | Bohemian-inspired style |
| Decorative strap | Add stripes or contrasting rows to the strap | Unique handmade look |
| Bag lining | Sew in a coordinating cotton lining | More structured and practical |
Create a Two-Tone Crochet Bag
For a simple color-blocked design, crochet the main body in a neutral shade and use a contrasting color for the strap and fringe. For example, a cream body paired with brown fringe creates a warm, natural look.
To avoid visible color changes, finish each color section neatly and weave the yarn tails into the inside of the bag.
Add a Fabric Lining
A lining is optional, but it can make the bag more practical for daily use. Choose a medium-weight cotton fabric that complements the yarn.
Measure the inside of the finished bag, allowing extra fabric for the seams. Sew the lining into a pouch shape, fold the top edge inward, and attach it carefully to the inside of the bag with small hand stitches.
Make sure the lining does not pull the crochet fabric out of shape. If you add a magnetic snap, install it according to the manufacturer’s instructions before closing the lining.
Care Instructions for a Chunky Crochet Shoulder Bag
Proper care helps preserve the texture, shape, and fringe of your handmade bag. Because yarn fibers vary, always follow the care instructions on the yarn label.
| Care Task | Recommended Method |
|---|---|
| Regular cleaning | Remove dust and loose debris with a soft brush |
| Spot cleaning | Blot gently with a damp cloth and suitable mild detergent |
| Washing | Follow the yarn label; hand-washing may be appropriate for some fibers |
| Drying | Reshape and dry flat when the yarn label permits |
| Fringe maintenance | Smooth the strands with your fingers and trim uneven ends if necessary |
| Storage | Store in a clean, dry place away from direct sunlight |
| Shape protection | Avoid overfilling the bag or hanging it by the strap for long periods |
Do not assume that every chunky yarn is machine washable. Some fibers can shrink, stretch, or lose their texture when washed incorrectly. Test any cleaning method on a small, inconspicuous area first.
Common Mistakes to Avoid
A few small adjustments can help prevent the most common problems when crocheting a chunky shoulder bag.
- Using the wrong hook size: If the fabric is too loose or too stiff, try a different hook size and check your gauge again.
- Skipping stitch markers: Mark the beginning of each round to make counting and shaping easier.
- Adding too few increases to the base: A base that curls may need additional increases around its ends.
- Attaching the strap loosely: Reinforce the attachment points with several rows of secure stitches.
- Cutting fringe before checking the length: Attach the strands first, then trim them evenly once the bag is hanging naturally.
- Overfilling the bag: Heavy contents can stretch the stitches and put extra pressure on the strap.
With consistent stitches, secure finishing, and the right yarn, you can create a chunky crochet shoulder bag that is both stylish and practical.
You can find more crochet on my Facebook page and my Pinterest profile.
Frequently Asked Questions
1. How do you crochet a chunky shoulder bag with fringe?
To crochet a chunky shoulder bag with fringe, start by making an oval or rectangular base using chunky yarn and a suitable crochet hook. Work single crochet stitches around the base, adding increases where necessary to keep it flat. Once the base reaches your desired size, crochet evenly around without increasing to build the sides of the bag.
Continue until the bag is approximately 10 inches tall, then finish the top edge. Make a sturdy shoulder strap, sew it securely to both sides, and attach yarn fringe along the bottom edge. For a medium-sized bag, aim for a finished width of around 12 inches and a strap length of 24–30 inches.
2. What yarn is best for a chunky crochet shoulder bag?
Bulky or super bulky yarn works well for a chunky crochet shoulder bag because it creates thick stitches and a textured finish. Cotton and cotton-blend yarns are particularly useful when you want a bag with good stitch definition and less stretch. Acrylic yarn is another option for a softer, budget-friendly design.
For a bag intended for everyday use, choose a yarn that feels sturdy and check its care instructions before starting. Approximately 200–300 yards may be enough for a medium-sized bag, including a simple strap and fringe, but the amount will depend on the yarn thickness, stitch pattern, and final dimensions. Having an extra skein available can help prevent running out before finishing.
3. How do you make fringe for a crochet bag?
To make fringe for a crochet bag, cut several strands of yarn to twice your desired finished fringe length, plus a little extra for trimming. For fringe measuring approximately 4–6 inches, start with strands around 8–12 inches long.
Fold one strand in half to form a loop. Insert your crochet hook through a stitch along the bottom edge of the bag, catch the folded loop, and pull it through. Pass the loose ends through the loop and gently tighten to secure the fringe. Repeat along the edge, keeping the spacing consistent.
Once all the fringe is attached, lay the bag flat and trim the strands to create an even finish. For a fuller appearance, attach fringe more closely together.
4. How do you attach a crochet strap to a shoulder bag?
To attach a crochet strap, position each end on opposite sides of the bag and use stitch markers to keep them in place. Check that both ends are at the same height and that the strap is not twisted.
Thread a yarn needle with a long piece of matching yarn and sew each strap end securely to the bag. Stitch around the edges of each attachment and add extra stitches through the center for reinforcement. Gently test the strap before using the bag.
If you plan to carry heavier items, consider adding a fabric lining or reinforcing the attachment areas. A securely attached strap helps the bag maintain its shape during everyday use.
Conclusion
This Chunky Crochet Shoulder Bag Pattern with Fringe Details is a fun way to create a stylish handmade accessory with a cozy texture and a bohemian touch. With chunky yarn, basic crochet stitches, and a few simple finishing techniques, you can make a practical bag that complements your everyday outfits.
Customize your design with your favorite yarn colors, adjust the strap length for a comfortable fit, or experiment with different fringe styles to make the bag uniquely yours. Whether you choose neutral shades for a minimalist look or bold colors for a statement accessory, this crochet project offers plenty of room for creativity.
Gather your supplies, follow the steps, and enjoy making a chunky crochet shoulder bag you can carry or give as a thoughtful handmade gift.

2 thoughts on “Chunky Crochet Shoulder Bag Pattern with Fringe”