
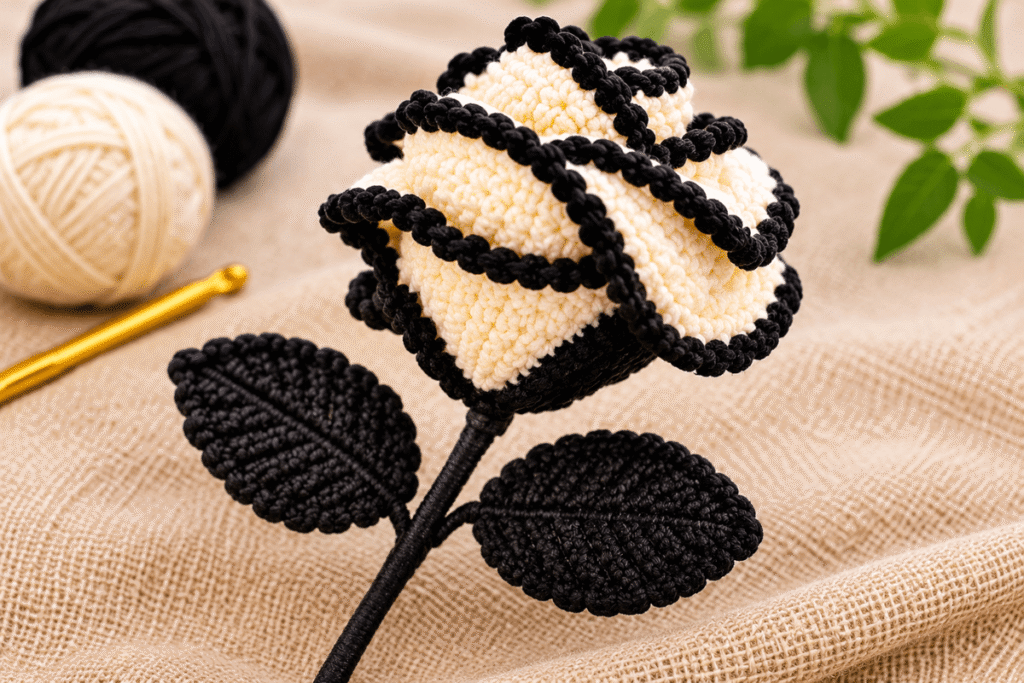
Crocheted Rose – Black and White Step-by-Step Pattern is a beautiful way to create a handmade flower with a timeless two-tone look. Combining soft cream yarn with bold black edging gives each petal a lovely spiral effect, while crocheted leaves and a sturdy stem complete the design. This project is suitable for crocheters with basic skills who want to try something decorative and practical. In this tutorial, you’ll learn how to choose the right materials, crochet the petals and leaves, shape the rose, and assemble all the pieces into a finished flower.

Table of Contents
Materials, Yarn Measurements, and Preparation for Your Crocheted Rose
Before starting your Crocheted Rose – Black and White Step-by-Step Pattern, it’s important to prepare the right materials and choose suitable yarn. This design combines cream-colored petals with black edging, creating a beautiful contrast that gives the finished flower its distinctive appearance. Fortunately, you don’t need many supplies, and most of them are easy to find at a local craft store or online.
Materials Needed for the Black and White Crochet Rose
For this project, choose a soft yarn that holds its shape well and makes the individual stitches easy to see. A medium-weight yarn works nicely because it creates defined petals without making the flower too bulky.
| Material | Recommended Type | Estimated Quantity |
|---|---|---|
| Cream yarn | Medium-weight yarn | 25–30 g |
| Black yarn | Medium-weight yarn | 15–20 g |
| Crochet hook | 3–4 mm | 1 hook |
| Floral wire | Flexible craft wire | 20–25 cm |
| Scissors | Sharp yarn scissors | 1 pair |
| Yarn needle | Blunt tapestry needle | 1 |
| Wire cutters | Small craft cutters | 1 pair, if needed |
These quantities are approximate and may vary depending on your yarn thickness, tension, and finished flower size. However, having a little extra yarn is always helpful, especially when making the leaves and wrapping the stem.

Choosing the Right Yarn for Your Crochet Rose
The yarn plays an important role in the final appearance of your Crocheted Rose – Black and White Step-by-Step Pattern. Therefore, choose two colors with a similar thickness so the petals and black borders look balanced.
Cream Yarn: Use cream, ivory, or soft white yarn for the main petals. A smooth acrylic or cotton-acrylic blend is a practical choice because it shows stitch definition and is easy to work with.
Black Yarn: Choose black yarn in the same weight as the cream yarn. You’ll use it to create the contrasting edges around the petals, giving the rose its signature two-tone appearance.
Green Yarn (Optional): If you prefer green leaves instead of the original black leaves, you can use a small amount of dark green yarn. However, black yarn keeps the finished flower closer to the reference design.
Crochet Hook Size and Tension
A 3–4 mm crochet hook is a good starting point for this project. The smaller size creates tighter stitches, helping the petals maintain their shape. On the other hand, a slightly larger hook produces softer and more flexible fabric.
Before beginning the flower, crochet a small sample using your chosen yarn and hook. Check that the stitches look even and that the fabric isn’t too loose. If the gaps between stitches are too large, try a smaller hook.
| Hook Size | Expected Result |
|---|---|
| 3 mm | Tighter stitches and firmer petals |
| 3.5 mm | Balanced stitch definition and flexibility |
| 4 mm | Softer petals with slightly more space between stitches |
For the black edging, try to maintain consistent tension throughout the work. This helps the border follow the scalloped petal shape without pulling the cream section out of place.
Recommended Measurements for the Finished Crochet Rose
The following measurements are practical estimates for a medium-sized decorative rose. They are not fixed pattern specifications, since the final dimensions depend on yarn thickness, stitch tension, and how tightly you roll the petals.
| Crochet Component | Suggested Measurement |
|---|---|
| Finished rose head | 8–10 cm wide |
| Petal strip before assembly | 30–35 cm long |
| Petal strip width | 4–5 cm |
| Individual crocheted leaf | 5–7 cm long |
| Stem wire | 20–25 cm long |
| Finished flower height | 28–35 cm |
These proportions create a balanced flower with a noticeable rose head, two decorative leaves, and a stem long enough for a small vase. If you’d like a larger flower, you can increase the length of the petal strip before assembling it.
Preparing Your Yarn and Workspace
Once you’ve gathered everything, prepare your yarn before starting the first stitches. Place the cream and black yarn separately to avoid tangling, and keep your crochet hook, scissors, and yarn needle within easy reach.
Next, cut the floral wire to approximately 20–25 cm if it isn’t already the desired length. Make sure the ends are smooth and safely covered before using it inside the stem. This wire will help support the flower and keep it upright.
Finally, organize your materials according to the order you’ll use them: cream yarn for the petals, black yarn for the borders and leaves, and the wire for the stem. With everything ready, you’ll have a much easier time following the Crocheted Rose – Black and White Step-by-Step Pattern in the next section.

How to Crochet the Black and White Rose Petal Strip
The petals are the most important part of the Crocheted Rose – Black and White Step-by-Step Pattern. Instead of crocheting each petal separately, this design uses a long decorative strip that is shaped into a rose by rolling it carefully. The cream-colored crochet fabric creates the main petals, while the black edging adds contrast and highlights their scalloped shape. In this section, you’ll prepare the foundation, build the petal structure, and create the decorative border.
Step 1: Create the Foundation Chain
Start with your cream yarn and crochet hook. Make a slip knot, then chain approximately 45–55 stitches to create the foundation for the petal strip. Keep the chain relaxed and even, as a very tight foundation can cause the finished strip to curl.
The exact chain count depends on the desired rose size. A longer foundation creates more petals and produces a fuller flower, while a shorter chain makes a smaller rose.
| Foundation | Suggested Chain Count | Expected Result |
|---|---|---|
| Small rose | 35–40 chains | Compact flower |
| Medium rose | 45–55 chains | Balanced rose |
| Large rose | 60–70 chains | Fuller flower |
Step 2: Work the First Row
After completing the foundation chain, begin working into the chain stitches to establish the base of your petal strip.
For a decorative rose, the crochet strip needs a combination of shorter and taller stitches to create a wavy structure. Work consistently across the row, following your chosen petal pattern.
Keep the stitches even and avoid pulling the yarn too tightly. This first row forms the foundation that supports the upper petal layers.
Step 3: Build the Scalloped Petal Shape
Next, work the taller stitches into the designated spaces to create rounded sections. These sections will eventually become the individual rose petals.
A useful construction approach is to alternate groups of taller stitches with smaller connecting stitches. This creates a series of raised curves rather than a straight rectangular strip.
As you work, check that the scallops are similar in size. Consistent spacing makes the final flower easier to assemble and gives the rose a more natural appearance.
Step 4: Add the Black Crochet Edging
Once the cream petal strip is complete, introduce the black yarn to create the contrasting border.
Attach the black yarn at the beginning of the outer edge. Then work a neat border along the scalloped sections, following their curves without pulling the fabric.
The black edging should remain relatively narrow so the cream petals stay visually dominant. If the border is too tight, the petals may curl inward before assembly.
Step 5: Shape and Prepare the Petal Strip
After finishing the black edging, fasten off the yarn and weave in any loose ends that won’t be needed for assembly.
Lay the crochet strip on a flat surface and gently arrange the scalloped sections. Check that the edges are smooth and that the petals have enough flexibility to overlap when rolled.
| Preparation Check | What to Look For |
|---|---|
| Petal size | Scallops are reasonably consistent |
| Black border | Even and not too tight |
| Foundation | No excessive curling |
| Yarn ends | Secure and neatly finished |
| Fabric flexibility | Soft enough to roll |
Tips for Getting Beautiful Crochet Rose Petals
For the best results, pay attention to the shape and tension of the petal strip. First, use the same hook size for both yarn colors. This helps maintain a consistent fabric thickness. Also, avoid making the black border too heavy, as it can overpower the cream-colored petals.
If some scallops look uneven, gently adjust them with your fingers before assembling the rose. However, don’t stretch the crochet fabric too much because this can distort the stitches.
At this stage, you should have a long cream-colored crochet strip with decorative black edging and clearly defined scalloped sections. This is the main component of your Crocheted Rose – Black and White Step-by-Step Pattern. In the next part, you’ll work on the leaves and prepare the supporting elements that complete the flower.
How to Crochet the Black and White Rose Leaves
Crocheted leaves add an important finishing touch to the Crocheted Rose – Black and White Step-by-Step Pattern. They help balance the flower head and give the finished piece a more complete, decorative appearance. For this design, you can use black yarn to maintain the original two-tone color combination. In this section, you’ll create the leaf shapes, add texture, and prepare them for attachment to the rose stem.
Materials for Crocheting the Rose Leaves
Before starting, prepare the following supplies:
| Material | Recommended Type |
|---|---|
| Yarn | Black medium-weight yarn |
| Crochet hook | 3–3.5 mm |
| Scissors | Sharp yarn scissors |
| Yarn needle | Blunt tapestry needle |
| Floral wire | Optional, for leaf support |
Using the same yarn weight as the petals helps maintain a consistent appearance throughout the flower.
Step 1: Start the Leaf with a Foundation Chain
Begin with a slip knot using your black yarn. Next, chain approximately 10–12 stitches to create the central foundation of the leaf.
Keep the chain relaxed but not too loose. This foundation determines the overall length of the leaf, so adjust the number of chains depending on your preferred size.
For a medium-sized rose, a leaf measuring approximately 5–7 cm works well.
Step 2: Crochet Along the Foundation Chain
Next, work along one side of the foundation chain using a combination of basic crochet stitches.
Start with slip stitches or single crochet stitches near the base, then use taller stitches toward the middle to create a wider shape.
Continue working toward the end of the chain. These changes in stitch height help form the pointed tip and rounded sides of the leaf.
Step 3: Shape the Other Side of the Leaf
Once you reach the end of the foundation chain, continue crocheting along the opposite side.
Repeat a similar arrangement of stitches to create a balanced leaf shape. Work carefully around the foundation so both sides look even.
At the end, join the round with a slip stitch if your construction requires it. Fasten off and leave a yarn tail for attaching the leaf to the flower.
Step 4: Create a Defined Leaf Edge
To make the leaves stand out, work a neat finishing border around the outer edge.
A row of slip stitches or single crochet stitches can help define the shape without adding too much bulk. Pay special attention to the pointed tip, as this gives the leaf a more recognizable appearance.
If you want a slightly firmer leaf, maintain consistent tension throughout the border.
Step 5: Make the Second Leaf
Repeat the same process to create a second leaf. Try to keep both leaves approximately the same length and width.
| Leaf Detail | Suggested Measurement |
|---|---|
| Foundation chain | 10–12 chains |
| Finished length | 5–7 cm |
| Finished width | 2–3 cm |
| Number of leaves | 2 |
| Yarn color | Black |
Two leaves are usually enough for a medium-sized decorative rose. However, you can make additional leaves if you want a fuller arrangement.
Step 6: Prepare the Leaves for Assembly
Once both leaves are complete, weave in any unnecessary yarn ends. Leave a small attachment tail on each leaf if you plan to sew them directly onto the stem.
If you’re using floral wire, place it along the center of each leaf and secure it carefully with yarn stitches. This optional technique provides extra support and makes it easier to position the leaves naturally.
Make sure all wire ends are covered to prevent them from catching on the yarn.
Tips for Beautiful Crochet Leaves
For a neat finish, keep the stitches around the leaf edges consistent. Also, avoid using a hook that’s too large, as loose stitches can make the leaves look floppy.
Furthermore, try positioning the two leaves at slightly different angles when planning the final assembly. This creates a more natural arrangement and prevents the flower from looking too symmetrical.
At this stage, you should have one completed petal strip and two matching black crochet leaves. Keep these pieces together with your other materials. Next, you’ll prepare the stem and combine the crocheted components to create the finished black and white rose.
You can find more crochet on my Facebook page and my Pinterest profile.
Frequently Asked Questions About the Crocheted Rose – Black and White Step-by-Step Pattern
1. How Do You Crochet a Black and White Rose Step by Step?
To crochet a black and white rose, start by creating a foundation chain with cream or white yarn. Next, work a decorative petal strip using different stitch heights to form rounded scallops. Once the main strip is complete, add a black crochet border around the petal edges to create the two-tone effect. Then, crochet two matching leaves and prepare the stem. Finally, roll the petal strip into a spiral, secure the base with a yarn needle, and attach the leaves and stem to complete your handmade rose.
2. What Yarn Is Best for Making a Crochet Rose?
Medium-weight acrylic or cotton yarn is a good choice for making a crochet rose. Acrylic yarn is affordable, easy to work with, and available in many colors. Cotton yarn, on the other hand, provides excellent stitch definition and creates a neat, structured appearance. For a black and white rose, choose cream or ivory yarn for the petals and black yarn for the decorative edging. Make sure both yarn colors have a similar thickness so the finished flower looks balanced.
3. How Do You Make Crochet Rose Petals and Leaves?
Crochet rose petals can be made by working a long decorative strip with a combination of shorter and taller stitches. These stitch variations create the rounded, wavy sections that form the petals. After completing the strip, add a contrasting border if desired. For the leaves, begin with a foundation chain and crochet along both sides using different stitch heights. This creates a pointed oval shape. Finally, add a neat border and leave a yarn tail so the leaves can be attached easily to the flower.
4. How Do You Assemble a Crocheted Rose into a Flower?
To assemble a crocheted rose, lay the completed petal strip flat and begin rolling one end inward to create the center. Continue wrapping the remaining strip around the center, allowing the scalloped edges to overlap naturally. Once the flower reaches your preferred size, use a yarn needle and matching yarn to sew through the base and secure the layers. Next, attach the crocheted leaves around the bottom of the rose. Finally, connect the flower to a prepared stem and check that all the pieces are firmly secured.
Conclusion: Create Your Own Beautiful Black and White Crochet Rose
This Crocheted Rose – Black and White Step-by-Step Pattern is a lovely project for anyone who enjoys making decorative flowers by hand. With its cream-colored petals, contrasting black edges, and matching crochet leaves, the finished rose offers a timeless look that works beautifully as a handmade gift or home decoration.
By following the steps in this tutorial, you can learn how to prepare the materials, crochet the petal strip, shape the leaves, and assemble all the pieces into a complete flower. Moreover, you can adjust the yarn colors, flower size, and stem length to suit your personal style.
Whether you’re making a single rose or creating a small handmade bouquet, this crochet project is a practical way to explore decorative crocheting and improve your skills. Gather your yarn and crochet hook, follow the instructions, and enjoy creating your own black and white crochet rose.
