
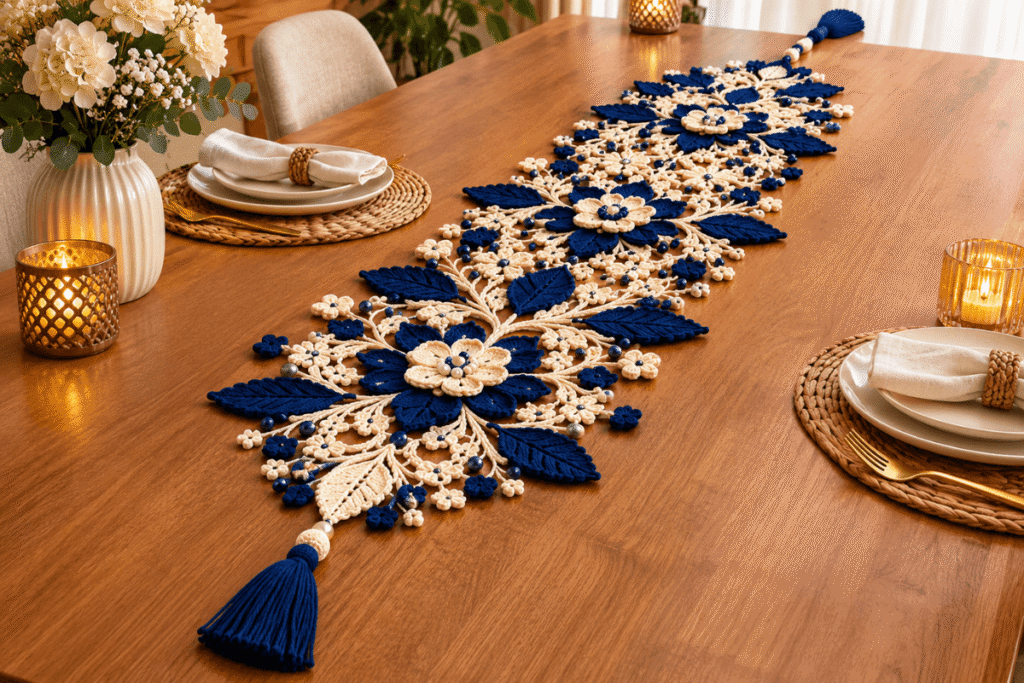
Crochet Table Runner – An Elegant Pattern, Step by Step is a lovely way to add a handmade touch to your dining table. With its elegant texture and practical design, this project works beautifully for everyday meals or special occasions. Whether you’re a beginner or have some crocheting experience, the pattern will guide you through each stage, from choosing the right yarn and hook to creating the finished runner. You’ll also learn the stitches, techniques, and simple tips needed to achieve a neat, polished result.

Table of Contents
Materials, Tools, and Finished Measurements for Your Crochet Table Runner
Before starting your crochet table runner, it’s important to gather the right materials and decide on the finished size. This pattern uses simple stitches and lightweight cotton yarn to create an elegant texture that looks beautiful on different table styles. Moreover, choosing the correct yarn and hook size will help keep your stitches even and your finished runner looking neat.
Materials and Supplies You’ll Need
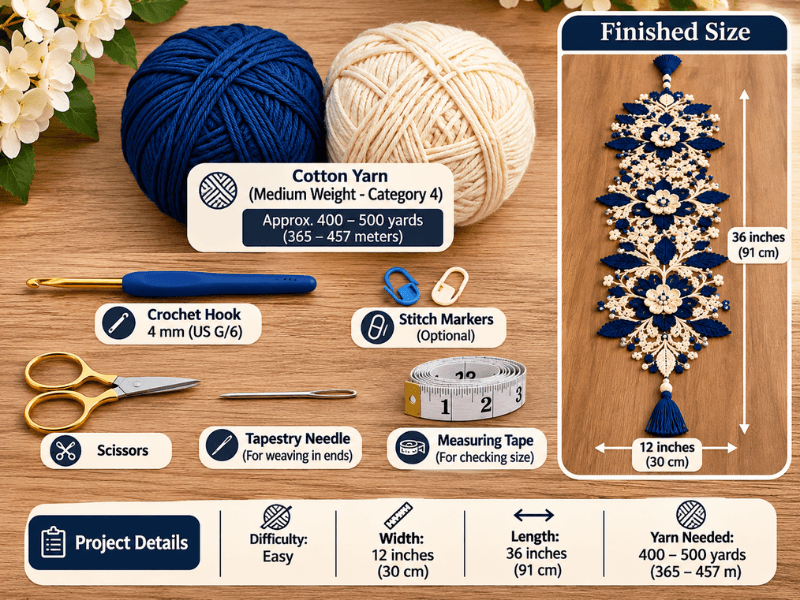
For this crochet table runner, I recommend using medium-weight cotton yarn. Cotton is a practical choice because it holds its shape well, creates defined stitches, and is easy to care for. In addition, it gives the finished runner a clean, polished appearance.
Here is everything you’ll need:
| Material | Recommended Details |
|---|---|
| Yarn | Medium-weight cotton yarn (Category 4) |
| Yarn Amount | Approximately 400–500 yards (365–457 meters) |
| Crochet Hook | 4 mm (US G/6) |
| Scissors | Small, sharp scissors |
| Tapestry Needle | For weaving in loose ends |
| Measuring Tape | For checking the runner’s dimensions |
| Stitch Markers | Optional, for marking important stitches |
Yarn recommendation: Choose cotton yarn in a neutral shade such as cream, ivory, beige, or soft white for a timeless table decoration. However, you can also use sage green, dusty pink, or light blue if you prefer a little color.
Choosing the Right Crochet Hook and Yarn
The combination of yarn and hook size makes a noticeable difference in the final result. For this project, a 4 mm crochet hook works well with medium-weight cotton yarn, creating stitches that are neither too tight nor too loose.
However, everyone’s crochet tension is slightly different. If your stitches look too tight and the fabric feels stiff, try a 4.5 mm hook. On the other hand, if your stitches look loose, a 3.5 mm hook may give you better control.
For the yarn, look for a smooth cotton fiber rather than a fuzzy or textured yarn. This makes it easier to see individual stitches and follow the pattern, especially if you’re still learning.
Finished Crochet Table Runner Size
This pattern is designed to create a rectangular table runner measuring approximately 12 inches wide and 36 inches long (30 × 91 cm).
This size works nicely on a small dining table, coffee table, or console table. Nevertheless, you can adjust the length or width to suit your furniture.
| Measurement | Size in Inches | Size in Centimeters |
|---|---|---|
| Finished Width | 12 inches | 30 cm |
| Finished Length | 36 inches | 91 cm |
| Optional Extra Length | 42 inches | 107 cm |
| Optional Larger Size | 48 inches | 122 cm |
If you’d like a longer runner, simply add more pattern repeats when working the length. Similarly, you can increase the starting chain to make the runner wider, provided you maintain the stitch pattern’s required multiple.
Understanding Crochet Gauge
Gauge refers to the number of stitches and rows you make within a specific measurement. Although it might seem like a small detail, checking your gauge helps ensure that your crochet table runner reaches the intended size.
For this project, use the following approximate gauge as a starting point:
| Gauge Measurement | Approximate Count |
|---|---|
| Width | 16 stitches |
| Height | 12 rows |
| Measurement | 4 × 4 inches (10 × 10 cm) |
To check your gauge, crochet a small swatch using the recommended yarn and 4 mm hook. Then, measure the center of your sample with a measuring tape.
If you have more stitches than recommended, try a larger hook. Conversely, if you have fewer stitches, switch to a smaller hook.
Helpful tip: Don’t worry if your gauge differs slightly. The most important thing is to maintain consistent tension throughout your project so the finished table runner has an even shape.
How Much Yarn Should You Prepare?
For a 12 × 36-inch crochet table runner, prepare approximately 400–500 yards of medium-weight cotton yarn.
The exact amount will depend on your stitch tension, yarn thickness, and any decorative edging you decide to add. Therefore, buying one extra skein in the same dye lot is a good idea, especially if you plan to make a longer version.
| Project Size | Estimated Yarn |
|---|---|
| Small (12 × 30 inches) | 350–400 yards |
| Standard (12 × 36 inches) | 400–500 yards |
| Long (12 × 42 inches) | 450–550 yards |
| Extra Long (12 × 48 inches) | 500–650 yards |
These quantities are planning estimates rather than guaranteed amounts. Always check the yardage printed on the yarn label before purchasing.
Once you have your yarn, crochet hook, and other supplies ready, you’re all set to begin. In the next part, we’ll look at the crochet stitches and techniques used in this elegant table runner so you can understand the pattern before working on the main piece.
Crochet Stitches and Techniques for an Elegant Table Runner
Before starting the main project, it’s helpful to understand the crochet stitches used in this pattern. The good news is that you don’t need advanced skills to create a beautiful crochet table runner. With a few basic stitches and consistent tension, you can achieve an elegant texture that looks neat and professionally finished.
Basic Crochet Stitches Used in This Pattern
This crochet table runner combines simple stitches to create a balanced fabric with a lovely handmade appearance. If you’re familiar with basic crochet techniques, you’ll find the pattern easy to follow.
Here are the main stitches you’ll need to know:
| Stitch | Abbreviation (US Terms) | Purpose |
|---|---|---|
| Chain | ch | Creates the foundation row |
| Single Crochet | sc | Adds structure and a neat texture |
| Double Crochet | dc | Creates height and an open texture |
| Slip Stitch | sl st | Joins stitches and finishes edges |
| Turning Chain | tch | Helps you start a new row at the correct height |
How to Make a Chain Stitch (ch)
The chain stitch is the foundation of your crochet table runner. First, make a slip knot and place it on your hook. Then, yarn over and pull the yarn through the loop on your hook.
Repeat this movement until you have the required number of chains. Try to keep each chain approximately the same size because an uneven foundation chain can affect the shape of your finished project.
Helpful tip: Avoid pulling your foundation chains too tightly. A slightly relaxed chain makes it easier to work into the following row.
How to Make a Single Crochet (sc)
Single crochet is a short, firm stitch that creates a dense and stable fabric. It’s particularly useful for keeping the edges of your table runner straight.
To make a single crochet:
- Insert your hook into the next stitch.
- Yarn over and pull up a loop.
- Yarn over again.
- Pull through both loops on your hook.
You should have one loop remaining on your hook. That’s one completed single crochet stitch.
How to Make a Double Crochet (dc)
Double crochet is taller than single crochet and helps create a softer, more decorative texture. It’s also a popular stitch for table runners because it allows you to work through rows without making the fabric too heavy.
Follow these steps:
- Yarn over before inserting your hook.
- Insert the hook into the indicated stitch.
- Yarn over and pull up a loop. You should now have three loops on your hook.
- Yarn over and pull through the first two loops.
- Yarn over once more and pull through the remaining two loops.
Once you’ve completed these steps, you’ve made one double crochet stitch.
Understanding Turning Chains
At the end of each row, you’ll need to turn your work before starting the next one. Turning chains help bring your yarn to the correct height for the following row.
For this pattern, use the following general guide:
| Next Row Stitch | Turning Chain |
|---|---|
| Single Crochet | 1 chain |
| Double Crochet | 3 chains |
The turning chain may count as a stitch depending on the pattern instructions. Therefore, keep this detail consistent throughout your project to avoid adding or losing stitches.
Tips for Keeping Your Crochet Stitches Even
Consistent stitches make a big difference in the final appearance of your crochet table runner. Even if you’re using basic techniques, a little attention to tension and placement will help create a more polished result.
Keep these tips in mind:
- Maintain consistent tension: Try to keep your yarn movements relaxed and steady.
- Count your stitches: Check each row to make sure you haven’t accidentally skipped or added a stitch.
- Use stitch markers: Place markers at the beginning and end of important rows if needed.
- Check your edges: Make sure both sides remain straight as you work.
- Practice first: If double crochet is new to you, make a small sample before starting the actual runner.
How to Read the Crochet Pattern Abbreviations
Written crochet patterns often use abbreviations to make instructions shorter and easier to follow. Understanding these terms will help you work through the upcoming steps without confusion.
| Abbreviation | Meaning |
|---|---|
| ch | Chain |
| sc | Single Crochet |
| dc | Double Crochet |
| sl st | Slip Stitch |
| st | Stitch |
| sts | Stitches |
| rep | Repeat |
| sk | Skip |
| sp | Space |
| RS | Right Side |
| WS | Wrong Side |
Remember that this project uses US crochet terminology. If you’re following tutorials from another country, check the stitch names carefully because UK and US crochet terms are different.
Now that you understand the basic stitches and abbreviations, you’re ready to prepare the foundation of your crochet table runner. In the next part, we’ll start working on the foundation chain and the first rows, where the shape and width of your project begin to take form.
Creating the Foundation Chain and First Rows of Your Crochet Table Runner
Now it’s time to begin crocheting! The foundation chain determines the width of your crochet table runner, so it’s worth taking a little extra care during this stage. For this pattern, we’ll create a rectangular piece measuring approximately 12 inches wide and 36 inches long, using medium-weight cotton yarn and a 4 mm crochet hook. Work at a comfortable pace, and remember that keeping your foundation chain even will make the following rows much easier.
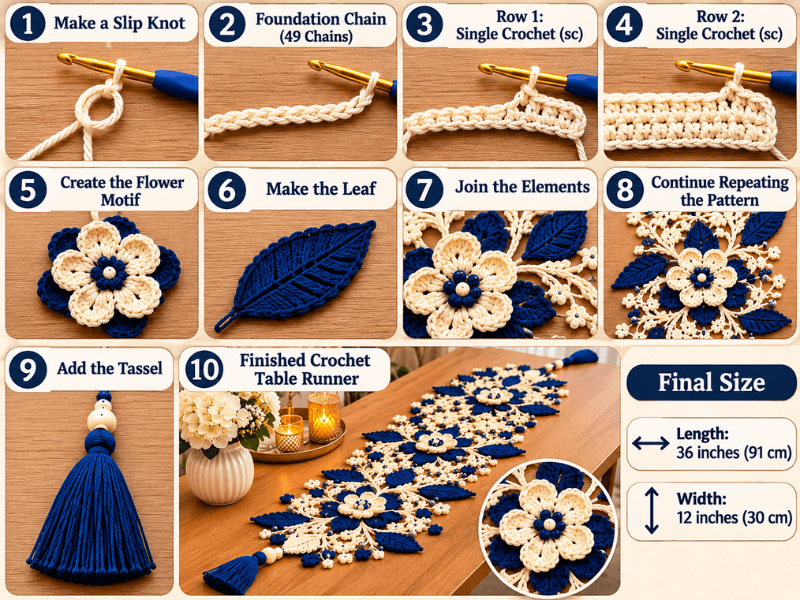
Step 1: Make a Slip Knot
Start by making a slip knot with your cotton yarn. Place the loop onto your crochet hook and gently pull both yarn ends to secure it. The knot should fit comfortably around the hook without being too tight.
Keep your working yarn behind the hook and hold the yarn tail securely with your fingers. This position gives you better control as you begin making your foundation chain.
Step 2: Create the Foundation Chain
For the standard 12-inch width, begin with a foundation chain of approximately 49 stitches. This is a starting estimate based on the recommended yarn and hook size, so your actual chain count may need adjusting after checking your gauge.
Follow these instructions:
- Yarn over your crochet hook.
- Pull the yarn through the loop already on your hook.
- Repeat until you have 49 chain stitches.
- Count your stitches carefully to avoid mistakes.
- Lay the chain flat and check that it doesn’t twist.
Important tip: Keep your foundation chain relaxed. If it’s too tight, the bottom edge of your crochet table runner may curl or become narrower than the rest of the project.
Step 3: Work the First Row of Single Crochet
Once your foundation chain is ready, it’s time to create the first row. Single crochet provides a firm base that helps the table runner maintain its rectangular shape.
Work through the following steps:
- Insert your hook into the second chain from the hook.
- Yarn over and pull up a loop.
- Yarn over again and pull through both loops.
- Continue making one single crochet in each chain across.
- At the end of the row, count your stitches.
You should have approximately 48 single crochet stitches if you started with 49 chains and skipped the first chain.
Step 4: Start the Second Row
After completing the first row, chain 1 and turn your work. This turning chain prepares your hook for the next row of single crochet.
Insert your hook into the first stitch and make one single crochet. Continue working one single crochet into every stitch across.
Make sure you work into the final stitch of the row. Missing that stitch can gradually make your crochet table runner narrower as you continue.
Step 5: Check the Width and Shape
Before moving forward, take a moment to measure your work. Your foundation section should be approximately 12 inches wide, although the exact measurement will depend on your crochet tension.
Use this table as a quick reference:
| Project Detail | Expected Result |
|---|---|
| Foundation Chain | Approximately 49 chains |
| First Row | Approximately 48 sc |
| Second Row | Approximately 48 sc |
| Hook Size | 4 mm |
| Target Width | 12 inches (30 cm) |
| Stitch Type | Single Crochet |
If your piece looks narrower than expected, consider using a slightly larger hook or adjusting the foundation chain. However, avoid changing hook sizes repeatedly once you’ve established a comfortable tension.
Tips for a Straight Foundation and Neat First Rows
The first few rows create the base for your entire project. Therefore, taking your time now can prevent problems later.
- Count regularly: Check your stitch count at the end of every row.
- Avoid tight chains: A relaxed foundation helps prevent curling.
- Watch the edges: Make sure the first and last stitches are easy to identify.
- Keep your tension steady: Try to make each stitch the same size.
- Measure early: Checking the width now is easier than correcting it later.
If you’re new to crocheting, don’t worry if your first rows look slightly uneven. Small differences often become less noticeable as you gain confidence and settle into a consistent rhythm.
You can find more crochet on my Facebook page and my Pinterest profile.
Frequently Asked Questions About Crochet Table Runners
1. How do you crochet a table runner for beginners?
To crochet a table runner for beginners, start by choosing medium-weight cotton yarn and a suitable crochet hook, such as a 4 mm hook. Then, create a foundation chain according to your desired width and work simple stitches, such as single crochet and double crochet, across each row. Continue repeating the pattern until you reach your preferred length. Finally, add a neat border, weave in the loose ends, and block your finished piece to give it a clean, even shape. Starting with a simple rectangular design makes this project easier to manage.
2. What is the best crochet stitch for a table runner?
The best crochet stitch depends on the style and texture you want. However, double crochet is an excellent choice because it creates a beautiful fabric without making the runner too heavy. Single crochet is another good option when you want a firm, compact finish. For a more decorative appearance, you can combine both stitches or use openwork patterns to create delicate spaces throughout the design.
| Crochet Stitch | Appearance | Best For |
|---|---|---|
| Single Crochet (sc) | Dense and firm | Simple, sturdy runners |
| Double Crochet (dc) | Soft and slightly open | Elegant everyday designs |
| Half Double Crochet (hdc) | Balanced texture | Neat, textured runners |
| Shell Stitch | Decorative and scalloped | Traditional table decorations |
| Moss Stitch | Subtle woven texture | Modern handmade designs |
For this crochet table runner, combining basic stitches is a practical way to achieve an attractive result while keeping the pattern accessible to beginners.
3. How much yarn do I need to crochet a table runner?
The amount of yarn depends on the runner’s dimensions, stitch pattern, yarn thickness, and personal crochet tension. For a standard 12 × 36-inch table runner made with medium-weight cotton yarn, approximately 400–500 yards should be a useful starting estimate.
Here is a general guide:
| Table Runner Size | Estimated Yarn |
|---|---|
| 12 × 30 inches | 350–400 yards |
| 12 × 36 inches | 400–500 yards |
| 12 × 42 inches | 450–550 yards |
| 12 × 48 inches | 500–650 yards |
Keep in mind that decorative stitches and detailed borders may require additional yarn. Therefore, it’s always a good idea to purchase a little extra from the same dye lot to avoid color differences.
4. How long does it take to make a crochet table runner?
A crochet table runner can take anywhere from a few hours to several days, depending on its size, stitch complexity, and your experience. A beginner working on a simple 12 × 36-inch design might need approximately 6–10 hours of crocheting time. More detailed patterns with decorative borders can take longer.
| Experience Level | Estimated Working Time |
|---|---|
| Beginner | 8–12 hours |
| Intermediate | 5–8 hours |
| Experienced | 3–6 hours |
These are approximate estimates rather than fixed times. If you crochet for one or two hours each evening, you may finish your project over several days. Taking regular breaks and maintaining consistent stitches will help you achieve a better result without rushing.
Conclusion: Create Your Own Elegant Crochet Table Runner
Creating a Crochet Table Runner – An Elegant Pattern, Step by Step is a rewarding project that combines simple crochet techniques with a beautiful handmade finish. With the right cotton yarn, a comfortable crochet hook, and a little patience, you can make a practical decoration that adds warmth and elegance to your home. Whether you’re a beginner or an experienced crocheter, you can customize the length, colors, and border to match your table and personal style. Gather your supplies, follow the steps, and enjoy creating a lovely crochet piece you’ll be happy to display or give as a handmade gift.

1 thought on “Crochet Table Runner: 5 Elegant Steps for Beginners”