

Crochet Round Backpack Pattern is a practical project that combines a simple rounded shape with the convenience of a hands-free bag. This handmade backpack features circular crochet panels, a side section, a front pocket, and adjustable straps, making it useful for everyday outings. In this tutorial, you’ll learn how to choose the right yarn and tools, follow the measurements, crochet and assemble each section, and add a zipper and hardware for a neat finish. The instructions are beginner-friendly, with helpful tips for shaping and reinforcing your bag.
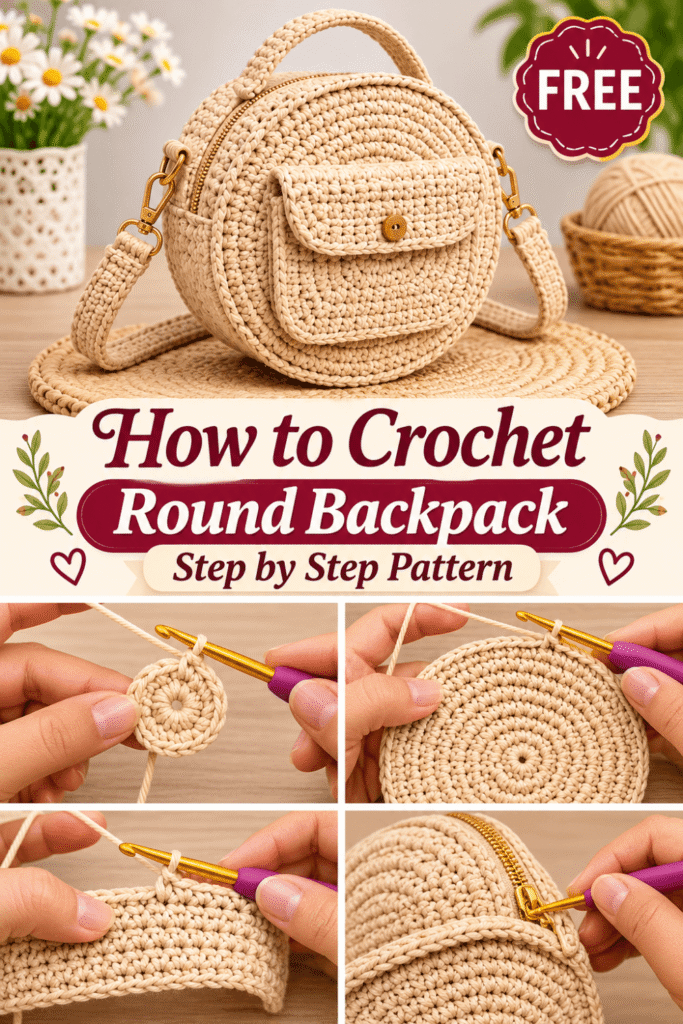
Table of Contents
Understanding the Crochet Round Backpack Pattern
A crochet round backpack is a practical handmade bag with a distinctive circular shape. Unlike a traditional rectangular backpack, this design uses two round crochet panels connected by a side section to create a compact, rounded body. It can include a front pocket, a zipper closure, adjustable shoulder straps, and a small top handle.
Before starting, it helps to understand how the backpack is constructed, what size to aim for, and how much yarn you may need. This will make the project easier to plan and help you avoid running short of materials.
What Makes a Round Crochet Backpack Unique?
The main feature of this backpack is its rounded shape. The front and back are made as separate circular panels, while a long crochet strip connects them and creates the depth of the bag.
This construction gives the backpack enough space for everyday essentials without making it look bulky. You can also customize the design by changing the yarn color, adding a decorative stitch, or adjusting the pocket and strap sizes.
The main parts of the backpack are:
- Front circular panel: Forms the visible front of the bag.
- Back circular panel: Creates the rear of the backpack.
- Side gusset: Connects both circular panels and provides storage depth.
- Front pocket: Adds space for small items such as keys or a phone.
- Zipper: Keeps the contents safely inside.
- Adjustable straps: Allow you to wear the bag comfortably on your back.
- Top handle: Makes it easy to carry or hang the backpack.
Features of This DIY Crochet Backpack
This design combines a simple crochet structure with practical bag-making details. The circular panels are worked in rounds, while the side gusset and pocket are crocheted separately and attached during assembly.
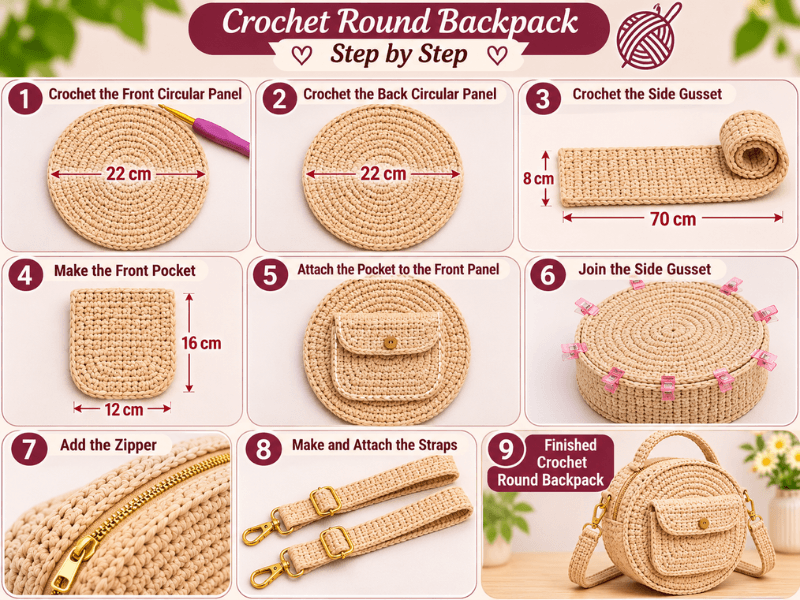
The measurements below provide a useful starting point for a compact round backpack. They follow the dimensions shown in the project reference, so you can use them to plan your pieces before crocheting.
| Backpack section | Suggested measurement | Purpose |
|---|---|---|
| Front circular panel | 22 cm diameter | Forms the front of the backpack |
| Back circular panel | 22 cm diameter | Forms the back of the backpack |
| Side gusset | 70 × 8 cm | Connects the two circular panels |
| Front pocket | 12 × 16 cm | Holds small everyday items |
| Pocket attachment strip | 12 × 4 cm | Helps finish or attach the pocket |
| Long strap section | 100 × 4 cm | Provides material for the strap construction |
| Additional side strip | 30 × 5 cm | Used for a small connecting or finishing section |
| Small connector pieces | 5 × 3 cm | Help attach or support the hardware |
These are project reference measurements, not universal backpack dimensions. Your final size may vary depending on yarn thickness, hook size, stitch tension, and assembly.
Is This Crochet Backpack Suitable for Beginners?
This project is suitable for crocheters who already know a few basic stitches and are comfortable following a pattern in rounds. You do not need advanced crochet techniques, but you should be familiar with:
- Magic ring: Used to begin the circular panels neatly.
- Single crochet: Creates a firm fabric that works well for bags.
- Increasing stitches: Helps the circular panels grow evenly.
- Slip stitch: Useful for joining rounds and finishing edges.
- Working in rows: Needed for the side gusset and front pocket.
- Sewing crochet pieces together: Helps assemble the backpack securely.
The zipper, adjustable straps, and metal hardware require a little extra patience. You can take your time with these finishing steps to achieve a clean and sturdy result.
How Much Yarn Do You Need?
The amount of yarn depends on the size of your backpack, the thickness of your yarn, your crochet hook, and how tightly you work your stitches.
For a compact round backpack with two circular panels, a side gusset, and a front pocket, a reasonable planning estimate is approximately 500–900 meters of yarn. This is an estimate rather than an exact requirement, so check your gauge and buy a little extra if you are unsure.
| Project component | Approximate yarn allocation |
|---|---|
| Front and back circular panels | 250–400 m |
| Side gusset | 120–200 m |
| Front pocket | 50–100 m |
| Straps, handle, and small details | 80–150 m |
| Estimated total | 500–900 m |
The allocation is only a planning guide; actual consumption will depend on the stitch pattern and dimensions. If you choose thick cotton cord or bulky yarn, you may need fewer meters but a heavier amount of yarn by weight.
How the Backpack Is Constructed
The backpack is made in separate pieces before everything is joined together. This makes it easier to control the shape and check the measurements as you work.
The construction follows this order:
- Crochet the first circular panel for the front.
- Crochet the second circular panel for the back.
- Make the long side gusset to create the backpack’s depth.
- Crochet the front pocket and prepare its attachment.
- Join the gusset to the circular panels.
- Attach the front pocket in the correct position.
- Add the zipper and reinforce the opening.
- Attach the adjustable straps, top handle, and hardware.
- Finish the loose ends and check the shape.
For a neat result, measure each piece before joining it. The side gusset should fit around the edges of the circular panels, and the zipper should match the length of the opening. Taking these measurements carefully will help the backpack keep its rounded shape and make the final assembly much easier.
Materials and Tools for Your Crochet Round Backpack
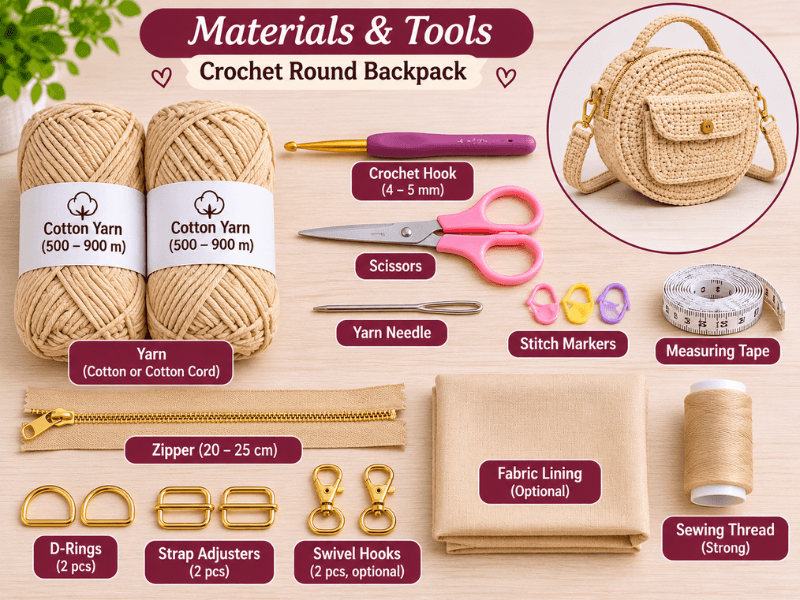
Choosing the right materials is important when making a crochet backpack. Since this bag needs to hold everyday items, the yarn should create a firm fabric that keeps its shape without becoming too stiff. You will also need a suitable crochet hook, basic sewing tools, a zipper, and hardware for the adjustable straps.
Before starting, gather everything you need so you can work through the circular panels, side gusset, pocket, and finishing details without interruptions.
Best Yarn for a Structured Crochet Backpack
Cotton yarn is a good choice for this project because it creates defined stitches and produces a durable fabric. It is also comfortable to work with and comes in many colors, making it easy to customize your backpack.
For a more structured result, choose medium-weight cotton yarn or cotton cord. Avoid yarn that is too soft or stretchy, as it may cause the backpack to lose its shape when filled.
| Yarn type | Main characteristics | Suitability |
|---|---|---|
| 100% cotton yarn | Firm stitches, durable, easy to maintain | Excellent choice |
| Cotton cord | Strong and structured fabric | Excellent for a sturdy backpack |
| Cotton blend | Often softer and flexible | Good option |
| Acrylic yarn | Lightweight and available in many colors | Suitable, but may be less structured |
| Bulky yarn | Creates thick stitches and a heavier bag | Best for a larger, chunky design |
Recommended amount: Prepare approximately 500–900 meters of yarn for the compact design described in this tutorial. The exact amount will depend on your yarn thickness, hook size, stitch tension, and final dimensions.
If you are using more than one color, make sure you have enough yarn for both circular panels and the side gusset. You can use a contrasting color for the pocket or decorative details.
Choosing the Right Crochet Hook Size
The crochet hook affects how tight or loose your stitches will be. For a backpack, you generally want firm stitches with small spaces between them so that the bag can support its contents.
A hook between 4 mm and 5 mm is a useful starting point when working with medium-weight cotton yarn. If you choose thick cotton cord, you may need a larger hook depending on the yarn label.
| Yarn type | Suggested hook size |
|---|---|
| Light cotton yarn | 3–3.5 mm |
| Medium-weight cotton yarn | 4–5 mm |
| Thick cotton cord | 5–6.5 mm |
| Bulky yarn | 6–8 mm |
These sizes are starting recommendations, not fixed rules. Always check the yarn label and make a small test swatch before beginning the backpack.
Helpful tip: If your stitches look loose and the fabric feels too flexible, try a smaller hook. If the fabric is difficult to crochet and feels excessively stiff, try a slightly larger one.
Essential Crochet Tools and Supplies
You do not need many specialized tools to crochet the main parts of this backpack. A few basic supplies will help you work accurately and assemble the pieces neatly.
| Tool or supply | What you will use it for |
|---|---|
| Crochet hook | Making all crochet pieces |
| Scissors | Cutting yarn and trimming ends |
| Yarn needle | Sewing pieces and weaving in ends |
| Stitch markers | Marking the beginning of rounds and important stitches |
| Measuring tape | Checking the dimensions of each piece |
| Pins or sewing clips | Holding pieces in position before joining |
| Row counter | Keeping track of rounds and rows |
| Small ruler | Measuring narrow strips and connector pieces |
A measuring tape is especially useful for this project. Check the diameter of both circular panels and the length of the side gusset before assembling the backpack.
Zippers, Metal Hardware, and Bag Accessories
The zipper and hardware give your handmade backpack a more practical finish. They also help the bag function like a regular everyday backpack.
Here are the accessories to prepare:
| Accessory | Recommended option | Purpose |
|---|---|---|
| Zipper | Around 20–25 cm, adjusted to the opening | Keeps the backpack closed |
| D-rings | 2 metal rings | Connects the shoulder straps |
| Strap adjusters | 2 adjustable sliders | Allows you to change strap length |
| Swivel hooks | 2 hooks, if desired | Makes straps removable |
| Metal rings | 2–4, depending on the design | Supports strap connections |
| Fabric lining | Optional cotton fabric | Covers the inside of the backpack |
| Sewing thread | Strong thread matching your fabric | Attaches the zipper and lining |
The zipper length should be selected according to the actual opening of your backpack. Measure the opening after crocheting the panels and gusset rather than relying only on the suggested measurement.
For the adjustable straps, choose hardware that matches the width of your strap. For example, 4 cm-wide straps need compatible rings and sliders.
Optional Materials for a Professional Finish
A few additional materials can improve the structure and appearance of your finished backpack. They are not essential, but they can make a noticeable difference.
- Fabric lining: Helps protect the inside of the crochet bag and prevents small objects from catching on the stitches.
- Lightweight interfacing: Adds support to the lining or pocket.
- Bag stabilizer: Helps the circular panels maintain their shape.
- Nylon webbing: Can reinforce the shoulder straps and reduce stretching.
- Sewing machine: Makes attaching the lining and zipper easier, although hand sewing is also possible.
- Leather or faux-leather tabs: Can cover strap connections and add a decorative detail.
If you plan to carry heavier items, consider reinforcing the strap attachment points with fabric or nylon webbing. Crochet stitches can stretch under repeated weight, so secure attachment points are important.
Materials Checklist Before You Start
Use this checklist to make sure you have everything ready before crocheting.
- 500–900 meters of suitable yarn
- Crochet hook matched to your yarn
- Scissors
- Yarn needle
- Stitch markers
- Measuring tape
- Pins or sewing clips
- Zipper matching the backpack opening
- Two D-rings
- Adjustable strap sliders
- Swivel hooks, if needed
- Fabric lining, if desired
- Strong sewing thread
Once all your materials are ready, you can move on to the measurements. Getting the dimensions right before crocheting will help both circular panels match and ensure that the side gusset fits properly around the backpack.
Crochet Round Backpack Measurements and Dimensions
Before crocheting your backpack, take a little time to understand the measurements of each piece. Accurate sizing helps the two circular panels match, allows the side gusset to fit correctly, and makes it easier to position the front pocket, zipper, and straps.
This tutorial uses a compact round backpack design with circular panels measuring approximately 22 cm in diameter and a side gusset measuring 70 × 8 cm. You can follow these dimensions or adjust them to create a slightly larger or smaller bag.
Understanding the Finished Backpack Size
The finished backpack is designed to have a rounded front and back, with enough depth to hold small everyday essentials. Its final dimensions depend on your stitch tension, yarn thickness, crochet hook, and how securely you join the pieces.
Here is an overview of the suggested measurements:
| Backpack section | Width or diameter | Height or length |
|---|---|---|
| Front circular panel | 22 cm | 22 cm |
| Back circular panel | 22 cm | 22 cm |
| Side gusset | 70 cm | 8 cm |
| Front pocket | 12 cm | 16 cm |
| Pocket attachment strip | 12 cm | 4 cm |
| Long strap section | 100 cm | 4 cm |
| Additional side strip | 30 cm | 5 cm |
| Small connector pieces | 5 cm | 3 cm |
The circular panels determine the overall front and back size, while the 8 cm gusset creates the backpack’s depth. The other pieces provide space for storage and help complete the strap and attachment details.
Measurements for the Two Circular Panels
You will need two circular crochet panels: one for the front and one for the back. Both should have the same diameter so they can be joined evenly.
For this design, aim for a finished diameter of approximately 22 cm per panel.
| Panel detail | Measurement |
|---|---|
| Number of panels | 2 |
| Diameter of each panel | 22 cm |
| Radius of each panel | 11 cm |
| Shape | Round |
| Construction | Crochet in joined or continuous rounds |
To check the size, place your crochet panel on a flat surface and measure straight across its center. The measurement should be approximately 22 cm from one edge to the opposite edge.
Keep the stitch tension consistent when making both panels. If one circle is noticeably larger than the other, the edges may not line up properly during assembly.
Helpful tip: Finish the first panel and use it as a size reference for the second one. This makes it easier to keep both pieces identical.
Creating the Backpack Side Gusset
The side gusset is the long strip that connects the front and back circular panels. It creates the depth of the backpack and gives the bag enough room to hold its contents.
For the reference design, the suggested dimensions are:
| Gusset detail | Measurement |
|---|---|
| Length | 70 cm |
| Width | 8 cm |
| Shape | Long rectangular strip |
| Quantity | 1 |
The 8 cm width determines the approximate depth of the backpack. You can increase or decrease this measurement depending on how much storage space you want.
The 70 cm length is a starting measurement. Because the gusset follows the outer edge of the circular panels, its actual required length should be checked against the finished circumference of your circles.
For a 22 cm diameter circle, the approximate circumference is:
\[ C = \pi \times D \]
\[ C = 3.14 \times 22 \approx 69.1\text{ cm} \]
This means a gusset measuring around 69–70 cm in length is a suitable starting point. Always compare the crocheted strip with the actual edge of your panels before joining them.
Measuring the Front Pocket
The front pocket adds useful storage without changing the overall circular shape of the backpack. It is suitable for small objects such as keys, tissues, or other lightweight essentials.
The suggested pocket dimensions are:
| Pocket detail | Measurement |
|---|---|
| Width | 12 cm |
| Height | 16 cm |
| Attachment strip | 12 × 4 cm |
The pocket should be positioned near the center of the front circular panel. Before sewing it in place, lay the pocket flat against the panel and check that it looks balanced.
Leave enough space around the pocket edges so that you can attach it securely without pulling or stretching the circular panel.
Helpful tip: Use stitch markers or sewing clips to hold the pocket in position before attaching it. This helps prevent it from shifting while you sew.
Crochet Backpack Strap Measurements
The straps should be comfortable, strong, and suitable for the size of the backpack. The reference design includes a long strap section measuring approximately 100 × 4 cm, along with smaller strips and connector pieces.
| Strap component | Suggested measurement | Purpose |
|---|---|---|
| Long strap section | 100 × 4 cm | Main strap material |
| Additional strip | 30 × 5 cm | Additional attachment or finishing section |
| Connector pieces | 5 × 3 cm | Connect or support hardware |
The final strap arrangement depends on how you attach the adjustable hardware. If you want adjustable shoulder straps, make sure the strap width matches the D-rings, sliders, and other accessories you have selected.
For extra strength, you can reinforce the strap attachment areas with nylon webbing or fabric before attaching the hardware.
How to Adjust the Backpack Size
You can easily modify the dimensions to make a smaller or larger backpack. The most important thing is to adjust the circular panels and side gusset together rather than changing only one piece.
| Design | Circular panel diameter | Side gusset width | Result |
|---|---|---|---|
| Small | 18 cm | 6 cm | Compact backpack |
| Reference size | 22 cm | 8 cm | Medium compact backpack |
| Large | 26 cm | 10 cm | More storage space |
These are suggested design variations, not tested finished sizes. If you change the diameter of the circular panels, recalculate the gusset length using the circumference formula:
\[ C = \pi \times D \]
For example, a 26 cm circular panel has an approximate circumference of 81.6 cm. You would need a longer gusset than the reference design.
Remember that the number of crochet rounds will also change depending on your yarn and stitch tension. Measure your panels as you work instead of relying only on a fixed round count.
Final Measurement Check Before Crocheting
Before moving on, review your measurements and make sure you are ready to create the crochet pieces.
- Two circular panels, each approximately 22 cm in diameter
- One side gusset, approximately 70 × 8 cm
- One front pocket, approximately 12 × 16 cm
- One pocket attachment strip, approximately 12 × 4 cm
- Strap components prepared according to your hardware
- Zipper selected to match the finished opening
Taking accurate measurements at this stage will make the next steps easier. Once your dimensions are clear, you can begin crocheting the circular panels and build the main shape of your backpack.
You can find more crochet on my Facebook page and my Pinterest profile.
Frequently Asked Questions About Crochet Round Backpacks
1. How Do You Crochet a Round Backpack for Beginners?
To crochet a round backpack, start by making two identical circular panels. You then crochet a long rectangular strip for the side gusset, which connects the panels and creates the depth of the bag. After assembling the main body, add a front pocket, zipper, adjustable straps, and a top handle.
For this design, follow these basic steps:
| Step | What to do |
|---|---|
| 1 | Crochet the first circular panel, approximately 22 cm in diameter |
| 2 | Make a second circular panel with the same measurements |
| 3 | Crochet the side gusset, approximately 70 × 8 cm |
| 4 | Make and attach the front pocket |
| 5 | Join the gusset to both circular panels |
| 6 | Install the zipper and reinforce the opening |
| 7 | Attach the straps, hardware, and top handle |
| 8 | Weave in loose ends and finish the backpack |
If you are a beginner, practice making a magic ring, single crochet stitches, and increases before starting. These basic techniques will help you create even circular panels.
2. What Materials Do You Need to Make a Crochet Round Backpack?
You need suitable yarn, a crochet hook, basic crochet tools, and a few accessories for assembling the bag. Cotton yarn or cotton cord is a good option because it creates a firm fabric that helps the backpack maintain its shape.
Here is a useful materials guide:
| Material | Recommended quantity or size | Purpose |
|---|---|---|
| Cotton yarn or cotton cord | Approximately 500–900 m | Main backpack |
| Crochet hook | Usually 4–5 mm for medium cotton yarn | Crocheting the pieces |
| Zipper | Around 20–25 cm, adjusted to the opening | Closing the backpack |
| D-rings | 2 pieces | Attaching the straps |
| Adjustable sliders | 2 pieces | Adjusting strap length |
| Swivel hooks | 2 pieces, optional | Connecting removable straps |
| Fabric lining | Enough for the backpack interior | Protecting and finishing the inside |
| Yarn needle | 1 | Sewing crochet pieces |
| Scissors | 1 pair | Cutting yarn |
| Measuring tape | 1 | Checking dimensions |
| Stitch markers | A few | Marking rounds and stitches |
The exact yarn quantity and hook size depend on the yarn thickness and your crochet tension. Check the yarn label and make a small test swatch before beginning.
3. What Size Should a Crochet Round Backpack Be?
The ideal size depends on how you plan to use the backpack. A compact design is suitable for carrying small everyday essentials, while a larger version offers more storage space.
For this tutorial, the reference dimensions are approximately 22 cm in diameter for each circular panel and 8 cm for the side gusset.
| Backpack size | Circular panel diameter | Side gusset width | Best suited for |
|---|---|---|---|
| Small | 18 cm | 6 cm | Small personal essentials |
| Medium | 22 cm | 8 cm | Everyday lightweight items |
| Large | 26 cm | 10 cm | Additional storage space |
These measurements are suggested variations. The finished dimensions may change slightly depending on your yarn, hook, and stitch tension.
One important detail is the side gusset length. It should match the circumference of your circular panels. For example, a panel with a 22 cm diameter has an approximate circumference of 69.1 cm.
You can calculate the circumference using:
\[ C = \pi \times D \]
This calculation helps you determine how long your side strip needs to be before joining the backpack pieces.
4. How Do You Add a Zipper and Adjustable Straps to a Crochet Backpack?
Adding a zipper and adjustable straps makes your crochet backpack more practical and comfortable to use. It is best to prepare the zipper and hardware before finishing the assembly so you can check that everything fits correctly.
How to add a zipper:
- Measure the finished backpack opening.
- Choose a zipper that matches the opening length.
- Position the zipper evenly along the opening.
- Use sewing clips or pins to hold it in place.
- Sew the zipper carefully to the crochet fabric using strong thread.
- Check that it opens and closes smoothly without catching the yarn.
For a cleaner finish, you can sew a narrow fabric strip behind the zipper before attaching it to the crochet bag. This also helps prevent the zipper from pulling directly on the crochet stitches.
How to attach adjustable straps:
- Prepare the strap sections according to your chosen design.
- Insert the strap through an adjustable slider.
- Attach the strap ends to compatible D-rings or swivel hooks.
- Secure the hardware to reinforced attachment points on the backpack.
- Adjust both straps to the same length.
- Test the attachments gently before using the bag.
| Accessory | How it is used |
|---|---|
| D-rings | Provide connection points for the straps |
| Adjustable sliders | Allow the shoulder straps to become longer or shorter |
| Swivel hooks | Make the straps removable |
| Nylon webbing | Reinforces the strap attachment areas |
| Strong sewing thread | Helps secure the zipper and fabric components |
Important tip: Do not rely only on ordinary crochet stitches to support heavy strap attachments. Reinforce these areas with fabric or nylon webbing, especially if you plan to carry heavier everyday items.
Conclusion – Enjoy Your Handmade Crochet Round Backpack
This Crochet Round Backpack Pattern is a practical way to create a handmade bag with a unique shape and useful everyday features. With two circular panels, a side gusset, a front pocket, and adjustable straps, you can make a backpack that combines style and functionality.
Take your time measuring each piece, keeping your stitches consistent, and reinforcing the zipper and strap attachments. You can also customize the yarn color, pocket size, and strap length to suit your preferences.
Gather your materials, follow the steps, and enjoy creating a crochet backpack that you can proudly use or give as a handmade gift.

1 thought on “Crochet Round Backpack Pattern: Easy DIY Tutorial”