

Crochet Rose Flower Pattern – Easy Step-by-Step Petal Strip Tutorial is a simple and beautiful way to create a realistic handmade rose using a single crocheted strip. Instead of making each petal separately, you’ll crochet a continuous strip, shape the scalloped edges, and roll it into a lovely layered flower. This project uses basic crochet stitches, soft pink yarn, and green yarn for the leaves and stem. Follow the step-by-step instructions to make the petal strip, crochet the floral details, and assemble your finished rose.
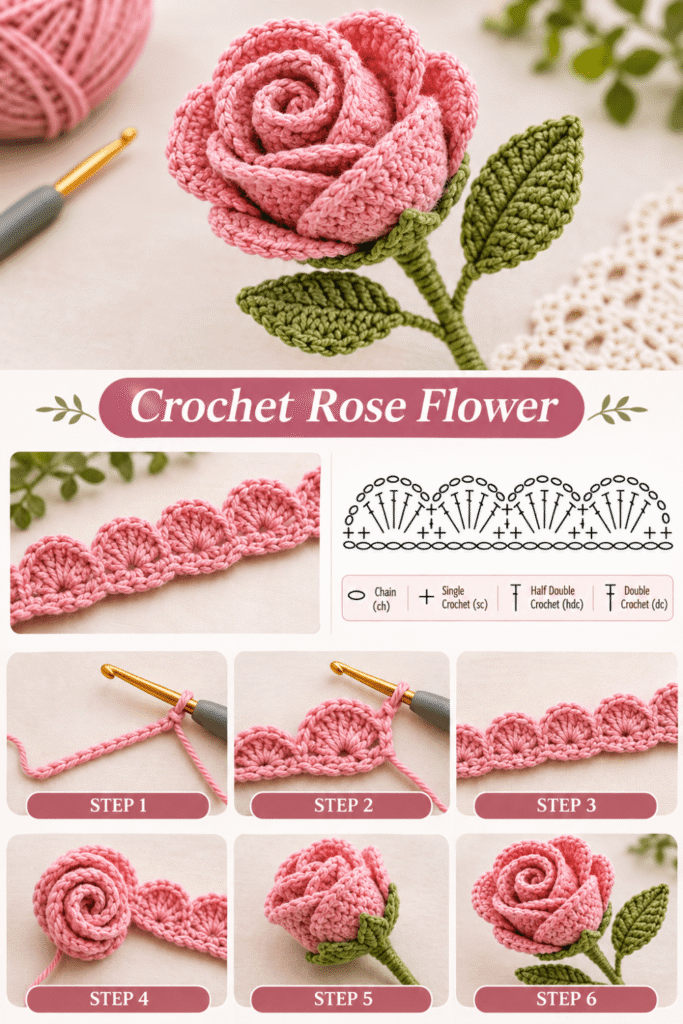
Table of Contents
Materials and Tools for Your Crochet Rose Flower
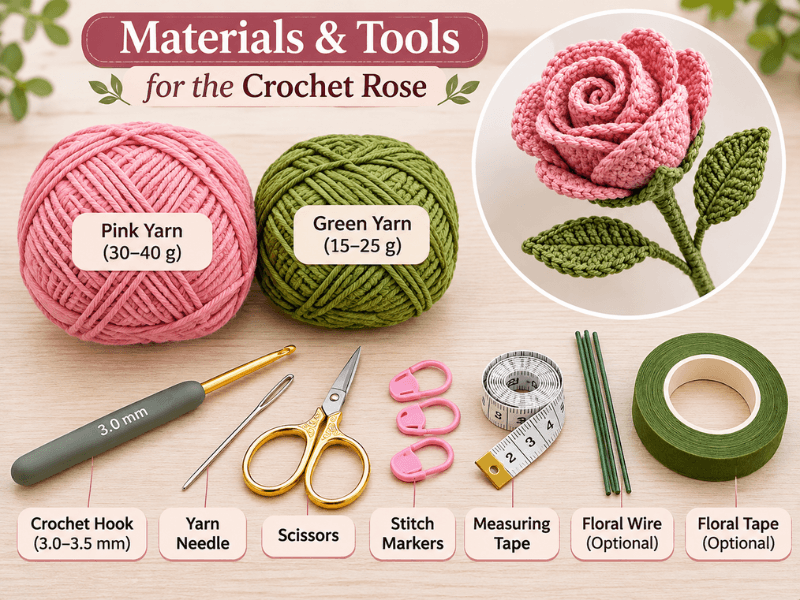
Before starting your Crochet Rose Flower Pattern, gather the right yarn, crochet hook, and a few basic accessories. This project uses a clever technique: instead of crocheting every petal separately, you’ll create one long scalloped strip and roll it into a beautiful layered rose. You’ll also make a green sepal, crochet leaves, and finish the flower with a wrapped stem. Choosing suitable yarn and keeping your stitches consistent will help your finished rose look neat, full, and realistic.
1.1 Choose the Best Yarn for a Crochet Rose
For this project, soft cotton yarn or a cotton-acrylic blend is a good choice. These yarns create clearly defined stitches and make it easier to shape the petals without making the flower too heavy.
You’ll need two main colors:
- Dusty pink: For the rose petals and central flower.
- Olive green: For the sepal, leaves, and stem covering.
Choose a yarn with a smooth texture so the scalloped edges remain visible when you roll the petal strip into a rose.
| Yarn Color | Recommended Quantity | Purpose |
|---|---|---|
| Dusty pink | 30–40 g | Petal strip and rose |
| Olive green | 15–25 g | Sepal and leaves |
| Green yarn for stem | Included above | Wrapping the stem |
| Total | 45–65 g | One crochet rose |
These quantities are approximate and may vary depending on the yarn thickness, flower size, and number of leaves.
1.2 Recommended Crochet Hook Size
A 3.0–3.5 mm crochet hook works well with lightweight cotton or sport-weight yarn. The hook should create firm stitches without making the petals too stiff.
| Hook Size | Best Use |
|---|---|
| 2.5 mm | Smaller, tighter petals |
| 3.0 mm | Firm and well-defined petals |
| 3.5 mm | Slightly softer and larger petals |
| 4.0 mm | Larger flowers with a looser texture |
For a rose similar to the reference design, start with a 3.0 mm hook. Use the same hook for the pink and green sections if both yarns have a similar thickness.
1.3 Additional Tools and Accessories
Besides yarn and your crochet hook, prepare the following tools to make the project easier to assemble.
| Tool | Quantity | Purpose |
|---|---|---|
| Crochet hook | 1 | Making petals, leaves, and sepal |
| Yarn needle | 1 | Rolling and sewing the rose |
| Scissors | 1 pair | Cutting yarn |
| Stitch markers | 2–3 | Marking important stitches |
| Measuring tape | 1 | Checking petal and leaf dimensions |
| Floral wire or craft wire | 1 piece | Optional stem support |
| Green floral tape | 1 roll | Optional stem finishing |
| Sewing pins | 3–4 | Holding the rose shape during assembly |
If you want a flexible decorative rose, you can make the stem entirely from yarn. For a firmer flower that holds its position, use a suitable craft wire inside the stem and cover it securely with green yarn.
1.4 Recommended Finished Measurements
Before crocheting, decide how large you want your finished rose to be. The following measurements are suitable targets for a medium-sized decorative flower.
| Component | Approximate Measurement |
|---|---|
| Foundation chain | 45–55 chains |
| Petal strip length | 30–40 cm |
| Petal strip width | 4–5 cm |
| Individual scallop height | 2–3 cm |
| Finished rose diameter | 6–8 cm |
| Rose height | 5–6 cm |
| Sepal diameter | 3–4 cm |
| Leaf length | 4–6 cm |
| Leaf width | 2–3 cm |
| Stem length | 12–18 cm |
These measurements are approximate because the final dimensions depend on your crochet tension and stitch pattern. The most important thing is to make a petal strip long enough to create several overlapping layers.
1.5 How Many Petals and Leaves Do You Need?
One of the advantages of this crochet technique is that the petals are connected in a continuous strip. You don’t need to crochet and sew every petal individually.
For a full-looking rose, prepare the following components:
| Component | Recommended Quantity | Color |
|---|---|---|
| Scalloped petal strip | 1 long strip | Dusty pink |
| Crochet sepal | 1 | Olive green |
| Crochet leaves | 2 | Olive green |
| Wrapped stem | 1 | Olive green |
You can make a longer petal strip if you prefer a larger rose with more layers. A shorter strip creates a smaller flower with a simpler shape.
1.6 Crochet Abbreviations Used in This Pattern
This tutorial uses US crochet terminology. Familiarizing yourself with these abbreviations will make the instructions easier to follow.
| Abbreviation | Meaning |
|---|---|
| ch | Chain |
| sc | Single Crochet |
| hdc | Half Double Crochet |
| dc | Double Crochet |
| tr | Treble Crochet |
| sl st | Slip Stitch |
| st | Stitch |
| sts | Stitches |
| rep | Repeat |
| sk | Skip |
| MR | Magic Ring |
Remember that US and UK crochet stitch names can differ, especially for single crochet and double crochet.
1.7 Prepare Your Yarn and Workspace
Before starting the petal strip, organize your materials and prepare a comfortable workspace.
Follow these simple preparation steps:
- Wind your dusty pink yarn into a manageable ball.
- Prepare a separate ball of olive-green yarn.
- Check that both yarn colors have a similar thickness.
- Select your crochet hook according to your yarn.
- Keep your yarn needle and scissors nearby.
- Measure your intended flower size before beginning.
- Make a small test swatch to check your stitch tension.
Helpful tip: Avoid crocheting the petal strip too tightly. The strip needs enough flexibility to curve naturally when rolled into a rose. If the stitches are too tight, the petals may become stiff and difficult to arrange.
How to Crochet the Rose Petal Strip Step by Step
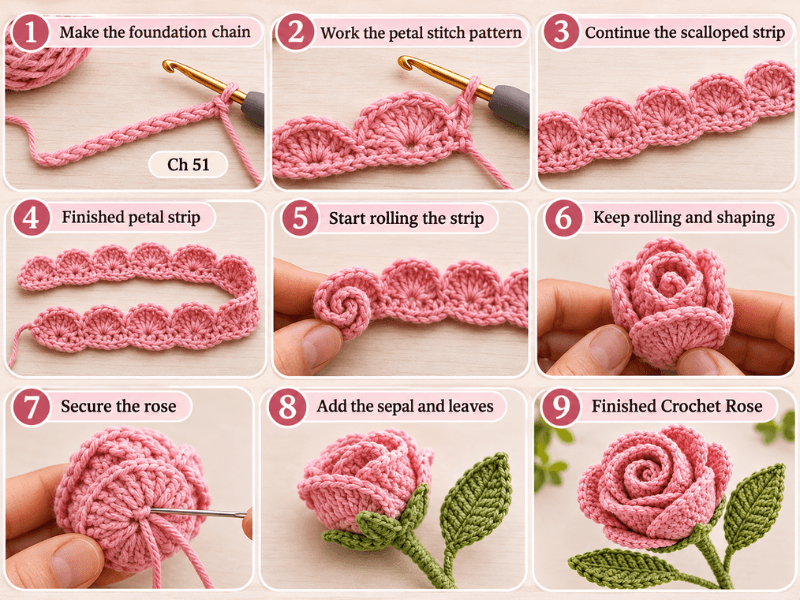
The petal strip is the most important part of this Crochet Rose Flower Pattern. Instead of making individual petals and sewing them together, you’ll crochet a continuous strip with repeated scalloped sections. Once the strip is finished, you’ll roll it carefully to create the layered appearance of a natural rose. Using dusty pink yarn and a 3.0 mm crochet hook, follow the instructions below to create evenly shaped petals with soft, rounded edges.
2.1 Start with the Foundation Chain
Begin with your dusty pink yarn and a 3.0 mm crochet hook.
- Make a slip knot and place it on your hook.
- Chain 51 stitches.
- Check that the chain is not too tight.
- Lay it flat on your work surface to make sure it doesn’t twist.
The foundation chain provides the length needed to create several connected petals.
Recommended starting length: approximately 30–35 cm, depending on your yarn and tension.
2.2 Create the First Row of Petal Foundations
Work along the foundation chain to create the structure for the scalloped petals.
For this sample strip:
- Skip the first 2 chains from the hook.
- Work 1 single crochet into the next chain.
- Work 1 half double crochet into the following chain.
- Work 3 double crochet stitches into the next chain.
- Work 1 half double crochet into the next chain.
- Work 1 single crochet into the following chain.
This creates the first rounded petal section.
Repeat a similar stitch sequence along the remaining chain, leaving a small space between the petal sections if needed.
2.3 Shape the Scalloped Petal Strip
The rounded sections are what give the finished rose its layered appearance. Each scallop becomes one visible petal when the strip is rolled.
Use the following stitch combination as a guide:
| Stitch Position | Crochet Stitch | Purpose |
|---|---|---|
| Beginning | 1 sc | Creates a narrow edge |
| Next stitch | 1 hdc | Gradually increases height |
| Middle | 3 dc | Forms the rounded petal |
| Next stitch | 1 hdc | Reduces the height |
| Ending | 1 sc | Defines the petal edge |
Repeat the sequence to create a connected row of rounded petals.
Important: The exact number of scallops depends on the length of your foundation chain and the spacing between the stitch groups. Keep the petals approximately the same size for a balanced flower.
2.4 Add a Neat Finishing Edge
After completing the petal strip, check that all the scallops have a similar shape.
If necessary:
- Add slip stitches along the bottom edge to create a cleaner finish.
- Avoid pulling the yarn too tightly around the petal curves.
- Make sure the lower edge remains flexible.
- Leave a yarn tail of approximately 25–30 cm for assembling the rose.
Fasten off carefully without cutting the yarn too close to the final stitch.
2.5 Recommended Petal Strip Measurements
For a medium-sized crochet rose similar to the reference design, use these approximate measurements:
| Detail | Recommended Measurement |
|---|---|
| Foundation chain | 51 chains |
| Strip length | 30–40 cm |
| Strip width | 4–5 cm |
| Petal height | 2–3 cm |
| Number of scallops | 8–10 |
| Yarn color | Dusty pink |
| Crochet hook | 3.0 mm |
| Assembly yarn tail | 25–30 cm |
These are suggested measurements rather than a verified stitch chart. Adjust the foundation chain and stitch spacing according to your yarn and desired flower size.
2.6 How to Make the Petals Look Natural
A realistic crochet rose needs petals that curve gently rather than lying completely flat.
Try these simple shaping techniques:
- Curve the outer edges: Gently bend the scalloped edges forward.
- Create soft folds: Add a slight curve near the bottom of each petal.
- Keep the center compact: Smaller folds work well around the middle of the rose.
- Allow the outer petals to open: Avoid rolling every section too tightly.
- Maintain consistent shapes: Similar petal heights create a more balanced flower.
You can temporarily hold the strip in place with sewing pins while checking its appearance.
2.7 Check Your Petal Strip Before Assembly
Before moving to the next stage, lay the finished strip flat and inspect its shape.
| What to Check | Desired Result |
|---|---|
| Petal edges | Rounded and clearly defined |
| Petal height | Approximately consistent |
| Bottom edge | Straight and flexible |
| Stitch tension | Firm but not stiff |
| Overall length | Enough for several overlapping layers |
| Loose ends | Long enough for sewing |
How to Roll and Assemble the Crochet Rose
Now that your pink petal strip is complete, it’s time to transform it into a beautiful layered rose. This is where the flower begins to take its final shape. By rolling the scalloped strip carefully and securing each layer with a yarn needle, you can create a realistic rose with a compact center and gently opening outer petals. The key is to keep the center tight while allowing the outer sections to spread naturally.
3.1 Prepare the Petal Strip for Rolling
Before assembling the flower, place your finished pink strip on a flat surface with the scalloped edges facing upward.
Check that:
- All the petals are clearly visible.
- The bottom edge is relatively straight.
- The yarn tail is long enough for sewing.
- The strip is flexible enough to curve without folding awkwardly.
If necessary, gently shape the scallops with your fingers before rolling.
3.2 Start Rolling the Crochet Rose
Begin at one end of the petal strip. This end will form the center of your rose.
Follow these steps:
- Hold the first petal section between your fingers.
- Roll it inward to create a small central spiral.
- Keep the bottom edge aligned as you continue rolling.
- Add the next petal around the center.
- Continue wrapping the strip around itself.
- Allow each new layer to sit slightly outside the previous one.
Avoid rolling the entire strip too tightly. A compact center combined with looser outer layers creates a more natural flower shape.
3.3 Shape the Outer Rose Petals
As you approach the end of the strip, pay special attention to the outer petals.
Use your fingers to gently open the scalloped sections and arrange them around the flower.
| Rose Section | Recommended Shape | Appearance |
|---|---|---|
| Center | Tightly rolled | Small spiral |
| Inner petals | Slightly curved inward | Compact layers |
| Middle petals | Gently opened | Fuller appearance |
| Outer petals | Curved outward | Natural blooming shape |
If some petals overlap too much, gently separate them before sewing the flower together.
3.4 Secure the Rose with a Yarn Needle
Once you’re happy with the arrangement, use the remaining pink yarn tail to secure the rolled flower.
- Thread the yarn tail through your yarn needle.
- Hold the bottom of the rose firmly.
- Insert the needle through several layers of the bottom edge.
- Make small stitches to connect the overlapping sections.
- Repeat around the base until the flower feels secure.
- Fasten off the yarn and weave in the remaining end.
Try to sew through the bottom of the flower rather than the visible petals. This keeps the stitches hidden and preserves the rose’s appearance.
Helpful tip: Before fastening off completely, check that the flower doesn’t loosen when you gently turn it upside down.
3.5 Recommended Finished Rose Measurements
For a medium-sized decorative rose, use these approximate measurements as a guide.
| Component | Approximate Size |
|---|---|
| Finished rose diameter | 6–8 cm |
| Flower height | 5–6 cm |
| Center spiral | 1–1.5 cm |
| Inner petal layers | 2–3 layers |
| Outer petal layers | 2–3 layers |
| Sewing stitches | 6–10 securing passes |
The final size depends on how tightly you roll the strip and how many scallops you include.
3.6 Adjust the Petals for a Realistic Finish
After securing the rose, gently adjust each petal individually.
- Pull the outer scallops slightly outward.
- Keep the central spiral compact.
- Separate overlapping petals with your fingers.
- Curve the edges to create more depth.
- Check the flower from different angles.
You can also use a few temporary sewing pins to hold the outer petals in position while you make adjustments.
Avoid stretching the stitches too much, as this can distort the scalloped edges.
3.7 Final Rose Assembly Checklist
Before moving to the green components, make sure your pink rose is properly assembled.
| Detail | What to Check |
|---|---|
| Center | Tightly rolled and secure |
| Inner petals | Neatly arranged |
| Outer petals | Slightly open and curved |
| Bottom section | Firmly sewn together |
| Loose yarn ends | Properly hidden |
| Overall shape | Rounded and balanced |
Your pink crochet rose is now complete! You should have a beautiful layered flower with a spiral center and softly curved petals.
You can find more crochet on my Facebook page and my Pinterest profile.
Frequently Asked Questions About the Crochet Rose Flower Pattern
1. How Do You Crochet a Rose Flower Using a Petal Strip Step by Step?
To crochet a rose flower using a petal strip, start by making a foundation chain with pink yarn. Next, work a combination of single crochet, half double crochet, and double crochet stitches to create repeated scalloped sections along the strip. Once the strip is complete, roll it from one end, keeping the center tight and allowing the outer petals to open slightly. Finally, use a yarn needle to sew the bottom layers together and secure the flower’s shape.
Here is a quick overview:
| Step | Instructions |
|---|---|
| 1 | Make the foundation chain |
| 2 | Crochet the scalloped petal sections |
| 3 | Finish the petal strip |
| 4 | Roll the strip into a spiral |
| 5 | Shape the outer petals |
| 6 | Sew the bottom to secure the rose |
2. What Yarn and Crochet Hook Are Best for Making a Crochet Rose?
Cotton yarn or a cotton-acrylic blend is an excellent choice for crocheting roses. These yarns create well-defined stitches and make it easier to shape the petals. Lightweight yarn is particularly suitable when you want a delicate flower with several overlapping layers.
A 3.0–3.5 mm crochet hook works well with most lightweight yarns.
| Material | Recommendation | Purpose |
|---|---|---|
| Pink cotton yarn | 30–40 g | Rose petals |
| Olive green yarn | 15–25 g | Leaves and sepal |
| Crochet hook | 3.0–3.5 mm | Main crochet work |
| Yarn needle | 1 | Assembling the flower |
| Scissors | 1 pair | Cutting yarn |
For a more realistic appearance, choose dusty pink, blush, or soft rose shades. Use olive or sage green for the leaves to create a natural color combination.
3. How Do You Shape and Roll a Crochet Petal Strip Into a Realistic Rose?
To create a realistic crochet rose, begin rolling the petal strip from one end, keeping the first few petals close together to form a compact center. As you continue wrapping the strip, gradually loosen the outer layers so the petals spread naturally.
Follow these shaping tips:
- Keep the center tightly rolled to create a spiral.
- Allow the middle petals to curve slightly outward.
- Separate the scalloped edges with your fingers.
- Avoid overlapping every petal in exactly the same position.
- Sew through the bottom layers to keep the flower secure.
| Rose Section | Recommended Shaping |
|---|---|
| Center | Tight spiral |
| Inner petals | Slightly curved inward |
| Middle petals | Gently opened |
| Outer petals | Curved outward |
| Bottom | Firmly sewn together |
The most important detail is to keep the center compact while allowing the outer petals to open. This creates the layered appearance associated with a blooming rose.
4. How Do You Crochet and Attach Leaves and a Stem to a Crochet Rose Flower?
To complete your crochet rose, use olive-green yarn to make a small sepal, two decorative leaves, and a stem. The sepal is attached underneath the flower, while the leaves are positioned along the stem to create a more natural appearance.
For the leaves, start with a short foundation chain and work single crochet, half double crochet, and double crochet stitches along the chain to create a pointed oval shape. Repeat along the opposite side if you want a fully shaped leaf.
| Component | Recommended Quantity | Approximate Size |
|---|---|---|
| Green sepal | 1 | 3–4 cm |
| Crochet leaves | 2 | 4–6 cm long |
| Stem | 1 | 12–18 cm long |
| Green yarn | 15–25 g | All green details |
To assemble everything:
- Position the green sepal underneath the pink rose.
- Sew it securely around the bottom of the flower.
- Prepare the stem using green yarn.
- If desired, place craft wire inside the stem for support.
- Wrap the stem with green yarn or floral tape.
- Attach the leaves along the stem.
- Secure all connections and hide the loose yarn ends.
For a decorative flower, a yarn-covered stem works well. If you want the rose to stand upright in a vase, adding a suitable wire support can help maintain its shape.
Conclusion
This Crochet Rose Flower Pattern is a lovely way to create a beautiful handmade flower using a simple petal strip. By following the steps, you can crochet the petals, roll them into a layered rose, and add green leaves and a stem for a realistic finish. Experiment with different yarn colors and adjust the petal shaping to create roses in various sizes. Your finished crochet rose makes a thoughtful handmade gift, a charming home decoration, or a beautiful addition to bouquets and other crochet projects.
