

Crochet Rectangle Beanie Pattern – Easy Ribbed Hat for Beginners is a simple way to make a cozy winter hat using a flat crocheted rectangle. The back-loop-only double crochet stitches create a stretchy ribbed texture, while a neat seam and gathered top turn the rectangle into a comfortable beanie. In this tutorial, you’ll learn how to choose your yarn and hook, measure the rectangle, sew the edges, close the crown, and add a folded cuff for a clean finish.
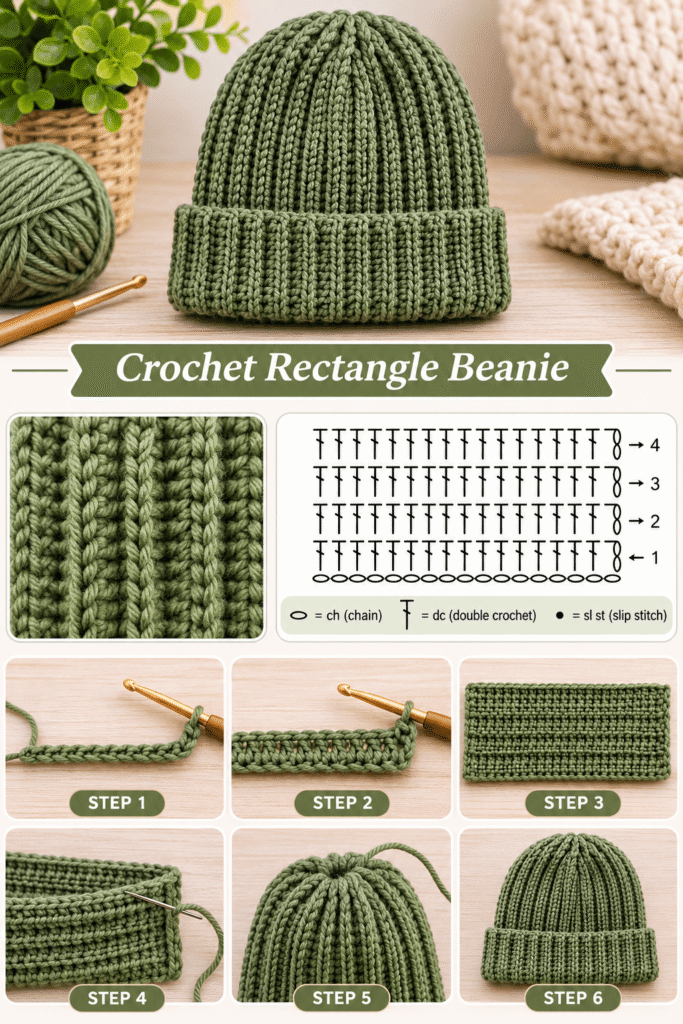
Table of Contents
Why You’ll Love This Crochet Rectangle Beanie Pattern
A Simple Rectangle That Becomes a Cozy Beanie
This Crochet Rectangle Beanie Pattern is a practical project because you don’t need to shape a crown with several rounds of increases and decreases. Instead, you’ll crochet a flat rectangle, fold it in half, sew the short edges together, and gather one end to close the top. As a result, the construction is easy to understand, even if you’re still learning the basics of crocheting.
The main stitch is double crochet worked through the back loop only (BLO). This technique creates raised vertical ribs that give the hat a stretchy texture and a classic handmade look. Plus, the folded cuff adds extra warmth around the forehead and gives the finished beanie a neat shape.
What Makes This Ribbed Rectangle Beanie Special?
There are several reasons to try this easy crochet hat pattern:
- Beginner-friendly construction: You make one rectangle before joining the edges and closing the top.
- Stretchy ribbed texture: Working double crochet stitches in the back loop creates visible ridges and helps the fabric stretch.
- Easy to customize: You can change the yarn color, adjust the rectangle size, or add a pom-pom.
- Comfortable folded cuff: The cuff gives the beanie a classic winter look and adds another layer around the ears.
- Useful handmade gift: A simple ribbed hat makes a thoughtful gift for family and friends.
Finished Beanie Measurements and Size Guide
The reference pattern shows a foundation chain of 50 stitches and provides three hook-size examples. These measurements are useful starting points, but your final size may change depending on your yarn, hook, stitch tension, and number of rows.
| Crochet hook | Flat width shown in the reference | Suggested head circumference |
|---|---|---|
| 5 mm | 24–25 cm (9.4–9.8 in) | 54–58 cm (21.3–22.8 in) |
| 6 mm | 25–26 cm (9.8–10.2 in) | 56–60 cm (22–23.6 in) |
| 6.5 mm | 27–28 cm (10.6–11 in) | 58–62 cm (22.8–24.4 in) |
Important sizing note: The reference gives these figures as a size guide, but it does not clearly explain whether the flat width is measured before or after folding. So, use the measurements as a guide rather than guaranteed finished dimensions. Before sewing, wrap the rectangle gently around the intended head to check the fit. The ribbed fabric should stretch comfortably without feeling too tight.
How Much Yarn Do You Need?
The reference pattern recommends medium-weight yarn but does not specify an exact yarn quantity. For planning purposes, a typical adult rectangle beanie may need approximately 150–250 yards (137–229 meters) of medium-weight yarn. This is an estimate, not a confirmed amount from the reference pattern. A longer hat, a wider fit, a large folded cuff, or a pom-pom may require more yarn.
| Project detail | Suggested amount or choice |
|---|---|
| Yarn weight | Medium-weight yarn (Category 4) |
| Estimated yarn quantity | 150–250 yards (137–229 meters) |
| Hook options shown | 5 mm, 6 mm, or 6.5 mm |
| Foundation chain example | 50 chains |
| Main stitch | Double crochet |
| Ribbing technique | Back Loop Only (BLO) |
| Construction | Flat rectangle, sewn into a tube, with a gathered crown |
For the best result, choose a soft yarn that feels comfortable against the skin. Also, check the yarn label for its recommended hook size. If you’re making a gift, measure the recipient’s head first whenever possible.
Is This Crochet Beanie Suitable for Beginners?
Yes. This project is a good choice if you already know how to make a foundation chain and work basic double crochet stitches. The back-loop-only technique may take a little practice, but it simply means inserting your hook under the back loop of each stitch instead of both loops.
Once you finish the rectangle, the remaining steps are mainly folding, sewing, gathering, and weaving in the loose ends. Therefore, you can focus on learning one main stitch pattern while building confidence with simple finishing techniques.
By the end, you’ll have a warm ribbed beanie made from a simple rectangle. You can keep the design plain for everyday wear or personalize it with your favorite color and an optional pom-pom.
Materials and Tools for a Crochet Rectangle Beanie
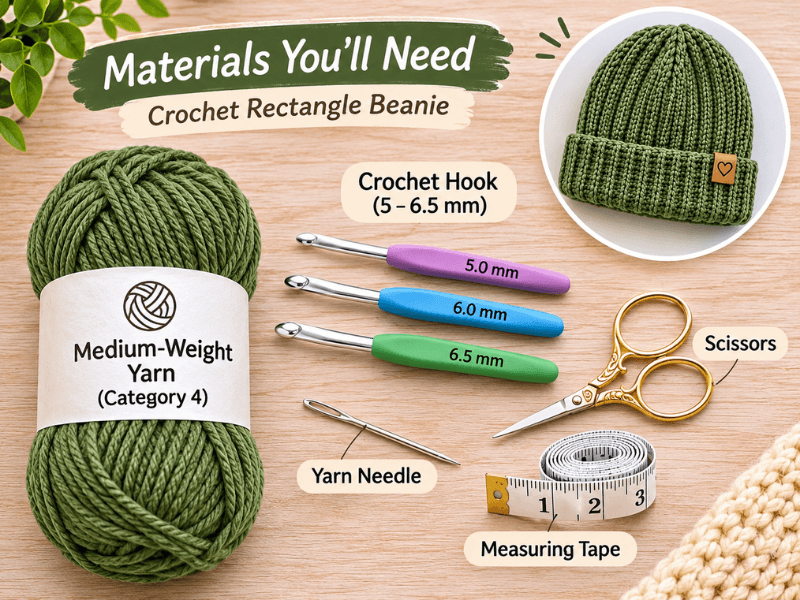
Before starting your Crochet Rectangle Beanie Pattern, prepare your yarn, crochet hook, and a few basic tools. You don’t need a large collection of supplies because this project uses one main stitch and a simple rectangle construction. Choosing the right yarn and hook will help you create a soft, stretchy fabric that is comfortable to wear.
1. Medium-Weight Yarn
The reference pattern uses medium-weight yarn, also known as Category 4 or worsted-weight yarn. This weight is a practical choice for a winter beanie because it creates a fabric with enough thickness to provide warmth without making the hat too heavy.
You can choose from several yarn fibers:
| Yarn type | Main features | Good choice for |
|---|---|---|
| Acrylic | Lightweight, affordable, and easy to care for | Everyday beanies and gifts |
| Wool | Warm, soft, and naturally insulating | Cold-weather hats |
| Wool-acrylic blend | Combines warmth with easier care | Comfortable winter accessories |
| Cotton blend | Breathable with a smooth feel | Lightweight hats for mild weather |
For this project, choose a yarn that feels soft against your forehead and ears. Also, check the yarn label to confirm that it is suitable for a 5–6.5 mm crochet hook.
Estimated yarn quantity: Plan for approximately 150–250 yards (137–229 meters) for a typical adult beanie. This is a general estimate, not an exact quantity supplied by the reference pattern. You may need more yarn if you make a longer hat, a wider rectangle, or a deeper folded cuff.
2. Crochet Hook: 5–6.5 mm
The reference pattern shows three hook-size options:
| Hook size | Flat width shown in the reference | Suggested head circumference |
|---|---|---|
| 5 mm | 24–25 cm | 54–58 cm |
| 6 mm | 25–26 cm | 56–60 cm |
| 6.5 mm | 27–28 cm | 58–62 cm |
A smaller hook generally creates tighter stitches, while a larger hook usually creates a looser fabric. However, your personal tension and yarn thickness also affect the final measurements.
If you’re unsure which hook to use, start with the size recommended on your yarn label. Then crochet a small sample using double crochet in the back loop only. Check whether the fabric feels comfortable and has enough stretch before making the full rectangle.
3. Yarn Needle
A yarn needle is important for joining the rectangle and closing the top of the beanie. After crocheting the main piece, you’ll use it to sew the two short edges together. You’ll also use it to gather the upper edge and weave in the loose yarn ends.
A blunt-tip yarn needle with a large eye is a convenient option because it can pass through crochet stitches without splitting the yarn easily.
4. Scissors
Keep a sharp pair of scissors nearby to cut the yarn after finishing the rectangle and completing the sewing. Small craft scissors are usually enough for this project.
5. Measuring Tape
A measuring tape helps you check the rectangle before sewing it into a tube. Since the number of rows determines how far the fabric stretches around the head, measuring is more reliable than following a fixed row count.
Measure the intended head circumference and compare it with the length of your crocheted rectangle. The ribbed fabric should stretch gently to fit without feeling uncomfortable.
6. Optional Accessories
You can keep your beanie simple or add a few decorative details after finishing the main construction.
| Optional item | How you can use it |
|---|---|
| Stitch markers | Mark the beginning or end of a row if needed |
| Faux fur pom-pom | Add a decorative detail to the crown |
| Handmade yarn pom-pom | Create a matching top decoration |
| Small fabric label | Give the finished beanie a personalized look |
| Extra yarn | Make adjustments or attach a pom-pom |
Materials Checklist
Before you begin, make sure you have the following supplies ready:
- Medium-weight yarn (Category 4)
- 5 mm, 6 mm, or 6.5 mm crochet hook
- Yarn needle
- Scissors
- Measuring tape
- Stitch markers (optional)
- Pom-pom or label (optional)
Once your materials are ready, you can move on to the stitches and abbreviations used in this pattern. Learning how to work double crochet stitches through the back loop only will help you create the raised ribbed texture that gives this rectangle beanie its distinctive look.
Crochet Stitches and Abbreviations
Before making your Crochet Rectangle Beanie Pattern, take a moment to understand the stitches and abbreviations used in the instructions. This design uses one main stitch: double crochet (DC). By working each stitch through the back loop only (BLO), you’ll create the raised vertical ridges that give the beanie its stretchy, ribbed appearance.
The stitch pattern is beginner-friendly because you repeat the same basic technique across each row. Once you understand how to make a double crochet stitch and identify the back loop, the main rectangle becomes easier to work.
Crochet Abbreviations Used in This Pattern
The following abbreviations use standard US crochet terminology:
| Abbreviation | Meaning |
|---|---|
| ch | Chain |
| DC | Double crochet |
| BLO | Back loop only |
| sl st | Slip stitch |
| st(s) | Stitch(es) |
| rep | Repeat |
| FO | Fasten off |
You may not need every abbreviation while crocheting the rectangle, but some are useful during assembly and finishing.
1. Chain (ch)
A chain is the foundation of many crochet projects. To make one, create a slip knot on your hook, yarn over, and pull the yarn through the loop on your hook.
Repeat this movement until you have the required number of chains. The reference pattern uses a foundation chain of 50 as its example.
Try to keep your chains even. If they are too tight, the starting edge may become difficult to work into.
2. Double Crochet (DC)
Double crochet is the main stitch used to create the rectangle.
Follow these basic steps:
- Yarn over your hook.
- Insert the hook into the required stitch.
- Yarn over again and pull up a loop. You should now have three loops on your hook.
- Yarn over and pull through the first two loops.
- Yarn over again and pull through the remaining two loops.
You have completed one double crochet stitch.
Repeat the same movement across the row, following the pattern instructions.
3. Back Loop Only (BLO)
Back loop only is the special technique that creates the ribbed texture of this beanie.
At the top of each crochet stitch, you’ll see two loops that form a small V shape. The loop closest to you is the front loop, while the loop farther away is the back loop.
For BLO stitches, insert your hook under the back loop only instead of going through both loops.
<AsyncImage query=”close up crochet double crochet back loop only BLO stitch showing front loop and back loop yarn tutorial” aspectRatio=”16:9″ width=”100%” />
Working double crochet stitches through the back loop leaves the front loop untouched. This creates horizontal ridges across the fabric. When the rectangle is folded and worn, these ridges appear as vertical ribs on the beanie.
4. Turning Chain
At the end of a row, you’ll turn your work to begin the next row.
The reference pattern uses a chain 2 at the beginning of the next row. It also states that this chain counts as a double crochet stitch.
This means you should follow the pattern’s starting instruction carefully and avoid adding an extra stitch at the row edge. Keeping the edges consistent will make the finished rectangle easier to sew.
5. Fasten Off (FO)
Fastening off secures your work when the rectangle is complete.
Cut the yarn, leaving a tail long enough for sewing if you plan to use it to join the edges. Pull the yarn tail through the final loop on your hook and gently tighten it.
Do not cut the yarn too close to the fabric because you’ll need enough length to secure the end properly.
Understanding the Ribbed Stitch Pattern
The main texture comes from repeating double crochet stitches through the back loop only.
| Pattern element | What to do |
|---|---|
| Foundation | Make the starting chain |
| First row | Work double crochet stitches in the back loop as described in the reference |
| Following rows | Chain 2, then work double crochet stitches in BLO across |
| Texture | Repeat the same stitch technique to build raised ridges |
| Finished fabric | A stretchy rectangle with a ribbed appearance |
A note about the first row: The reference image says to make the first double crochet in the back loop of the third chain from the hook, then continue across. Follow that instruction as shown, but check your stitch placement and finished width as you work because the reference does not provide a complete written stitch-count chart.
Tips for Even Crochet Rows
- Keep your yarn tension consistent from the first row to the last.
- Work into the back loop only for the ribbed texture.
- Count your stitches occasionally to help keep both edges straight.
- Make sure the turning chain is handled consistently.
- Measure the rectangle as you go instead of relying only on a fixed number of rows.
Once you’re comfortable with these stitches, you’re ready to crochet the main rectangle. This is the largest part of the project, and repeating the same BLO double crochet technique will gradually build the soft, ribbed fabric used to form your beanie.
You can find more crochet on my Facebook page and my Pinterest profile.
Crochet Rectangle Beanie Pattern FAQ
If you’re making a rectangle beanie for the first time, you may have questions about the stitches, foundation chain, and sewing process. The answers below explain the main steps and help you get a comfortable fit without making the project more complicated.
1. How do you crochet a rectangle beanie step by step?
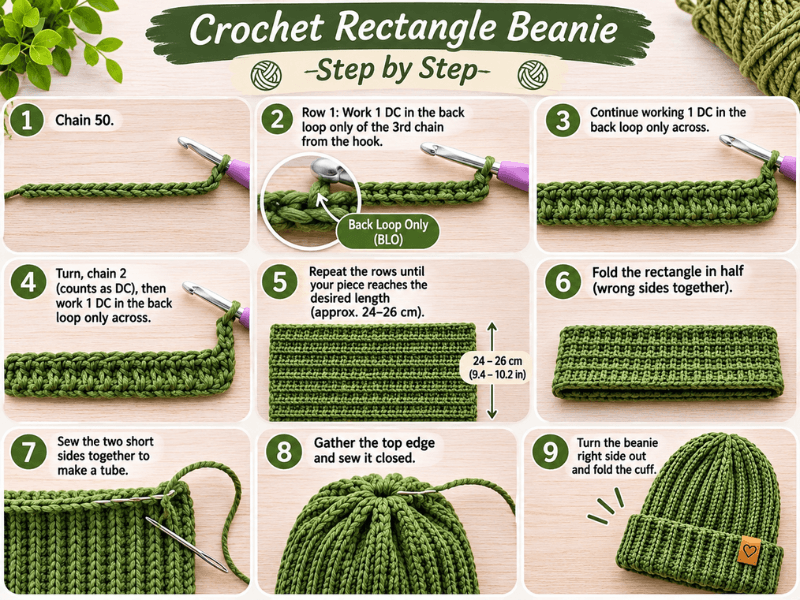
To crochet a rectangle beanie, start by making a flat rectangle using medium-weight yarn and a suitable crochet hook. The reference pattern uses double crochet stitches worked through the back loop only (BLO) to create a stretchy ribbed texture.
Follow these steps:
- Make a foundation chain. The reference pattern uses 50 chains as an example.
- Work the first row of double crochet stitches as described in the pattern.
- Turn your work, make a chain 2, and continue with double crochet stitches in BLO across.
- Repeat the rows until the rectangle reaches the desired size.
- Fasten off, leaving a yarn tail for sewing.
- Fold the rectangle in half and sew the two short edges together using a yarn needle.
- Gather the upper opening and sew it closed.
- Turn the beanie right side out and fold the bottom edge to create a cuff.
| Stage | Main action |
|---|---|
| 1 | Crochet the foundation chain |
| 2 | Work the ribbed rectangle |
| 3 | Check the measurements |
| 4 | Sew the short edges together |
| 5 | Gather and close the top |
| 6 | Turn right side out and fold the cuff |
The most important part is checking the rectangle’s size before sewing. This helps you get a beanie that fits comfortably.
2. What stitch is best for making a crochet rectangle beanie?
Double crochet worked through the back loop only (BLO) is the stitch combination used in this rectangle beanie pattern. It creates a ribbed texture with raised ridges and gives the fabric some stretch.
The back-loop-only technique is simple: instead of inserting your hook under both loops at the top of a stitch, insert it under the back loop only.
| Stitch or technique | Result |
|---|---|
| Double crochet (DC) | Builds the main fabric |
| Back Loop Only (BLO) | Creates raised ribbed rows |
| DC in BLO | Combines fabric height with a stretchy ribbed texture |
This combination is a good choice for a beanie because the finished fabric can stretch gently around the head. It also gives the hat a classic ribbed appearance without requiring a complicated stitch pattern.
3. How do you turn a crochet rectangle into a beanie?
You can turn a flat crochet rectangle into a beanie by joining its short edges to create a tube, then gathering one end to close the crown.
First, lay the rectangle flat and fold it in half so the two short sides meet. Use a yarn needle and a whip stitch to sew those edges together. This creates the main tube of the hat.
Next, thread a long piece of yarn through the stitches along one open edge. Gently pull the yarn to gather the fabric until the opening closes. Secure the gathered section with a few stitches and weave in the remaining yarn ends.
| Step | What to do |
|---|---|
| Fold | Bring the two short edges together |
| Sew | Join the edges with a whip stitch |
| Form a tube | Check that the seam is secure |
| Gather | Pass yarn through the stitches around one opening |
| Close | Pull the yarn gently and sew the opening shut |
| Finish | Turn the beanie right side out and fold the cuff |
Avoid pulling the gathering yarn too quickly or too tightly. Adjust the fabric as you pull so the crown closes evenly and does not form an unnecessarily bulky knot.
4. How many chains do you need for a crochet rectangle beanie?
The reference pattern uses a foundation chain of 50 chains as its starting example. However, the number of chains you need can change depending on your yarn, hook size, crochet tension, and desired hat size.
The reference also provides the following hook-size guide:
| Hook size | Flat width shown | Suggested head circumference |
|---|---|---|
| 5 mm | 24–25 cm | 54–58 cm |
| 6 mm | 25–26 cm | 56–60 cm |
| 6.5 mm | 27–28 cm | 58–62 cm |
To choose the right starting chain, make a sample and measure the rectangle’s height. Compare it with the desired beanie depth, including the folded cuff if you plan to make one.
Remember that the foundation chain determines one dimension of the rectangle, while the number of rows determines the other. Since the reference does not provide a complete sizing formula, use the 50-chain example as a starting point and adjust your work based on your measurements.
Helpful tip: Always measure your rectangle before sewing it into a tube. A little extra checking at this stage can help you avoid a beanie that feels too tight or too loose.
Conclusion
This Crochet Rectangle Beanie Pattern is a simple and practical way to create a cozy ribbed hat using basic crochet techniques. With medium-weight yarn, double crochet stitches worked through the back loop only, and a few easy sewing steps, you can turn a flat rectangle into a comfortable handmade beanie.
Remember to check your measurements before joining the edges, keep your stitches consistent, and gather the top securely for a neat finish. You can also customize your hat with different colors, a deeper folded cuff, or an optional pom-pom.
Whether you’re making one for yourself or as a handmade gift, this easy rectangle beanie is a lovely project to add to your crochet collection.
