
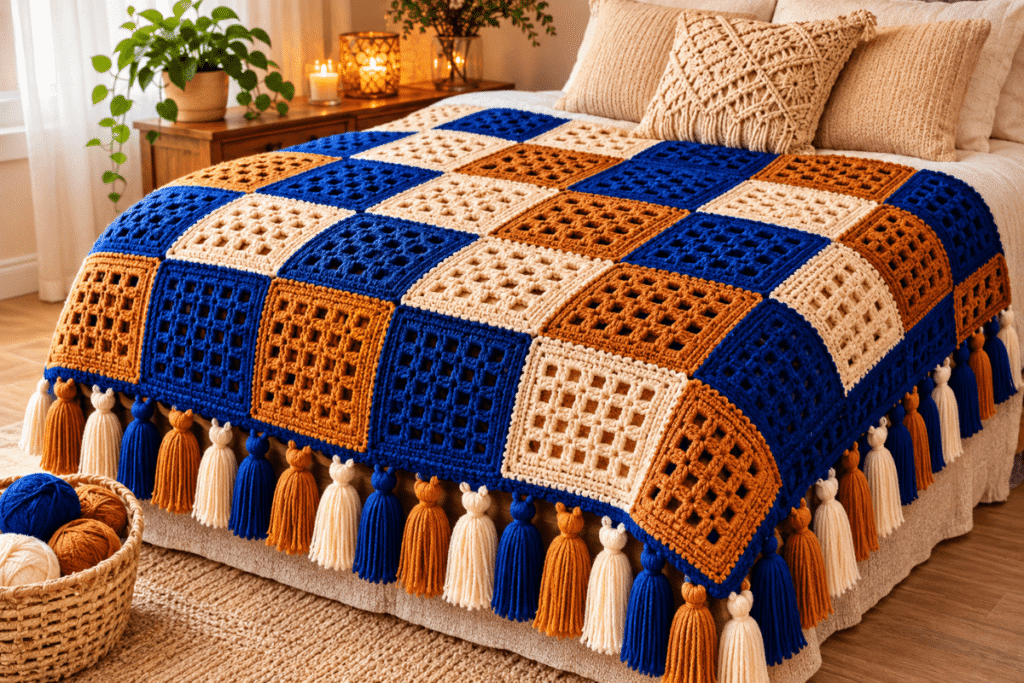
Crochet Granny Square Blanket Free Pattern is a timeless project that lets you turn simple crochet squares into a cozy, colorful blanket. It’s a practical choice for beginners because you can make the squares one at a time, use leftover yarn, and customize the size to suit your needs. In this step-by-step tutorial, you’ll learn how to crochet classic granny squares, choose the right yarn and hook, calculate how many squares you need, and join them neatly. We’ll also cover borders and finishing tips for a polished result.
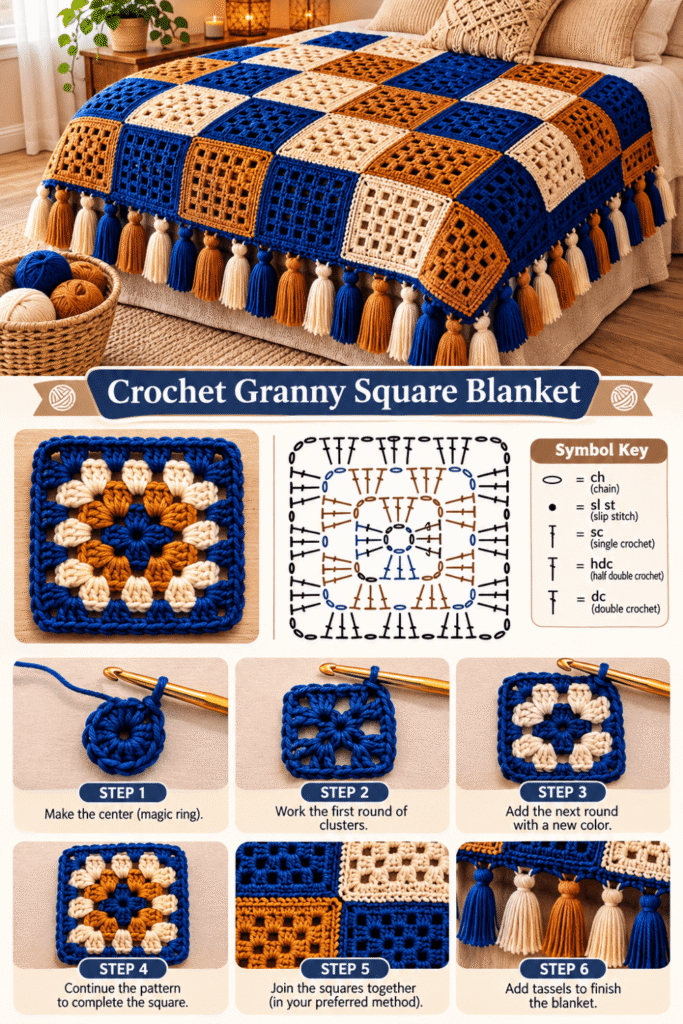
Table of Contents
Materials and Tools for Your Crochet Granny Square Blanket
Before starting your Crochet Granny Square Blanket Free Pattern, it’s important to prepare the right yarn, crochet hook, and basic supplies. Choosing suitable materials will make your granny squares easier to work and help your finished blanket look neat and even.
For this tutorial, we’ll use medium-weight yarn and a 5.0 mm crochet hook to create classic granny squares. The recommended square size is approximately 6 × 6 inches, making it a practical option for a cozy throw blanket. You can also change the colors and overall dimensions to create a blanket that matches your style.
1. Best Yarn for a Granny Square Blanket
Worsted-weight yarn (#4 medium) is an excellent choice for a granny square blanket, especially if you’re a beginner. It’s thick enough to show the crochet stitches clearly, but still flexible enough to create soft, comfortable squares.
You can choose acrylic, cotton, or a blended yarn depending on the look and feel you want.
| Yarn Type | Advantages | Best For |
|---|---|---|
| Acrylic yarn | Soft, affordable, lightweight, and available in many colors | Everyday blankets and beginner projects |
| Cotton yarn | Breathable, durable, and provides clear stitch definition | Lightweight blankets and warmer climates |
| Acrylic-cotton blend | Combines softness, durability, and breathability | Comfortable blankets for regular use |
| Wool blend | Warm, cozy, and suitable for colder weather | Winter blankets and decorative throws |
For this project, I recommend a soft worsted-weight acrylic yarn or an acrylic-cotton blend. Both options are easy to work with and come in a wide range of colors.
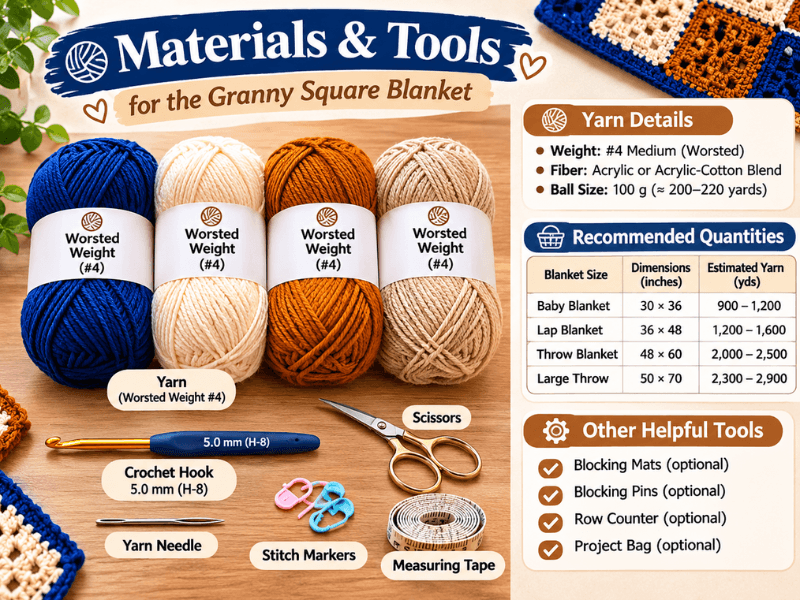
Recommended yarn specifications:
- Yarn weight: #4 Medium / Worsted
- Yarn texture: Smooth and medium thickness
- Recommended fiber: Acrylic or acrylic-cotton blend
- Suggested ball size: 100 g per skein
- Approximate yardage: 200–220 yards per 100 g, depending on the brand
Try to use yarns with similar thickness throughout the blanket. This is especially important when combining several colors because different yarn weights can make some squares larger than others.
2. How Much Yarn Do You Need?
The amount of yarn depends on the blanket size, the number of granny squares, your stitch tension, and whether you use several colors.
For a standard throw blanket measuring approximately 48 × 60 inches, you can start with an estimated total of 2,000–2,500 yards of worsted-weight yarn. This estimate includes the squares, joining, and a simple border, but your actual consumption may vary.
Here is a practical yarn estimate for different blanket sizes:
| Blanket Size | Approximate Dimensions | Estimated Yarn |
|---|---|---|
| Baby Blanket | 30 × 36 inches | 900–1,200 yards |
| Small Lap Blanket | 36 × 48 inches | 1,200–1,600 yards |
| Standard Throw | 48 × 60 inches | 2,000–2,500 yards |
| Large Throw | 50 × 70 inches | 2,300–2,900 yards |
| Twin Blanket | 66 × 90 inches | 3,500–4,500 yards |
| Full Blanket | 80 × 90 inches | 4,500–5,500 yards |
<text>These figures are planning estimates, not exact yarn requirements. Larger squares, thicker stitches, tighter tension, and wider borders can increase the amount needed.</text>
3. Choosing Yarn Colors for Your Granny Square Blanket
One of the best things about a granny square blanket is the freedom to experiment with colors. You can make every square different, repeat a simple color combination, or choose a coordinated palette for a more modern look.
For a balanced blanket, I recommend choosing three to five main colors and one optional joining or border color.
Here are some color combinations to consider:
| Style | Color Combination | Overall Look |
|---|---|---|
| Classic Vintage | Cream, mustard, rust, and brown | Warm and traditional |
| Soft Pastel | Pink, lavender, mint, and cream | Light and delicate |
| Modern Neutral | Beige, ivory, taupe, and gray | Simple and elegant |
| Bright and Colorful | Blue, yellow, orange, pink, and green | Cheerful and playful |
| Farmhouse | Sage green, cream, dusty blue, and tan | Calm and natural |
| Autumn Inspired | Burnt orange, burgundy, mustard, and brown | Cozy and seasonal |
Before crocheting all your squares, arrange a few yarn colors together to see how they look. This small step can help you avoid choosing colors that don’t work well together.
4. Recommended Crochet Hook Size
For medium-weight #4 yarn, a 5.0 mm (H-8) crochet hook is a good starting point. It creates granny squares with clear stitch definition while keeping the fabric reasonably soft.
However, your personal crochet tension can affect the finished size. If you crochet tightly, a 5.5 mm hook may help. If your stitches are naturally loose, try a 4.5 mm hook instead.
| Hook Size | Letter Size | When to Use It |
|---|---|---|
| 4.5 mm | 7 | If you crochet loosely |
| 5.0 mm | H-8 | Recommended starting size |
| 5.5 mm | I-9 | If you crochet tightly |
The most important thing is to keep your hook size consistent throughout the project. Otherwise, your granny squares may have slightly different dimensions, making them harder to join neatly.
5. Complete Materials and Tools Checklist
Besides yarn and a crochet hook, you’ll need a few basic tools to make your blanket. Most are inexpensive and can be reused for future crochet projects.
| Material or Tool | Recommended Quantity | Purpose |
|---|---|---|
| Worsted-weight yarn (#4) | 2,000–2,500 yards for a standard throw | Making the granny squares |
| 5.0 mm crochet hook | 1 | Working the crochet stitches |
| Yarn needle | 1 | Joining squares and weaving in loose ends |
| Scissors | 1 pair | Cutting yarn |
| Stitch markers | 4–6 | Marking corners or important stitches |
| Measuring tape | 1 | Checking square and blanket dimensions |
| Blocking mats | Optional | Keeping squares evenly shaped |
| Rust-resistant blocking pins | Optional | Securing squares during blocking |
| Row counter | Optional | Tracking repeated rounds |
| Project bag | 1 | Keeping yarn and squares organized |
A blunt-tip yarn needle is particularly useful when joining granny squares. It allows you to sew the pieces together without splitting the yarn.
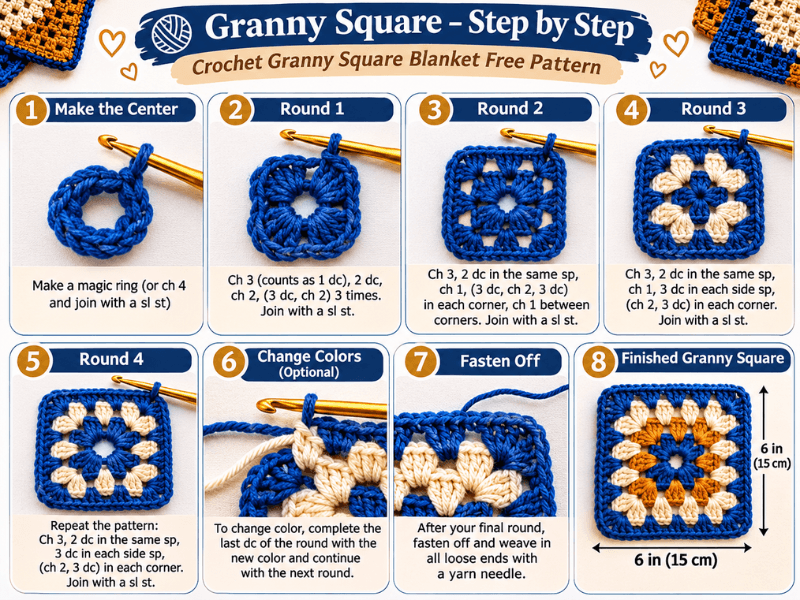
6. Finished Granny Square and Blanket Measurements
For this tutorial, we’ll aim for individual granny squares measuring approximately 6 × 6 inches after finishing. This size is easy to handle, simple to arrange, and works well for a standard throw blanket.
The following measurements provide a useful starting point:
| Project Part | Approximate Measurement |
|---|---|
| One granny square | 6 × 6 inches |
| Standard throw width | 48 inches |
| Standard throw length | 60 inches |
| Number of squares across | 8 |
| Number of squares down | 10 |
| Total granny squares | 80 |
| Finished blanket size | 48 × 60 inches |
These measurements assume that each square remains approximately 6 inches wide and that the joining seams do not significantly change the overall dimensions. You may need to adjust your square size slightly to reach your preferred finished measurements.
7. How Many Granny Squares Should You Make?
The number of squares depends on the dimensions of your finished blanket and the size of each individual square.
For example, if each granny square measures 6 × 6 inches, an arrangement of 8 squares across and 10 squares down will give you 80 squares.
Here’s a simple planning table:
| Blanket Size | Squares Across | Squares Down | Total Squares |
|---|---|---|---|
| Baby Blanket | 5 | 6 | 30 |
| Small Lap Blanket | 6 | 8 | 48 |
| Standard Throw | 8 | 10 | 80 |
| Large Throw | 9 | 12 | 108 |
| Twin Blanket | 11 | 15 | 165 |
| Full Blanket | 14 | 15 | 210 |
For example, a baby blanket with 30 squares measuring 6 inches each would have an approximate finished size of 30 × 36 inches before adding a border.
You don’t have to make all the squares at once. Instead, work on a few at a time and arrange them on a flat surface to check the colors and overall layout.
8. Preparing Your Materials Before Starting
Once you’ve gathered everything, take a few minutes to organize your workspace. Having your yarn colors, hook, and tools nearby will make the project easier to manage.
Here are some useful preparation tips:
- Check your yarn: Make sure your skeins have similar thickness and texture.
- Prepare your colors: Separate the yarn by color so you can easily find what you need.
- Test your hook: Crochet a small sample to check whether your stitches feel comfortable.
- Measure your first square: Make sure it is close to the recommended 6 × 6 inches.
- Keep extra yarn: Buy a little more than your estimated amount to avoid running out before finishing.
- Organize completed squares: Store finished pieces in a clean project bag to prevent them from getting tangled or dirty.
9. Make a Gauge Square Before Starting the Blanket
A gauge square helps you understand how your yarn and hook work together. Since every crocheter has a slightly different tension, making a sample before producing dozens of squares can save time and prevent sizing problems.
For this project, crochet one complete granny square using your chosen yarn and 5.0 mm hook. Then, lay it flat and measure its width and height.
| Measurement | Target |
|---|---|
| Square width | Approximately 6 inches |
| Square height | Approximately 6 inches |
| Shape | Even and square |
| Corners | Clearly defined |
| Fabric texture | Flexible, not too tight or too loose |
If your square is smaller than expected, try a larger hook. If it’s too large, use a smaller hook. Make another sample until you get a size close to your target.
Once your yarn, hook, and other supplies are ready, you can move on to the crochet techniques used in this project. In the next part, we’ll explain the basic stitches, granny stitch clusters, and pattern abbreviations you’ll need to make your granny squares with confidence.
Crochet Stitches and Abbreviations for a Granny Square Blanket
Before starting your Crochet Granny Square Blanket Free Pattern, it’s helpful to understand the basic crochet stitches and abbreviations used in the instructions. The classic granny square is made mainly with double crochet clusters and chain spaces, which create the familiar open, decorative pattern.
The good news is that you don’t need advanced crochet skills to make this blanket. Once you understand the basic stitches and how to work into the corners and spaces, you’ll be able to follow the pattern more easily.
1. Crochet Abbreviations Used in This Pattern
Crochet patterns often use abbreviations to make instructions shorter and easier to follow. This tutorial uses standard US crochet terminology, so make sure you follow the US stitch names.
| Abbreviation | Full Name | Meaning |
|---|---|---|
| ch | Chain | A basic stitch used to create chains and spaces |
| sl st | Slip Stitch | Used to join rounds or move between stitches |
| sc | Single Crochet | A short stitch that creates a compact fabric |
| hdc | Half Double Crochet | A medium-height crochet stitch |
| dc | Double Crochet | A tall stitch commonly used in granny squares |
| st | Stitch | One individual crochet stitch |
| sts | Stitches | More than one stitch |
| sp | Space | An opening between stitches or clusters |
| ch-sp | Chain Space | An opening created by chain stitches |
| rnd | Round | One complete circular row |
| rep | Repeat | Work the same instructions again |
| sk | Skip | Leave a stitch or space unworked |
| FO | Fasten Off | Secure and cut the yarn when finishing |
For this classic granny square blanket, the most important abbreviations are ch, sl st, dc, and ch-sp. You’ll see these repeatedly when working through the rounds.
2. How to Make a Chain Stitch (ch)
The chain stitch is one of the first techniques to learn. It creates a foundation for crochet projects and forms the chain spaces used throughout a granny square.
Step-by-step instructions:
- Make a slip knot and place it on your crochet hook.
- Hold the working yarn comfortably with your other hand.
- Yarn over by wrapping the yarn over your hook.
- Pull the yarn through the loop already on your hook.
- Repeat until you have the required number of chains.
Each completed loop pulled through counts as one chain stitch. Try to keep your chains even rather than pulling them too tightly.
3. How to Make a Slip Stitch (sl st)
A slip stitch is a small stitch used to join crochet work. In a granny square, it’s especially useful for joining the beginning and end of a round.
Step-by-step instructions:
- Insert your hook into the indicated stitch or chain space.
- Yarn over.
- Pull the yarn through the stitch and directly through the loop on your hook.
You have now completed one slip stitch.
Keep the tension relaxed because a tight slip stitch can make the center of your granny square look too small or pull the corners out of shape.
4. How to Make a Double Crochet Stitch (dc)
The double crochet stitch is the main stitch used to create traditional granny square clusters. It produces a taller stitch with small openings between the groups, giving the blanket its classic texture.
Step-by-step instructions:
- Yarn over your hook.
- Insert the hook into the indicated stitch or space.
- Yarn over again and pull up a loop. You should have three loops on your hook.
- Yarn over and pull through the first two loops.
- Yarn over once more and pull through the remaining two loops.
You have completed one double crochet stitch.
Practice a few stitches until they have a similar height. Consistent double crochet stitches will help your granny squares look more even.
5. Understanding Granny Stitch Clusters
A granny cluster is a group of three double crochet stitches worked into the same space. These groups form the main decorative pattern of a classic granny square.
Instead of placing every double crochet into a separate stitch, you work three double crochets into one opening. Then, chain stitches create spaces between the clusters.
How to make one granny cluster:
- Yarn over and make one double crochet into the selected space.
- Make a second double crochet into the same space.
- Make a third double crochet into that same space.
You now have one complete granny cluster.
| Cluster Component | Number of Stitches |
|---|---|
| First double crochet | 1 dc |
| Second double crochet | 1 dc |
| Third double crochet | 1 dc |
| Total | 3 dc |
The three stitches should sit together as a small group. Avoid making them too tight because the spaces between clusters are part of the traditional granny square design.
6. Understanding Chain Spaces and Corners
Chain spaces are the openings created by working chain stitches between granny clusters. These openings provide the spaces where you’ll work additional clusters in the following rounds.
The corner spaces are especially important because they help the granny square grow evenly. In a traditional granny square, each corner is shaped by working groups of double crochet stitches separated by chain stitches.
Here’s a simple reference table:
| Element | Purpose |
|---|---|
| Granny cluster | Creates the main textured pattern |
| Chain space | Separates clusters and provides room for new stitches |
| Corner space | Allows the square to increase at each corner |
| Side space | Provides room for additional clusters along the sides |
As the square grows, you’ll work additional clusters along the sides and maintain the corner spaces. This creates the familiar square shape instead of a circular piece.
7. What Is the Difference Between a Stitch and a Space?
This is an important detail for beginners. A stitch is the actual crochet stitch you create with your hook, while a space is an opening between stitches or groups of stitches.
For example, when a pattern says to work three double crochets into the next chain space, you should insert your hook into the opening rather than into the top loops of an individual stitch.
| Pattern Instruction | Where to Insert Your Hook |
|---|---|
| Work into the next stitch | Under the top loops of that stitch |
| Work into the chain space | Into the opening made by chain stitches |
| Work into the corner space | Into the larger opening at a corner |
| Work into the beginning chain | Into the specified chain loop |
Learning this difference will make the granny square instructions much easier to understand.
8. How to Read a Granny Square Crochet Pattern
A crochet pattern is usually written round by round. Each round explains which stitches to make, where to place them, and how to finish before moving to the next round.
For example, a common instruction might look like this:
3 dc, ch 2, 3 dc in the same corner space
This means you should work three double crochet stitches into the corner space, make two chain stitches, and then work another three double crochet stitches into that same space.
Here are a few other examples:
| Pattern Instruction | What It Means |
|---|---|
| 3 dc in ch-sp | Work three double crochet stitches into the chain space |
| ch 2 | Make two chain stitches |
| sl st to join | Use a slip stitch to close the round |
| Rep around | Repeat the same instructions around the square |
| FO | Fasten off and secure the yarn |
Always read the complete round before starting it. This helps you understand where the corners are and how the clusters should be arranged.
9. Beginner Tips for Even Granny Squares
Even though granny squares use simple stitches, a few small mistakes can affect their shape. Therefore, it’s worth developing good habits from the beginning.
- Keep your tension consistent: Try to make each double crochet stitch approximately the same height.
- Count your clusters: Make sure you don’t accidentally skip a group.
- Check your corners: Work the required stitches into each corner space.
- Don’t pull chain stitches too tightly: Chain spaces need enough room for the next round.
- Use a stitch marker: Mark the beginning of each round if you find it difficult to keep track.
- Check the square regularly: Lay your work flat to see whether the sides are growing evenly.
- Practice before making multiple squares: One practice square can help you identify tension or counting problems early.
10. Practice the Basic Stitches Before Starting
If you’re new to crochet, take a few minutes to practice chain stitches, slip stitches, and double crochet clusters before making your first granny square.
You can use a small amount of leftover yarn to create a sample. Practice working three double crochets into the same space, then make chain stitches before starting another cluster.
Once you feel comfortable with these movements, you’ll find the actual blanket pattern much easier to follow.
Now that you understand the stitches, abbreviations, and granny cluster structure, you’re ready to make your first square. In the next part, we’ll explain how to crochet a classic granny square step by step, starting with the center and working outward to create the four corners.
You can find more crochet on my Facebook page and my Pinterest profile.
Frequently Asked Questions About Crochet Granny Square Blankets
If you’re planning to make your first granny square blanket, you may have questions about the crochet process, yarn choices, square measurements, and joining techniques. These answers will help you understand the basics and make your Crochet Granny Square Blanket Free Pattern easier to follow.
1. How Do You Crochet a Granny Square Blanket Step by Step?
To crochet a granny square blanket, you first make individual granny squares, then arrange and join them to create the finished blanket. The classic granny square uses groups of three double crochet stitches separated by chain spaces.
Follow these steps to get started:
| Step | What to Do | Helpful Tip |
|---|---|---|
| 1 | Gather your yarn, crochet hook, scissors, and yarn needle. | Choose yarns with similar thickness. |
| 2 | Create the center of your granny square using a magic ring or chain ring. | Keep the center loose enough for your stitches. |
| 3 | Crochet the first round of double crochet clusters. | Count your clusters to maintain an even pattern. |
| 4 | Work additional rounds, adding clusters along the sides and corners. | Make sure each corner has the correct chain space. |
| 5 | Repeat until you have enough squares for your blanket. | Measure each square to keep them consistent. |
| 6 | Arrange the squares in your preferred color pattern. | Lay them flat before joining. |
| 7 | Join the squares and add a border. | Keep your seams and edges even. |
Finally, weave in the loose ends and gently block your blanket if needed. This will help the squares sit neatly and give your finished project a polished appearance.
2. What Is the Best Yarn and Hook Size for a Granny Square Blanket?
Worsted-weight yarn (#4 medium) is an excellent choice for a granny square blanket because it’s easy to handle, widely available, and creates clearly defined stitches.
A 5.0 mm (H-8) crochet hook is a good starting point for this yarn weight. However, your personal tension may require a slightly smaller or larger hook.
| Material | Recommendation | Why It Works |
|---|---|---|
| Yarn weight | Medium #4 / Worsted | Easy to handle and suitable for blankets |
| Yarn fiber | Acrylic or acrylic-cotton blend | Soft, practical, and available in many colors |
| Crochet hook | 5.0 mm (H-8) | A good starting size for worsted yarn |
| Yarn needle | Blunt-tip needle | Helps join squares and hide loose ends |
| Scissors | Small sharp scissors | Makes clean yarn cuts |
Cotton yarn is another good option if you prefer a breathable blanket with clear stitch definition. For a softer, warmer result, acrylic yarn is a practical choice.
Always make a sample square before starting the full blanket. This helps you check the size and adjust your hook if necessary.
3. How Many Granny Squares Do You Need to Make a Blanket?
The number of granny squares depends on the finished blanket size and the dimensions of each square. Smaller squares require more pieces, while larger squares need fewer.
For example, if each granny square measures approximately 6 × 6 inches, you can use the following layout as a guide:
| Blanket Type | Approximate Size | Squares Across | Squares Down | Total Squares |
|---|---|---|---|---|
| Baby Blanket | 30 × 36 inches | 5 | 6 | 30 |
| Lap Blanket | 36 × 48 inches | 6 | 8 | 48 |
| Standard Throw | 48 × 60 inches | 8 | 10 | 80 |
| Large Throw | 54 × 72 inches | 9 | 12 | 108 |
| Twin Blanket | 66 × 90 inches | 11 | 15 | 165 |
| Full Blanket | 84 × 90 inches | 14 | 15 | 210 |
These measurements are approximate and assume that each square is 6 inches wide and tall before joining and adding a border.
To calculate the number of squares for your own project, divide the desired blanket width by the square width, then divide the desired blanket length by the square length. Multiply the two results to find the total number of squares.
For example:
- Blanket width: 48 inches ÷ 6 inches = 8 squares.
- Blanket length: 60 inches ÷ 6 inches = 10 squares.
- Total: 8 × 10 = 80 granny squares.
This simple calculation makes it easier to plan your yarn, colors, and overall blanket layout before you begin.
4. How Do You Join Crochet Granny Squares Together to Make a Blanket?
There are several ways to join crochet granny squares. The best method depends on the finish you prefer. Some techniques create visible decorative seams, while others produce a flatter and more subtle connection.
Here are four popular joining methods:
| Joining Method | How It Works | Finished Look |
|---|---|---|
| Slip Stitch Join | Connects squares using slip stitches along their edges | Slightly raised seam |
| Single Crochet Join | Joins edges with single crochet stitches | Textured, decorative seam |
| Whip Stitch Join | Uses a yarn needle to sew the square edges together | Neat and relatively flat seam |
| Join As You Go | Connects each new square while crocheting its final round | Fewer separate joining steps |
Slip Stitch Join: Place two squares with their edges together and work slip stitches through the corresponding edge loops. This creates a visible seam without adding too much bulk.
Single Crochet Join: Use your crochet hook to work single crochet stitches along the edges of two squares. This method creates a slightly raised border between the pieces.
Whip Stitch Join: Place the squares side by side and use a yarn needle to sew their edges together. Keep the stitches evenly spaced for a clean finish.
Join As You Go: Instead of making all the squares separately and joining them later, connect each new square to the previous ones during its final round. This method can save time on larger blankets.
For beginners, the whip stitch and single crochet join are good options to practice. Whichever method you choose, keep the joining tension consistent so the blanket stays flat.
5. Can Beginners Make a Granny Square Blanket?
Yes! A granny square blanket is a suitable project for beginners who know how to make chain stitches, slip stitches, and double crochet stitches.
You can start with one small square, practice the repeating rounds, and then make more squares as you become comfortable. Working on individual pieces also makes the project easier to manage because you don’t have to carry the entire blanket while crocheting.
6. How Do You Keep Granny Squares the Same Size?
The easiest way to keep your squares consistent is to use the same yarn weight, crochet hook, and stitch tension throughout the project.
Measure your first completed square and use it as a reference for the others. If a square looks noticeably larger or smaller, check your tension before making more.
Blocking can also help correct small differences in shape and make the edges easier to join.
7. Should You Block Granny Squares Before Joining Them?
Blocking is optional, but it can make a noticeable difference in the finished blanket. It helps straighten uneven edges, define the corners, and make squares more consistent in size.
If your yarn is suitable for wet blocking, gently dampen the squares, shape them to the correct measurements, and allow them to dry completely. Always follow the yarn manufacturer’s care instructions before applying water or heat.
8. How Do You Stop a Granny Square Blanket from Curling or Becoming Uneven?
Uneven tension, incorrect corner stitches, and inconsistent square sizes can cause a blanket to curl or lose its shape.
To avoid these problems:
- Check that each corner contains the correct stitches and chain spaces.
- Avoid pulling your chain stitches too tightly.
- Keep your double crochet stitches at a consistent height.
- Measure your squares regularly.
- Block the squares if necessary before joining.
- Use a simple border to give the outside edges a neat finish.
If your blanket starts to become wavy, check the stitch count and tension before continuing.
9. Can You Use Different Colors in a Granny Square Blanket?
Absolutely! Granny squares are perfect for using multiple yarn colors. You can change colors after each round, create a different combination for every square, or use one main color throughout the blanket.
For a coordinated look, choose three to five complementary colors and repeat them in a planned arrangement. Alternatively, use leftover yarn to create a colorful scrap-yarn blanket.
10. How Much Time Does It Take to Crochet a Granny Square Blanket?
The time depends on the blanket size, the number of squares, your crochet experience, and how much time you can spend working each day.
A small baby blanket may take considerably less time than a large throw or bed blanket. Joining, weaving in ends, and adding a border also contribute to the total project time.
Working on a few squares each day is a practical way to make steady progress without feeling overwhelmed.
Conclusion: Make Your Own Cozy Crochet Granny Square Blanket
This Crochet Granny Square Blanket Free Pattern is a wonderful project for creating a cozy, handmade blanket one square at a time. With basic crochet stitches, worsted-weight yarn, and a little patience, you can make a beautiful blanket in almost any size or color combination.
Whether you’re making a baby blanket, a comfortable couch throw, or a larger bed blanket, granny squares give you plenty of room to customize your design. You can experiment with different colors, practice new crochet techniques, and use leftover yarn to create something truly unique.
Once your squares are ready, join them together, add your favorite border, and weave in the remaining ends for a neat finish. Most importantly, take your time and enjoy the process. Grab your crochet hook, choose your favorite yarn colors, and start making your own granny square blanket!
