

Crochet Flower Mandala Pattern – Easy DIY Tutorial is a lovely project for creating a colorful, floral decoration with layered petals and a delicate scalloped edge. Using cotton yarn in shades of dusty pink, cream, and sage green, you can make a beautiful mandala that works as a decorative coaster or a handmade accent for your home. This beginner-friendly guide explains the materials you need, how to crochet each round, and how to change colors neatly. Follow the step-by-step instructions to create an even, well-shaped mandala with a polished finish.
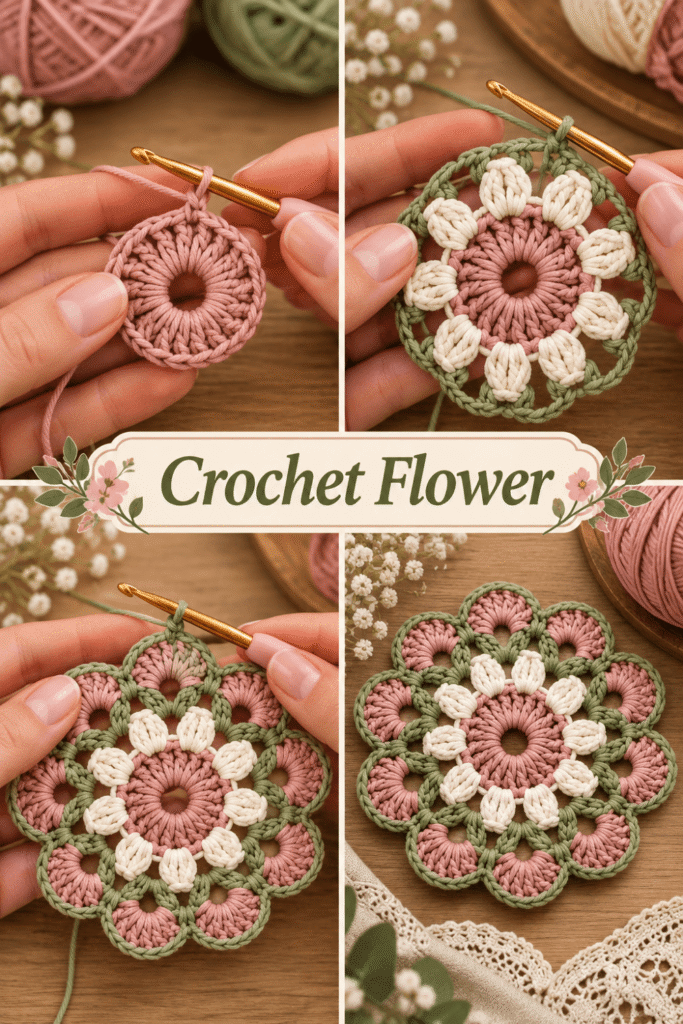
Table of Contents
Materials and Preparation
Before starting your Crochet Flower Mandala Pattern, prepare your yarn, crochet hook, and basic tools. This design combines a dusty pink center, cream flower petals, and sage green details to create a decorative floral mandala with a scalloped edge. Cotton yarn is a practical choice because it provides clear stitch definition and helps the finished piece hold its shape. With the right materials and a little preparation, you can create a neat mandala suitable for a coaster, table decoration, or handmade gift.
1. Materials Needed
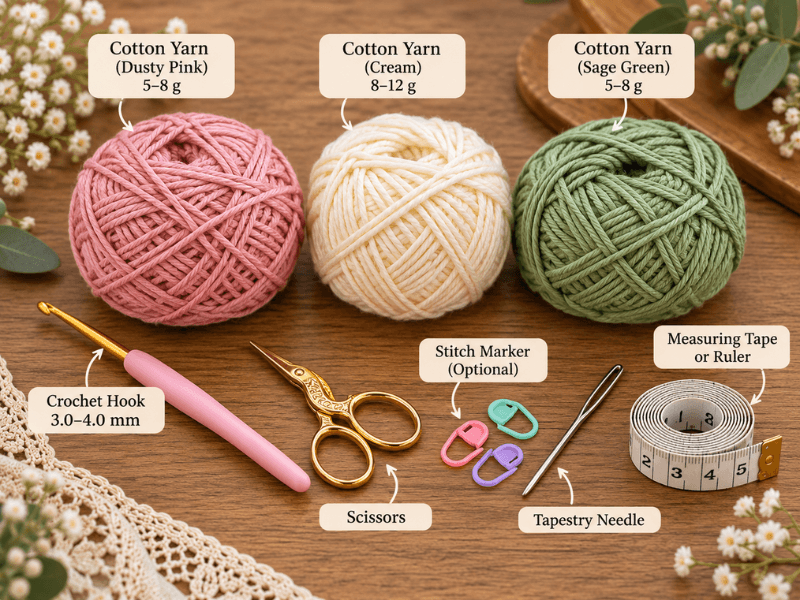
You do not need many supplies to make a crochet flower mandala. Most of the materials are basic crochet tools, and the small size of the project means you can use leftover yarn from other projects.
| Material | Recommended Type or Size | Purpose |
|---|---|---|
| Main yarn | Medium-weight cotton yarn, such as Category 2 or 3 | Creates the flower center and main structure |
| Petal yarn | Cream or ivory cotton yarn | Forms the flower petals |
| Accent yarn | Sage green cotton yarn | Adds decorative stitches between the petals |
| Crochet hook | 3.0–4.0 mm, depending on yarn | Creates compact, even stitches |
| Scissors | Small, sharp scissors | Cuts yarn neatly |
| Tapestry needle | Blunt needle suitable for yarn | Weaves in loose ends |
| Stitch marker | Optional removable marker | Marks the beginning of each round |
| Measuring tape or ruler | Standard measuring tool | Checks the finished diameter |
| Blocking pins and mat | Optional | Helps shape the finished mandala |
| Fabric stiffener | Optional, suitable for cotton yarn | Adds firmness if the mandala will be used decoratively |
Beginner tip: Start with three coordinating colors and a hook recommended on your yarn label. If your stitches are naturally loose, a slightly smaller hook may help you achieve a flatter, more defined mandala.
2. Choosing the Best Yarn
Cotton yarn is a good option for flower mandalas because it creates clear stitches and is suitable for projects that need a relatively stable shape. It is especially useful if you plan to use the finished piece as a coaster or table accent.
| Yarn Type | Advantages | Best Use |
|---|---|---|
| 100% cotton | Good stitch definition and a firm finish | Coasters and decorative mandalas |
| Mercerized cotton | Smooth texture and subtle sheen | Decorative floral designs |
| Cotton blend | Can provide softness and flexibility | Home accents and handmade gifts |
| Acrylic yarn | Affordable and available in many colors | Decorative pieces that do not need high heat resistance |
For a mandala inspired by the reference design, choose dusty pink, cream, and sage green cotton yarn. These colors create a soft, balanced appearance while making the individual floral layers easy to distinguish.
If the mandala will be used as a hot-pan trivet, check the yarn manufacturer’s heat-resistance guidance. Cotton is generally more suitable than acrylic for this purpose, but a crocheted mandala should not automatically be considered a heat-safe trivet.
3. Recommended Crochet Hook Size
The hook size affects the texture, flexibility, and final dimensions of your mandala. A smaller hook usually produces tighter stitches, while a larger hook creates a more open fabric.
| Yarn Weight | Suggested Hook Size | Expected Result |
|---|---|---|
| Lightweight cotton, Category 2 | 2.5–3.5 mm | Fine, delicate stitches |
| Light-medium cotton, Category 3 | 3.0–4.0 mm | Defined petals and a balanced fabric |
| Medium cotton, Category 4 | 3.5–4.5 mm | Fuller stitches and a slightly larger mandala |
These sizes are starting points rather than strict rules. Always check the yarn label and make a small sample if you are unsure.
For the floral design described in this guide, a 3.5 mm crochet hook with Category 3 cotton yarn is a useful starting combination. Adjust the hook if the stitches are too tight or the mandala begins to curl.
4. Finished Measurements and Sizing
A flower mandala can be made in different sizes depending on how many rounds you add and how tightly you crochet. For a beginner-friendly project, aim for a finished diameter of approximately 12–15 cm (4.7–5.9 inches).
| Project Size | Approximate Diameter | Suggested Use |
|---|---|---|
| Mini mandala | 8–10 cm (3.1–3.9 inches) | Small decorative accent |
| Standard mandala | 12–15 cm (4.7–5.9 inches) | Decorative coaster or table accent |
| Large mandala | 16–20 cm (6.3–7.9 inches) | Table decoration or wall accent |
The dimensions are approximate and will vary with yarn thickness, hook size, stitch tension, and the number of rounds.
To increase the size, add extra rounds using a stitch pattern that keeps the mandala flat. Simply adding stitches without considering the shape may cause the edges to ripple excessively or the center to cup.
5. How Much Yarn Do You Need?
A small flower mandala requires only a modest amount of yarn. The following estimates are intended for a single mandala measuring approximately 12–15 cm (4.7–5.9 inches) across, made with lightweight or light-medium cotton yarn.
| Color | Estimated Yarn per Mandala | Main Use |
|---|---|---|
| Dusty pink | 5–8 g | Center |
| Cream or ivory | 8–12 g | Flower petals |
| Sage green | 5–8 g | Connecting stitches and outer details |
| Total | 18–28 g | Complete mandala |
These quantities are estimates, not exact requirements. A larger mandala, fuller petals, or additional decorative rounds will use more yarn.
Estimated Yarn for Multiple Mandalas
| Number of Mandalas | Estimated Total Yarn |
|---|---|
| 1 | 18–28 g |
| 3 | 54–84 g |
| 5 | 90–140 g |
| 10 | 180–280 g |
If you are making several matching mandalas, prepare a little extra yarn in each color so you can finish all the pieces consistently. Small variations in tension can also affect how much yarn each mandala uses.
6. Understanding the Basic Crochet Stitches
This project uses common crochet stitches to form the center, petals, connecting details, and outer edge. The instructions use US crochet terminology.
| Abbreviation | Stitch Name | How It Is Used |
|---|---|---|
| ch | Chain | Creates starting loops and spaces |
| sl st | Slip stitch | Joins rounds and moves across stitches |
| sc | Single crochet | Forms compact stitches |
| hdc | Half double crochet | Adds medium-height stitches |
| dc | Double crochet | Creates taller stitches and fuller petals |
| tr | Treble crochet | Can add height to decorative petals |
| st | Stitch | Refers to one crochet stitch |
| sts | Stitches | Refers to multiple stitches |
| sp | Space | Refers to a gap created by chains or stitches |
| MR | Magic ring | Creates an adjustable center loop |
You do not need to memorize every abbreviation before starting. Keep the table nearby and refer to it as you work through each round.
7. Preparing the Three-Color Design
The dusty pink, cream, and sage green combination gives the mandala its layered floral appearance. Each color has a specific role, so preparing the yarn in advance makes color changes easier.
| Design Section | Yarn Color | Purpose |
|---|---|---|
| Center | Dusty pink | Creates the focal point |
| Petals | Cream or ivory | Forms the main floral shape |
| Connecting details | Sage green | Separates and frames the petals |
| Outer edge | Sage green or cream | Creates a clean, decorative finish |
You can change the palette to match your home decor or personal preference. For example, lavender and white create a softer floral look, while yellow and cream produce a brighter design.
When changing colors, complete the final yarn-over of the last stitch in the old color with the new color if the pattern calls for a clean transition. Leave enough yarn at each change to weave in the ends securely.
8. Before You Begin
A little preparation helps the mandala remain flat and symmetrical.
- Check your yarn: Make sure the yarn is smooth and free of knots.
- Choose the hook: Begin with the recommended size and adjust if necessary.
- Prepare each color: Keep the pink, cream, and green yarn within easy reach.
- Use a stitch marker: Mark the first stitch of each round when working in continuous rounds.
- Count your stitches: Follow the stitch counts carefully, especially when making increases.
- Check the shape regularly: Lay the work flat after each round to see whether the edges are curling or ruffling.
- Prepare a finishing needle: You will need it to weave in the yarn tails after the final round.
Once everything is ready, you can begin crocheting the center and building the floral layers. Working with consistent tension and checking the shape as you go will help you create a neat, balanced flower mandala.
Step-by-Step Crochet Flower Mandala Pattern
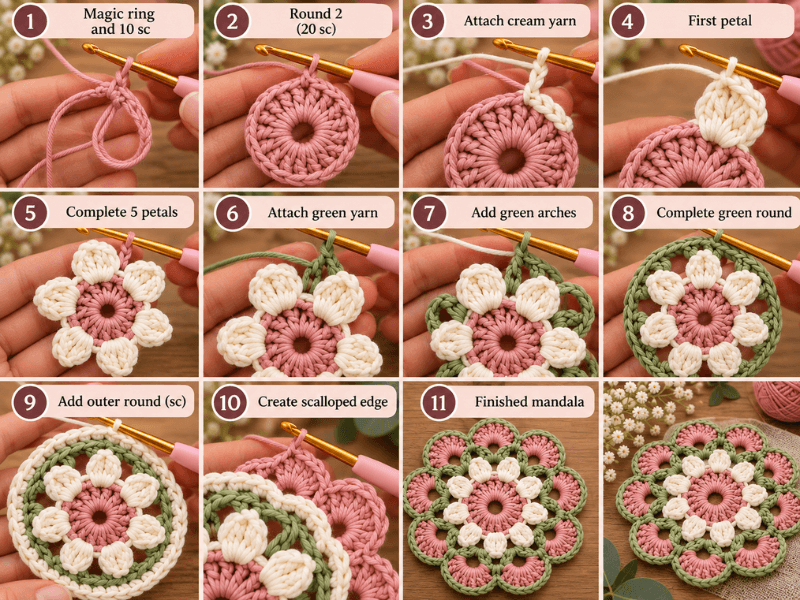
Now that your materials are ready, it is time to crochet your flower mandala. This beginner-friendly pattern uses dusty pink for the center, cream for the flower petals, and sage green for the decorative details. The stitches are worked in rounds to create a flat, circular design with a beautiful floral appearance.
For the best results, use consistent tension and count your stitches at the end of each round. The instructions below use US crochet terminology.
Step 1: Create the Center Circle
Start with your dusty pink cotton yarn. The center circle forms the foundation of your mandala, so it is important to keep it neat and even.
Round 1: Make the magic ring
- Create a magic ring with your dusty pink yarn.
- Chain 1 to secure the starting point. This chain does not count as a stitch.
- Work 10 single crochet stitches (sc) into the ring.
- Pull the yarn tail to close the center hole.
- Join with a slip stitch (sl st) into the first single crochet.
Stitch count: 10 sc
Round 2: Increase the circle
- Chain 1.
- Work 2 single crochet stitches into each stitch around.
- Join with a slip stitch into the first single crochet.
Stitch count: 20 sc
Your center should now look like a small, flat pink circle. If it begins to curl into a bowl, check your tension and make sure the stitches are not too tight.
Step 2: Crochet the Cream Flower Petals
The cream petals create the main floral effect. You will make five rounded petals around the pink center.
- Finish Round 2 and fasten off the dusty pink yarn.
- Attach the cream yarn to the first stitch of the pink circle.
- Chain 1. This chain does not count as a stitch.
- Repeat the following sequence five times around the circle:
- Slip stitch in each of the next 3 stitches.
- In the next stitch, work (sl st, ch 2, 3 dc, ch 2, sl st) to form one rounded petal.
- After completing all five petals, fasten off the cream yarn and weave in the end.
Stitch count: Each petal uses 4 stitches from the pink base, so five petals use all 20 stitches.
The chain spaces on each side of the double crochet stitches help create a rounded petal shape. If your petals look too tight, try using a slightly looser tension rather than pulling the yarn firmly after every stitch.
Step 3: Add the Sage Green Details
Sage green adds contrast between the cream petals and gives the flower a more natural, botanical appearance.
- Turn your work so you can see the spaces between the cream petals.
- Attach the sage green yarn to a visible space between two petals, near the pink center.
- Chain 1.
- Work 1 single crochet into the space between the petals.
- Chain 3, then work 1 single crochet into the next space between petals.
- Repeat around the flower, creating a small chain arch between each pair of petals.
- Join with a slip stitch to the first single crochet and fasten off.
You should now have five small green arches around the flower. These arches provide a decorative transition between the petals and the outer edge.
Helpful tip: If the green arches pull the flower inward, loosen your chain stitches or use a slightly larger hook for this round.
Step 4: Create a Stable Outer Round
The outer round helps the mandala keep its circular shape and gives you a base for a decorative border.
- Attach the cream yarn to one of the green chain arches.
- Chain 1.
- Work 3 single crochet stitches into the first chain arch.
- Work 3 single crochet stitches into each remaining chain arch.
- Join with a slip stitch to the first single crochet.
With five arches, this round gives you 15 single crochet stitches.
At this stage, your flower mandala should have a pink center, five cream petals, green arches, and a small outer round. Lay it on a flat surface to check its shape before continuing.
Step 5: Crochet the Scalloped Border
A scalloped border gives the mandala a soft, decorative finish. For this round, use the cream yarn or choose another color that complements your design.
- Attach the yarn to any stitch on the outer round.
- Chain 1.
- Repeat the following sequence around:
- Slip stitch in the next stitch.
- In the following stitch, work (1 sc, 3 dc, 1 sc) into the same stitch to create a small scallop.
- Slip stitch in the next stitch.
- Continue around the circle, adjusting the spacing slightly if needed to finish neatly.
- Join with a slip stitch and fasten off.
Because the previous round contains 15 stitches, this border can form five evenly spaced scallops when you repeat the sequence across groups of three stitches.
If the edge looks wavy, check that each scallop contains the correct number of stitches. If it pulls inward, loosen your tension or consider using a slightly larger hook for the border.
Step 6: Weave in the Ends and Shape the Mandala
Finishing makes a noticeable difference to the appearance of your crochet flower mandala.
- Thread each yarn tail onto a tapestry needle.
- Weave the tails through several stitches on the back of the work.
- Change direction once or twice to help secure each end.
- Trim excess yarn without cutting into the stitches.
- Gently spread the petals and scallops with your fingers.
- Lay the mandala flat and adjust the outer edge until the circle looks even.
If necessary, lightly block the finished piece according to the yarn label. For cotton yarn, gentle shaping on a flat surface is often sufficient.
Crochet Flower Mandala: Round-by-Round Overview
| Round | Yarn Color | Main Stitches | Purpose |
|---|---|---|---|
| 1 | Dusty pink | 10 sc in a magic ring | Creates the center |
| 2 | Dusty pink | 2 sc in each stitch | Enlarges the center |
| 3 | Cream | Slip stitches, chains, and dc | Forms five flower petals |
| 4 | Sage green | sc and chain arches | Adds decorative details |
| 5 | Cream | 3 sc in each chain arch | Creates a stable outer round |
| 6 | Cream or chosen accent | sc, dc, and slip stitches | Forms the scalloped border |
Tips for a Neat, Flat Flower Mandala
- Count your stitches: Accurate stitch counts help keep the flower balanced.
- Keep your tension consistent: Very tight stitches can make the center curl, while loose stitches can create gaps.
- Check the shape after every round: Lay the work flat before continuing.
- Hide yarn tails carefully: Weave them into the back of the work so the front stays clean.
- Choose cotton yarn for definition: Cotton helps the petals and scallops maintain their shape.
- Adjust the hook if necessary: If your stitches feel difficult to work, try a hook 0.5 mm larger.
Important sizing note: This example creates a small floral mandala. Its finished diameter will depend on your yarn, hook, and tension, so it may be smaller than the 12–15 cm standard size mentioned in the materials section. To make a larger mandala, add evenly spaced increase rounds before creating the petals and border, or use a thicker yarn and a suitable hook.
You can find more crochet on my Facebook page and my Pinterest profile.
Frequently Asked Questions About Crochet Flower Mandala Patterns
1. How do you crochet a flower mandala for beginners?
To crochet a flower mandala for beginners, start with a small magic ring and work single crochet stitches to create a flat center. Increase the stitches evenly in the next round, then crochet decorative petals around the center. Add a contrasting color for the leaves or arches and finish with a simple scalloped border. Cotton yarn and a 3.5 mm crochet hook are a good starting combination for this project.
2. What materials do you need to make a crochet flower mandala?
You need cotton yarn, a suitable crochet hook, scissors, and a tapestry needle to weave in the yarn ends. A stitch marker and ruler are also helpful for keeping track of your rounds and checking the finished size.
| Material | Recommended Choice | Purpose |
|---|---|---|
| Yarn | Category 2 or 3 cotton yarn | Creates defined stitches and petals |
| Crochet hook | 3.0–4.0 mm | Helps control stitch size and tension |
| Scissors | Small, sharp scissors | Cuts yarn neatly |
| Tapestry needle | Blunt-tipped needle | Hides yarn tails |
| Stitch marker | Removable marker | Marks the beginning of a round |
| Ruler or measuring tape | Standard measuring tool | Checks the finished diameter |
For a floral design inspired by this pattern, use dusty pink for the center, cream for the petals, and sage green for the decorative details.
3. How do you change colors when crocheting a flower mandala?
The easiest way to change colors is to finish the current round, fasten off the yarn, and attach the new color where the next round begins. For a cleaner transition, insert your hook into the joining stitch, yarn over with the new color, and pull it through to complete the slip stitch.
Keep the yarn tails on the back of the mandala and weave them in with a tapestry needle when the project is finished. Avoid pulling the new yarn too tightly, as this can make the center or outer edge curl.
For this pattern, use dusty pink for the center, cream for the petals, and sage green for the decorative arches. This combination creates a soft floral appearance without making the design look too busy.
4. What can you make with a crochet flower mandala besides a coaster?
A crochet flower mandala can be used in many creative ways beyond a traditional coaster. Its circular shape and decorative petals make it suitable for home décor, accessories, and handmade gifts.
Here are some ideas:
- Wall decoration: Attach a finished mandala to a small embroidery hoop and display it on a wall.
- Table centerpiece: Make several matching mandalas to decorate a dining table or coffee table.
- Garland: Join several small mandalas together to create a decorative garland.
- Bag decoration: Sew a small mandala onto a crochet tote bag or fabric pouch.
- Gift embellishment: Use a finished flower mandala to decorate a handmade gift.
- Appliqué: Attach the mandala to a blanket, cushion cover, or other crochet project.
- Layered floral décor: Combine mandalas in different sizes and colors for a textured decorative arrangement.
Choose the yarn and finishing method according to how you plan to use the mandala. For everyday accessories, secure the yarn ends carefully and avoid bulky embellishments that could snag.
Conclusion
This Crochet Flower Mandala Pattern – Easy DIY Tutorial is a lovely way to create a handmade floral decoration using simple crochet stitches and beautiful color combinations. With a dusty pink center, cream petals, sage green details, and a delicate scalloped border, you can make a charming mandala that adds a cozy, personal touch to your home.
By following the step-by-step instructions, you can practice working in rounds, changing yarn colors, and creating decorative petals. You can also customize your mandala with different yarn shades, experiment with larger sizes, or use your finished piece to decorate bags, cushions, table settings, and handmade gifts.
Remember to keep your stitches even, check the shape after each round, and weave in your yarn ends carefully for a neat finish. Even small adjustments to your yarn, hook size, and color choices can give your mandala a completely different look.
Gather your favorite cotton yarn and crochet hook, and enjoy creating your own beautiful flower mandala. This simple project is a wonderful opportunity to explore your creativity and make something unique, one stitch at a time.

1 thought on “Crochet Flower Mandala Pattern: Easy DIY Tutorial”