
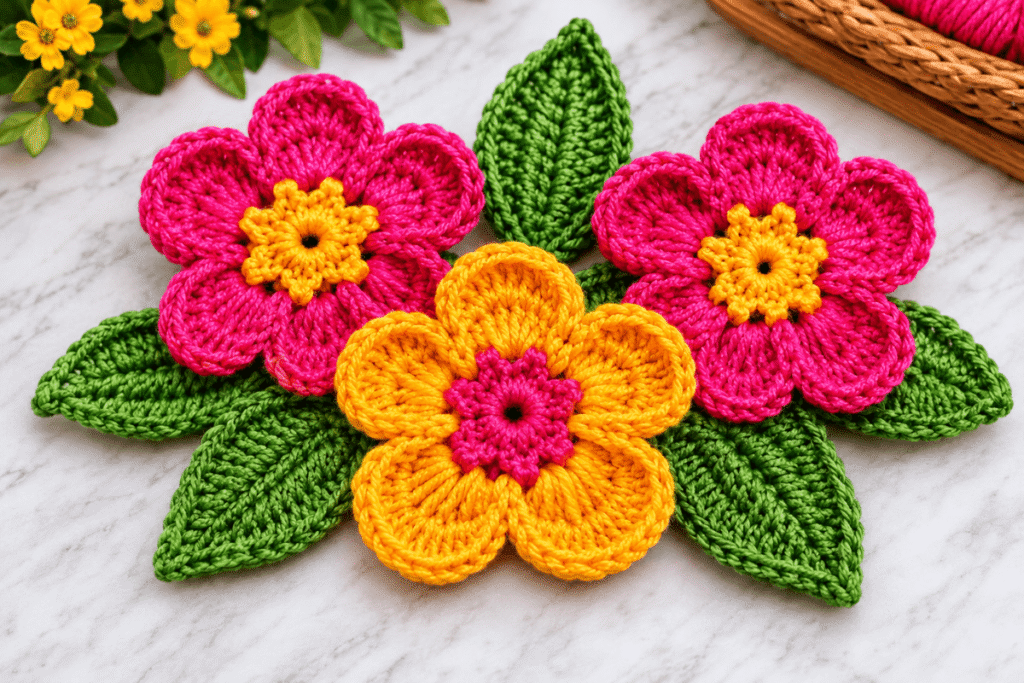
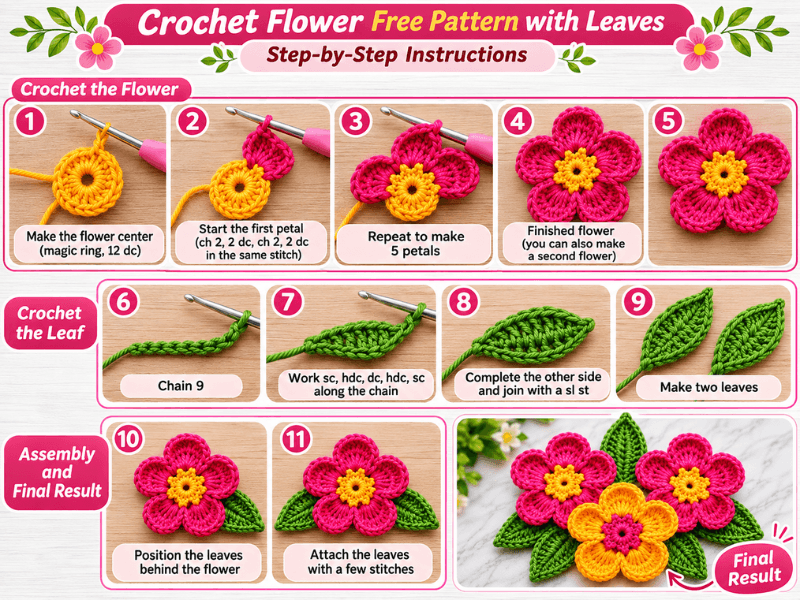
Crochet Flower Free Pattern with Leaves is a lovely beginner-friendly project that combines simple flower petals with delicate green leaves to create a beautiful handmade decoration. It’s a great way to use leftover yarn and experiment with different color combinations. In this step-by-step tutorial, you’ll learn how to crochet the flower, shape the leaves, and assemble all the pieces using basic stitches. With a crochet hook, a small amount of yarn, and easy-to-follow instructions, you can create charming flowers for gifts, accessories, and home decor.
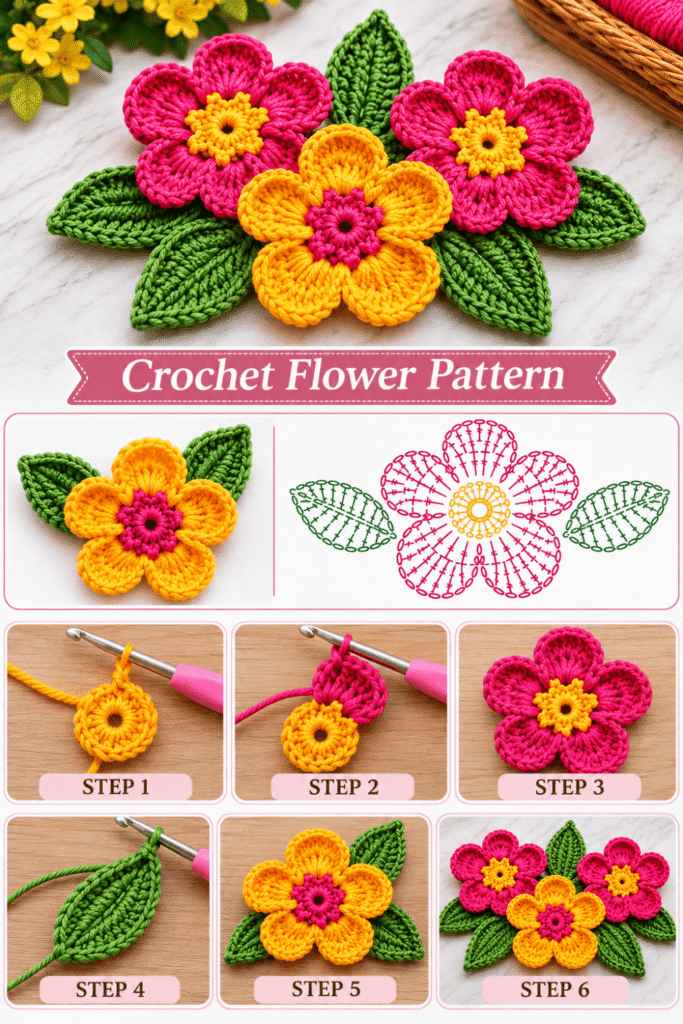
Table of Contents
Materials and Tools for Your Crochet Flower Free Pattern with Leaves
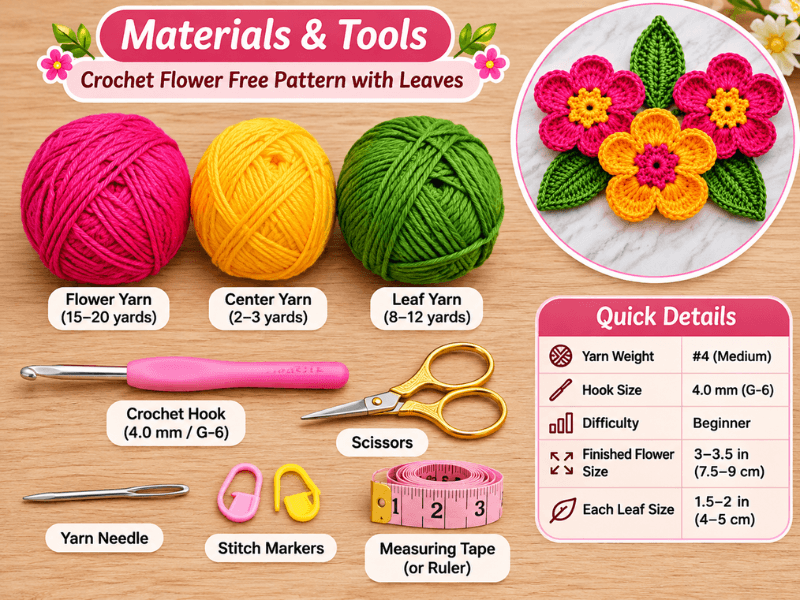
Before starting your Crochet Flower Free Pattern with Leaves, let’s prepare all the materials you’ll need. This project is beginner-friendly and uses a small amount of yarn, making it a lovely way to use leftover yarn from other crochet projects. You’ll crochet a five-petal flower with two green leaves, then join the pieces to create a pretty floral motif.
For the best results, I recommend using medium-weight yarn and a crochet hook that gives you neat, even stitches. However, you can also choose different colors to match your personal style.
1. Yarn Requirements and Recommended Yarn Type
The yarn you choose will affect the flower’s texture, shape, and final size. For this pattern, medium-weight cotton yarn is a great option because it holds its shape well and gives the petals and leaves a clean, defined look.
You can also use acrylic yarn if that’s what you have at home. Just keep in mind that softer yarn may make the petals look a little less firm.
| Yarn Type | Recommended Weight | Best Use |
|---|---|---|
| Cotton yarn | Medium weight (#4) | Crisp petals and well-shaped leaves |
| Acrylic yarn | Medium weight (#4) | Soft, colorful flowers |
| Cotton-acrylic blend | Medium weight (#4) | A balance of softness and structure |
For one flower with two leaves, prepare approximately 25–35 yards of yarn in total. The exact amount may vary depending on your tension, hook size, and the thickness of your yarn.
Suggested yarn quantities:
| Color | Approximate Amount | Purpose |
|---|---|---|
| Main flower color | 15–20 yards | Five flower petals |
| Yellow or contrasting color | 2–3 yards | Flower center |
| Green yarn | 8–12 yards | Two leaves and joining |
| Total | 25–35 yards | One complete flower motif |
You don’t need to buy full skeins for this project. Small leftover yarn pieces are usually enough, especially if you’re making several flowers in different colors.
2. Crochet Hook Size
A 4.0 mm (G/6) crochet hook is a good starting point when working with medium-weight #4 yarn. It creates stitches that are firm enough to help the flower keep its shape without making the fabric too stiff.
However, crochet tension varies from person to person. If your stitches are very tight, try a 4.5 mm hook. On the other hand, if your stitches are loose and the petals look floppy, a 3.5 mm hook may give you better control.
| Hook Size | When to Use It | Expected Result |
|---|---|---|
| 3.5 mm (E/4) | If you crochet loosely | Smaller, firmer stitches |
| 4.0 mm (G/6) | Recommended starting size | Balanced flower shape |
| 4.5 mm (7) | If you crochet tightly | Slightly larger, softer stitches |
Try to keep your tension consistent throughout the project. This will help the five petals look similar in size and make the two leaves easier to attach.
3. Complete Materials and Supplies Checklist
Besides yarn and a crochet hook, you’ll need a few basic tools to finish your crochet flower neatly. Most of these supplies are already part of a beginner’s crochet kit.
| Material or Tool | Quantity | Purpose |
|---|---|---|
| Main-color yarn | 15–20 yards | Creating the flower petals |
| Yellow or contrasting yarn | 2–3 yards | Making the flower center |
| Green yarn | 8–12 yards | Crocheting two leaves |
| 4.0 mm crochet hook | 1 | Working the crochet stitches |
| Yarn needle | 1 | Hiding yarn ends and joining pieces |
| Scissors | 1 pair | Cutting yarn |
| Stitch marker | 1–2 | Marking the beginning of a round |
| Measuring tape or ruler | 1 | Checking the finished dimensions |
| Blocking pins | Optional | Shaping the petals and leaves |
A yarn needle with a blunt tip is especially useful because it helps you weave in the loose ends without splitting the yarn. Meanwhile, a stitch marker can help you keep track of the beginning of each round, particularly when working in the flower center.
4. Finished Size and Measurements
With medium-weight #4 yarn and a 4.0 mm crochet hook, your finished flower should measure approximately 3–3.5 inches (7.5–9 cm) across. Each leaf will measure around 1.5–2 inches (4–5 cm) long.
These measurements are estimates rather than strict requirements. Your final size may change depending on your yarn, hook, and personal crochet tension.
| Part of the Project | Approximate Measurement |
|---|---|
| Complete flower width | 3–3.5 inches (7.5–9 cm) |
| Flower center | 0.5–0.75 inch (1.25–2 cm) |
| Individual petal length | 1–1.25 inches (2.5–3 cm) |
| Each leaf length | 1.5–2 inches (4–5 cm) |
| Each leaf width | 0.5–0.75 inch (1.25–2 cm) |
If you’d like a larger flower, you can use thicker yarn and a larger hook. For a smaller decorative flower, choose lighter-weight yarn and a smaller hook instead.
5. Choosing the Best Colors for Your Crochet Flower
One of the nicest things about this Crochet Flower Free Pattern with Leaves is that you can customize it with almost any color combination. A classic combination is a pink or white flower with a yellow center and green leaves. Still, you can experiment with brighter shades or soft pastel colors.
Here are a few color ideas to inspire your project:
| Color Combination | Flower Color | Center Color | Leaf Color |
|---|---|---|---|
| Classic Garden | Pink | Yellow | Leaf green |
| Soft Pastel | Lavender | Cream | Sage green |
| Bright Spring | White | Golden yellow | Fresh green |
| Romantic Style | Red | Cream | Dark green |
| Natural Look | Cream | Brown | Olive green |
For a more realistic flower, choose a natural shade for the petals and a slightly darker green for the leaves. Alternatively, use contrasting colors if you want your handmade flower to stand out.
6. Before You Start Crocheting
Before moving on to the actual pattern, take a moment to prepare your yarn and workspace. First, separate the yarn colors so they’re easy to reach. Next, check that your crochet hook works comfortably with your chosen yarn.
It’s also a good idea to make sure your scissors and yarn needle are nearby. That way, you won’t need to stop halfway through your project to look for supplies.
Keep these simple tips in mind:
- Use the same yarn weight for the petals and leaves whenever possible.
- Choose a hook that creates neat stitches without stretching the yarn.
- Avoid pulling the yarn too tightly when making the flower center.
- Leave enough yarn at the end of each piece for joining and weaving in.
- Check the size of your petals as you work so they remain consistent.
Once everything is ready, you’re all set to begin. In the next part, we’ll go through the basic crochet stitches and explain the abbreviations used in the Crochet Flower Free Pattern with Leaves, so you can follow the instructions with confidence.
Crochet Stitches and Abbreviations for Your Flower with Leaves
Before making your flower and leaves, it’s helpful to understand the basic crochet stitches used throughout this project. The good news is that this Crochet Flower Free Pattern with Leaves uses beginner-friendly stitches that are easy to learn and practice.
Even if you’re new to crocheting, don’t worry! Once you understand the abbreviations and how each stitch works, you’ll find it much easier to follow the pattern instructions. In addition, knowing these stitches will help you create neat petals and well-shaped leaves.
1. Crochet Pattern Abbreviations
Most crochet patterns use short abbreviations to keep the instructions clear and easy to read. This pattern follows common US crochet terminology, so make sure you use the US stitch names when following the instructions.
Here’s a quick reference table:
| Abbreviation | Stitch Name | Description |
|---|---|---|
| ch | Chain | A basic stitch used to create a starting chain |
| sl st | Slip Stitch | Used to join stitches or move across a row |
| sc | Single Crochet | A short, compact stitch |
| hdc | Half Double Crochet | A stitch slightly taller than single crochet |
| dc | Double Crochet | A taller stitch that helps create petal height |
| tr | Treble Crochet | A tall stitch that can create longer petal shapes |
| st | Stitch | Refers to one individual stitch |
| sts | Stitches | Refers to more than one stitch |
| rep | Repeat | Work the same instructions again |
| rnd | Round | A circular row of stitches |
| sk | Skip | Leave a stitch unworked |
| FO | Fasten Off | Secure the yarn when finishing a piece |
Keep this table nearby while crocheting. That way, you can quickly check any abbreviation you don’t remember.
2. How to Make a Chain Stitch (ch)
The chain stitch is one of the first techniques you’ll learn in crochet. It creates a foundation for many projects and can also be used when forming small decorative details.
How to crochet a chain stitch:
- Make a slip knot and place it on your crochet hook.
- Hold the working yarn comfortably in your other hand.
- Wrap the yarn over the hook from back to front.
- Pull the yarn through the loop already on your hook.
- Repeat these steps until you have the required number of chains.
Try to keep each chain approximately the same size. If you make them too tight, it may become difficult to insert your hook into them later.
3. How to Make a Slip Stitch (sl st)
A slip stitch is a small stitch that helps join crochet pieces or move from one point to another without adding much height. It’s particularly useful when working in rounds.
Steps:
- Insert your hook into the indicated stitch.
- Wrap the yarn over your hook.
- Pull the yarn through the stitch and directly through the loop on your hook.
That’s it! A slip stitch is quick and simple. However, avoid pulling it too tightly because doing so can make your work difficult to continue.
4. How to Make a Single Crochet (sc)
The single crochet stitch creates a firm, compact fabric. It’s useful for small crochet details and can help give leaves a neat outline.
Steps:
- Insert your hook into the next stitch.
- Yarn over and pull up a loop. You should now have two loops on your hook.
- Yarn over again.
- Pull through both loops.
You have completed one single crochet stitch.
For consistent results, keep your tension even and avoid making the stitches too loose. This will help your crochet pieces look tidy.
5. How to Make a Half Double Crochet (hdc)
The half double crochet is taller than a single crochet but shorter than a double crochet. It adds a little more height while keeping a relatively compact texture.
Steps:
- Yarn over before inserting your hook.
- Insert the hook into the indicated stitch.
- Yarn over and pull up a loop. You should have three loops on your hook.
- Yarn over once more.
- Pull through all three loops.
This stitch is useful when you want a smooth transition between shorter and taller stitches.
6. How to Make a Double Crochet (dc)
The double crochet stitch is taller and more open than a single crochet. It’s a popular choice for flower petals because it creates extra height and helps give decorative shapes more volume.
Steps:
- Yarn over your hook.
- Insert the hook into the indicated stitch.
- Yarn over and pull up a loop. You should have three loops on your hook.
- Yarn over and pull through the first two loops.
- Yarn over again and pull through the remaining two loops.
You now have one completed double crochet stitch.
As you practice, make sure the height of your stitches stays consistent. This is especially helpful when making several petals that should look similar.
7. How to Make a Treble Crochet (tr)
The treble crochet stitch is taller than a double crochet. It can be used to create elongated shapes and decorative details.
Steps:
- Yarn over your hook twice.
- Insert the hook into the indicated stitch.
- Yarn over and pull up a loop. You should have four loops on your hook.
- Yarn over and pull through the first two loops.
- Yarn over again and pull through the next two loops.
- Yarn over once more and pull through the final two loops.
Although this stitch may look a little complicated at first, it’s easy to master with practice.
8. Which Crochet Stitches Are Used for Flowers and Leaves?
Different stitches create different textures and shapes. For example, taller stitches can help form rounded or elongated flower petals, while shorter stitches are useful for compact details and neat edges.
Here’s a quick comparison of the stitches and their possible uses in floral crochet projects:
| Crochet Stitch | Height | Common Use in Flower Projects |
|---|---|---|
| Chain (ch) | Very short | Starting chains and small spaces |
| Slip stitch (sl st) | Very short | Joining rounds and finishing |
| Single crochet (sc) | Short | Compact details and leaf edges |
| Half double crochet (hdc) | Medium | Rounded shapes and gradual height |
| Double crochet (dc) | Tall | Flower petals and decorative shapes |
| Treble crochet (tr) | Very tall | Longer or more pointed shapes |
You don’t need to memorize everything immediately. Instead, practice each stitch a few times until you feel comfortable with the movement.
9. Beginner Tips for Neat Crochet Stitches
A few simple habits can make a big difference in the final appearance of your flower. In particular, consistent tension helps keep the petals even and makes the leaves easier to shape.
- Keep your tension consistent: Avoid pulling the yarn too tightly or leaving large loops.
- Count your stitches: Counting helps prevent accidental increases or skipped stitches.
- Use a stitch marker: Mark the beginning of a round when working in a circle.
- Practice before starting: Make a few sample stitches if you’re unfamiliar with a technique.
- Use good lighting: Clear lighting makes it easier to see where to insert your hook.
- Check your work as you go: Compare each petal with the previous one to keep their sizes similar.
Now that you know the basic stitches and abbreviations, you’re ready to move on to the flower itself. In the next part, we’ll start crocheting the flower center and creating the petals, step by step.
You can find more crochet on my Facebook page and my Pinterest profile.
Frequently Asked Questions About Crochet Flowers with Leaves
If you’re planning to make your first crochet flower, you may have a few questions about the stitches, yarn, and different ways to use your finished project. Below, you’ll find helpful answers to common questions about this Crochet Flower Free Pattern with Leaves.
1. How Do You Crochet a Flower with Leaves Step by Step?
To crochet a flower with leaves, you’ll make the flower and leaves separately before joining them together. The process is simple and can be completed with basic crochet skills.
Follow these general steps:
| Step | What to Do | Helpful Tip |
|---|---|---|
| 1 | Gather your yarn, crochet hook, scissors, and yarn needle. | Choose colors that complement each other. |
| 2 | Crochet the flower center. | Keep your stitches even to create a neat center. |
| 3 | Make the flower petals around the center. | Repeat the same stitch pattern for every petal. |
| 4 | Crochet two green leaves. | Use consistent tension so both leaves look balanced. |
| 5 | Attach the leaves to the flower. | Arrange them before sewing to find the best position. |
| 6 | Weave in the loose yarn ends. | Use a yarn needle for a clean finish. |
Once all the pieces are joined, gently adjust the petals and leaves with your fingers. This helps give your handmade flower a balanced, natural appearance.
2. What Crochet Stitches Are Used to Make Flowers and Leaves?
Most crochet flowers and leaves can be made using a combination of basic stitches. The exact stitches depend on the shape and texture you want to create.
For this project, the main stitches include chain, slip stitch, single crochet, half double crochet, double crochet, and treble crochet.
| Crochet Stitch | Abbreviation | How It Helps |
|---|---|---|
| Chain | ch | Creates starting chains and spaces. |
| Slip Stitch | sl st | Joins pieces and finishes rounds. |
| Single Crochet | sc | Creates compact stitches and neat edges. |
| Half Double Crochet | hdc | Adds medium height and smooth shaping. |
| Double Crochet | dc | Helps create taller, rounded petals. |
| Treble Crochet | tr | Creates extra height for elongated shapes. |
For beginners, it’s best to practice these stitches before starting the flower. In addition, keeping your tension consistent will help the petals and leaves look more even.
3. What Is the Best Yarn for Crocheting Flowers with Leaves?
Cotton yarn is one of the best choices for crocheting flowers with leaves because it creates clear stitches and holds its shape well. It’s also easy to work with and comes in many colors.
However, acrylic yarn and cotton-acrylic blends are also suitable options. Your choice will depend on the texture and appearance you want.
| Yarn Type | Advantages | Best For |
|---|---|---|
| Cotton yarn | Defined stitches and good shape retention | Decorative flowers and leaves |
| Acrylic yarn | Soft, lightweight, and widely available | Colorful crochet flowers |
| Cotton-acrylic blend | Combines softness with stitch definition | Everyday decorative projects |
For this pattern, medium-weight #4 yarn is a good starting point, especially when paired with a 4.0 mm crochet hook. Nevertheless, you can adjust the hook size depending on your yarn and personal tension.
4. How Can You Use Crochet Flowers with Leaves for Decorations and Gifts?
Crochet flowers with leaves are versatile handmade decorations. Once you’ve finished your flower, you can use it in many creative ways or turn it into a thoughtful handmade gift.
Here are some lovely ideas:
| Project Idea | How to Use Your Crochet Flower |
|---|---|
| Hair accessories | Attach it to a hair clip, headband, or hair tie. |
| Gift wrapping | Sew or attach it to a ribbon for a decorative gift topper. |
| Home decor | Use it to decorate cushions, baskets, or wall hangings. |
| Clothing accessories | Add it to a cardigan, bag, or scarf. |
| Brooch | Attach a suitable pin backing to the flower. |
| Greeting cards | Glue or sew it onto a handmade card. |
| Floral arrangements | Combine several crochet flowers to create a small bouquet. |
For gifts, try making flowers in the recipient’s favorite colors. You can also crochet several flowers in different sizes and arrange them into a beautiful handmade bouquet.
5. Is This Crochet Flower Pattern Suitable for Beginners?
Yes! This project is suitable for beginners who know a few basic crochet stitches. The flower and leaves are made as separate pieces, which makes the project easier to manage.
If you’re completely new to crochet, start by practicing chain, single crochet, and double crochet stitches. Then, move on to the flower and leaves when you’re comfortable with the basic techniques.
6. Can I Make the Crochet Flower Bigger or Smaller?
Yes, you can adjust the finished size by changing your yarn weight and crochet hook. For example, thicker yarn and a larger hook will generally create a bigger flower, while lighter yarn and a smaller hook will produce a smaller design.
You can also experiment with the number and shape of the petals, but remember that changing the stitch pattern may affect the final appearance.
7. How Do I Keep Crochet Flower Petals and Leaves in Shape?
To keep your flower looking neat, maintain even tension while crocheting and avoid pulling the yarn too tightly. Once you’ve finished, gently arrange the petals and leaves with your fingers.
If the yarn allows it, you can lightly block the pieces to help them lie flat. Always check the yarn care instructions before using water or heat, especially with acrylic yarn.
8. Can I Use Leftover Yarn to Make Crochet Flowers?
Absolutely! Crochet flowers are a great way to use leftover yarn because each flower requires only a small amount. You can combine different colors to create unique designs without buying full skeins.
Just try to use yarns with similar thicknesses so the flower and leaves have a consistent appearance.
Conclusion: Create Your Own Beautiful Crochet Flower with Leaves
Making a Crochet Flower Free Pattern with Leaves is a lovely way to enjoy a simple and creative crochet project. With a few basic stitches, colorful yarn, and a little patience, you can create a charming handmade flower that’s perfect for decorating your home, personalizing accessories, or making thoughtful gifts.
The best part is that you can customize your flower with different colors, yarn types, and sizes. You can also make several flowers and combine them into a beautiful crochet bouquet or floral decoration.
Whether you’re a beginner or an experienced crocheter, this project is a fun way to practice your skills and use leftover yarn. So, grab your crochet hook, choose your favorite colors, and start creating your own little crochet garden!
If you make this crochet flower, feel free to share your finished project and let others see your color combinations. Happy crocheting!
