
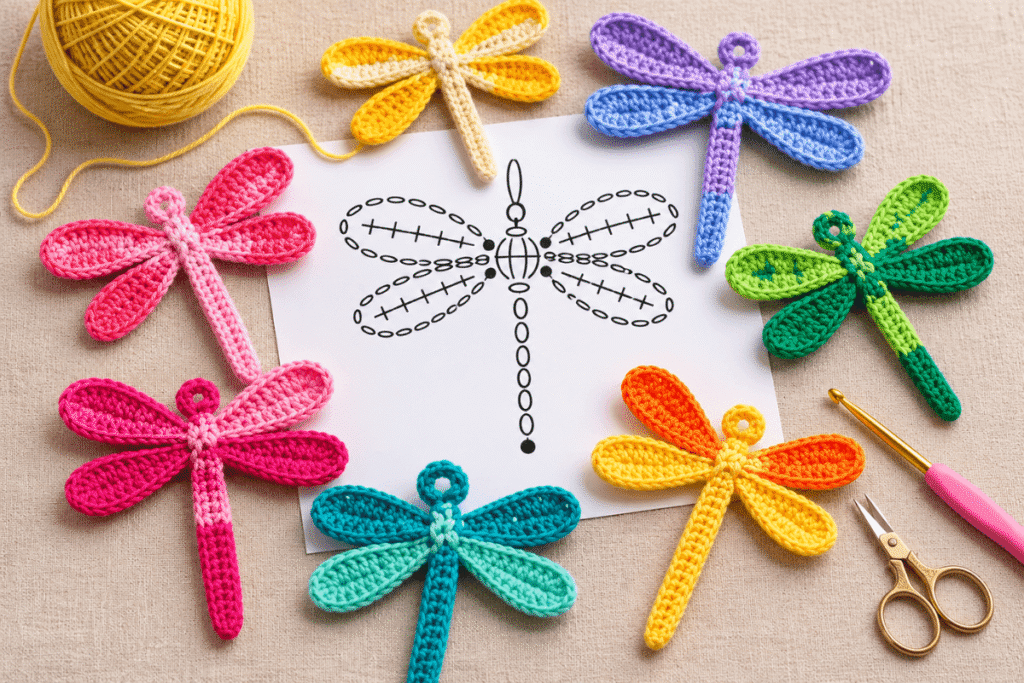
Colorful Crochet Dragonfly Pattern with Stitch Chart – Easy DIY Tutorial is a fun and beginner-friendly project that turns simple yarn into beautiful decorative dragonflies. With colorful wings, a delicate body, and a handy crochet stitch chart, this pattern is easy to follow and customize. In this step-by-step tutorial, you’ll learn how to crochet the wings, shape the body, and assemble your dragonfly using basic stitches, yarn, and a crochet hook. These handmade dragonflies are perfect for gifts, accessories, and home decorations.
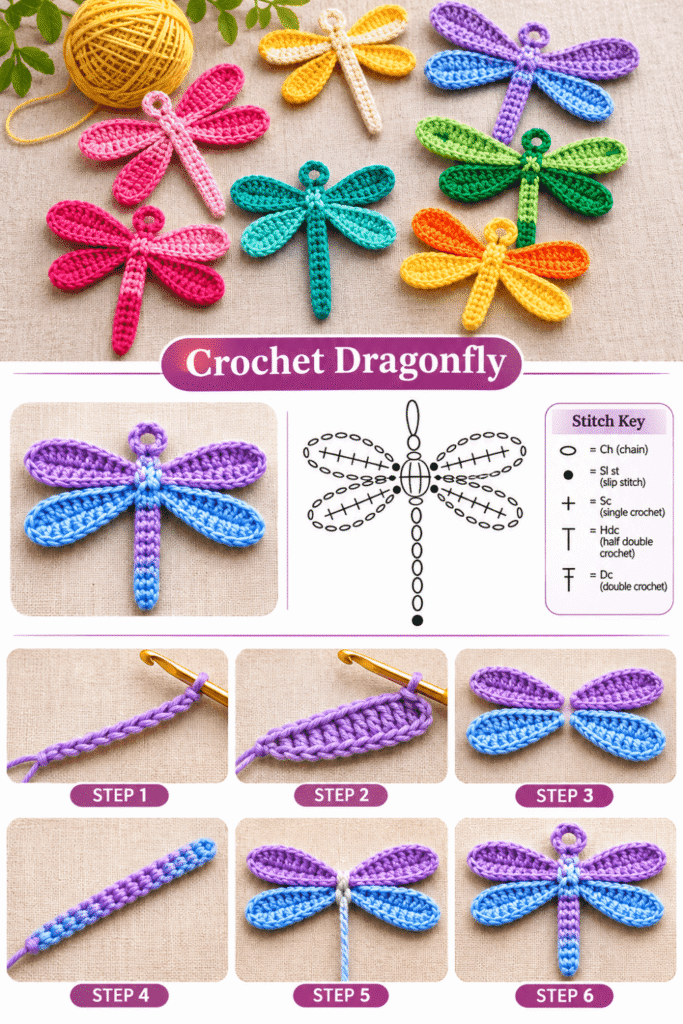
Table of Contents
Materials and Tools for a Colorful Crochet Dragonfly Pattern
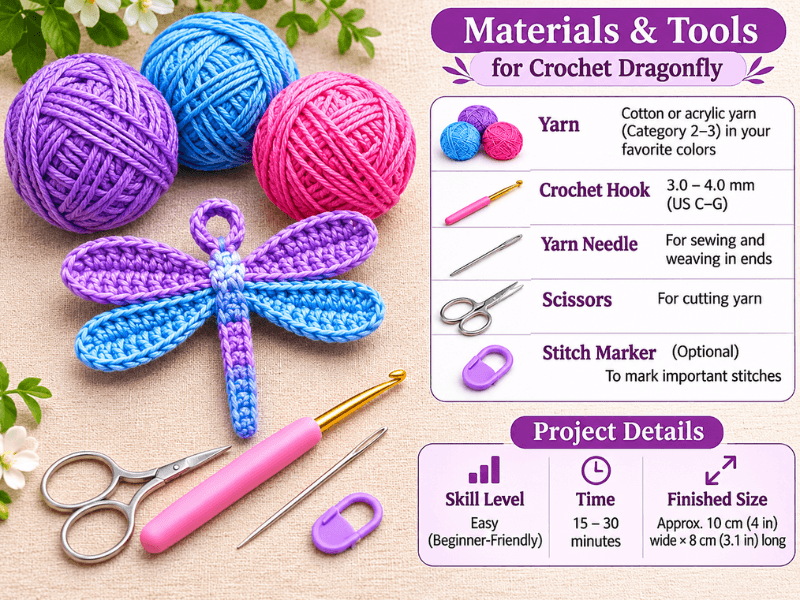
Before starting your Colorful Crochet Dragonfly Pattern with Stitch Chart, gather all the materials you’ll need to create the wings, body, and decorative details. This project is a great way to use leftover yarn in different colors, making each dragonfly unique. Lightweight cotton or acrylic yarn works well because it helps the wings keep their shape while showing off the crochet stitches. Here’s a detailed look at the recommended supplies, hook size, yarn quantities, and finished measurements.
1. Choosing the Right Yarn
For this crochet dragonfly, lightweight cotton or acrylic yarn is a practical choice. Cotton gives the wings a neat stitch definition and a slightly firm finish, while acrylic yarn offers more softness and a wide range of colors.
For a colorful design, choose two or three coordinating shades. You can use one color for the upper wings, another for the lower wings, and a third for the body.
Recommended yarn specifications:
- Yarn weight: Category 2 (Sport) or Category 3 (DK).
- Yarn material: 100% cotton or soft acrylic.
- Main color: Approximately 10–15 yards (9–14 meters).
- Second color: Approximately 5–8 yards (4.5–7.5 meters).
- Body color: Approximately 3–5 yards (3–4.5 meters).
- Optional accent color: A small amount for decorative details.
You can also use different leftover yarn colors for each dragonfly. This is especially useful when making a colorful collection for gifts or decorations.
2. Recommended Crochet Hook Size
A 3.0 mm or 3.5 mm crochet hook is a good starting point for lightweight yarn. The smaller hook helps create firm wings with clearly defined stitches.
| Yarn Weight | Recommended Hook |
|---|---|
| Category 2 – Sport | 2.5–3.5 mm |
| Category 3 – DK | 3.0–4.0 mm |
| Category 4 – Worsted | 4.0–4.5 mm |
For this project, start with a 3.5 mm crochet hook if you’re using DK yarn. However, adjust the hook size if your stitches look too loose or too tight.
3. Complete Materials and Tools Checklist
Gather the following supplies before beginning your dragonfly.
| Material | Recommended Quantity | Purpose |
|---|---|---|
| Main-color yarn | 10–15 yards | Upper wings |
| Second-color yarn | 5–8 yards | Lower wings |
| Body-color yarn | 3–5 yards | Dragonfly body |
| Accent yarn | 2–3 yards | Decorative details |
| Crochet hook | 3.5 mm | Working the stitches |
| Yarn needle | 1 | Joining and sewing pieces |
| Scissors | 1 pair | Cutting yarn |
| Stitch marker | 1 | Marking important stitches |
| Measuring tape | 1 | Checking finished dimensions |
The quantities are approximate estimates for one small dragonfly. Actual yarn use will depend on the yarn thickness, hook size, wing dimensions, and stitch tension.
4. Finished Dragonfly Size and Measurements
The finished size depends on the number of stitches used for the wings and the length of the body. For a small decorative dragonfly, the following measurements are useful starting targets.
| Part | Approximate Measurement |
|---|---|
| Total wingspan | 4–5 inches |
| Body length | 2–3 inches |
| Upper wing length | 1.5–2 inches |
| Lower wing length | 1.5–2 inches |
| Finished dragonfly length | 4–6 inches |
These measurements are suggestions rather than fixed dimensions. You can make smaller dragonflies for keychains or larger ones for wall decorations by adjusting the yarn weight and stitch count.
5. Choosing Colors for Your Crochet Dragonfly
One of the best features of this project is how easily you can customize the colors. The reference design uses bright combinations such as purple and blue, pink, green, turquoise, and yellow-orange.
Here are a few color combinations to try:
| Color Combination | Suggested Placement |
|---|---|
| Purple and lavender | Upper and lower wings |
| Pink and magenta | Contrasting wings |
| Turquoise and teal | Wings and body |
| Yellow and orange | Bright summer design |
| Green and lime | Nature-inspired dragonfly |
For a balanced look, use contrasting shades for the upper and lower wings. Then choose a slightly darker or matching color for the body.
6. Useful Tips Before You Start
- Choose yarn with similar thickness for all the dragonfly parts.
- Keep your stitches consistent so both sides of the wings look balanced.
- Use a slightly smaller hook if your wings feel too loose.
- Prepare all four wings before assembling the body.
- Leave enough yarn at the end of each piece for sewing.
- Use a yarn needle to secure loose ends neatly.
Helpful Tip: If you’re making several dragonflies, prepare the wings in different color combinations before assembling them. This makes it easier to create matching sets while using small amounts of leftover yarn.
Once your materials are ready, you can move on to the basic crochet stitches and chart symbols used to create the dragonfly.
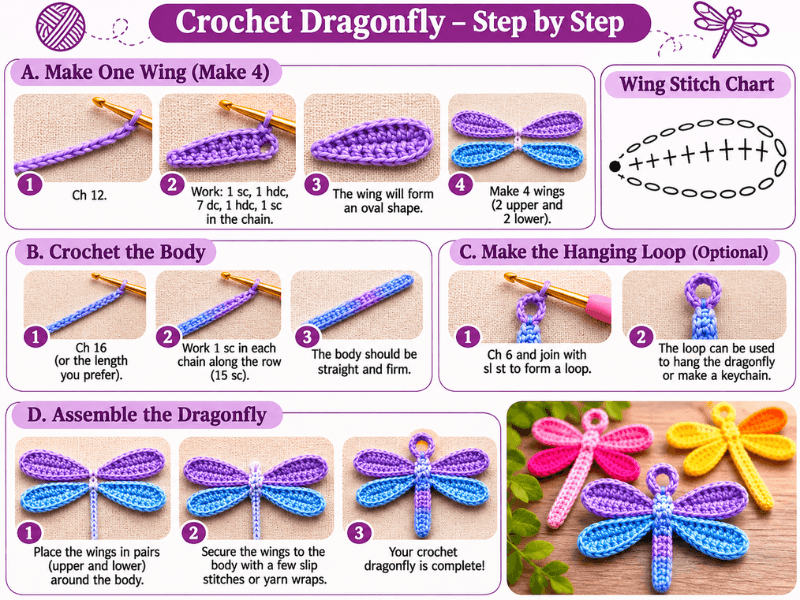
Basic Crochet Stitches and Stitch Chart Symbols for a Dragonfly
Before starting your Colorful Crochet Dragonfly Pattern with Stitch Chart, it’s helpful to understand the basic crochet stitches used to create the wings and body. This project uses simple stitches that are suitable for beginners, especially if you already know how to make a foundation chain. In this section, you’ll learn the US crochet abbreviations, understand the stitch chart symbols, and practice the techniques needed to make neat, colorful dragonfly wings.
1. Crochet Abbreviations Used in This Pattern
Crochet patterns often use abbreviations to make instructions shorter and easier to follow. The following table explains the main US crochet terms used in this tutorial.
| Abbreviation | Full Name | Description |
|---|---|---|
| ch | Chain | Creates the foundation chain |
| sl st | Slip Stitch | Joins stitches or finishes a section |
| sc | Single Crochet | Creates a short, firm stitch |
| hdc | Half Double Crochet | Creates a medium-height stitch |
| dc | Double Crochet | Creates a taller stitch |
| st | Stitch | One individual crochet stitch |
| sts | Stitches | More than one stitch |
| sp | Space | Gap between stitches |
| rep | Repeat | Work the same instructions again |
Note: This tutorial uses US crochet terminology. If you’re following a UK crochet pattern, remember that some stitch names are different.
2. How to Make a Foundation Chain (ch)
The foundation chain is the starting point for many crochet projects. For the dragonfly, it helps create the base of the wings and other crocheted pieces.
Follow these steps:
- Make a slip knot and place it on your crochet hook.
- Hold the working yarn comfortably behind the hook.
- Yarn over by wrapping the yarn around your hook.
- Pull the yarn through the loop already on your hook.
- Repeat until you have the required number of chains.
Try to keep your chains even and avoid pulling them too tightly. A flexible foundation chain makes it easier to work the next row.
3. How to Make a Single Crochet (sc)
Single crochet is a short stitch that creates a firm and compact fabric. It’s useful for making neat edges and shaping small crochet details.
- Insert your hook into the indicated chain or stitch.
- Yarn over and pull up a loop. You should have two loops on your hook.
- Yarn over again.
- Pull through both loops.
You’ve now completed one single crochet stitch. Repeat the same process wherever the pattern requires sc.
4. How to Make a Half Double Crochet (hdc)
Half double crochet is taller than single crochet but shorter than double crochet. It helps create a smooth transition between different stitch heights.
- Yarn over once.
- Insert your hook into the indicated stitch.
- Yarn over and pull up a loop. You’ll have three loops on your hook.
- Yarn over again.
- Pull through all three loops.
Keep your tension consistent so the wing edges remain smooth and balanced.
5. How to Make a Double Crochet (dc)
Double crochet creates a taller stitch that can add length and shape to the dragonfly wings.
- Yarn over once.
- Insert your hook into the indicated stitch.
- Yarn over and pull up a loop.
- Yarn over and pull through the first two loops.
- Yarn over again and pull through the remaining two loops.
You have completed one double crochet stitch. This technique is especially useful when working longer sections of the wings.
6. How to Make a Slip Stitch (sl st)
Slip stitch is one of the shortest crochet stitches. It’s commonly used to join pieces, secure the ends of a section, or move across stitches without adding much height.
To make a slip stitch:
- Insert your hook into the indicated stitch.
- Yarn over.
- Pull the yarn through the stitch and the loop on your hook.
Avoid pulling too tightly, especially when joining the wings, because tight stitches can make the finished dragonfly look uneven.
7. Understanding Crochet Stitch Chart Symbols
A crochet stitch chart uses simple symbols to represent individual stitches. Learning these symbols makes it easier to follow visual instructions without reading every step in written form.
| Stitch | Common Chart Symbol | Abbreviation |
|---|---|---|
| Chain | Oval | ch |
| Slip Stitch | Small filled dot | sl st |
| Single Crochet | Cross or plus sign | sc |
| Half Double Crochet | T-shaped symbol | hdc |
| Double Crochet | T-shaped symbol with one diagonal bar | dc |
The exact appearance of symbols can vary slightly between crochet chart publishers. Therefore, always check the chart key before beginning.
8. Tips for Reading a Crochet Dragonfly Chart
When following a crochet chart, start by identifying the foundation chain and the direction of the stitches. Then look at the chart key to understand each symbol.
Keep these points in mind:
- Each symbol represents a specific crochet stitch.
- Oval symbols usually represent chain stitches.
- Filled dots commonly indicate slip stitches.
- Cross-shaped symbols often represent single crochet.
- T-shaped symbols with bars indicate taller stitches.
- Follow the chart in the direction shown by its arrows or row numbers.
For this dragonfly project, pay special attention to the wing sections. Keeping the stitch placement consistent helps create four wings with a balanced appearance.
Helpful Tip: Practice the chain, single crochet, half double crochet, and double crochet stitches on a small yarn sample before starting the dragonfly. Once you’re comfortable with these techniques and chart symbols, you’ll be ready to crochet the individual wings and body.
How to Crochet the Dragonfly Wings and Body
Now it’s time to create the main parts of your dragonfly! For this Colorful Crochet Dragonfly Pattern with Stitch Chart, you’ll make four individual wings and one long, narrow body. The wings have a simple oval shape, while the body is worked as a small crocheted cord. You can use matching yarn or combine different colors to create a bright, decorative design.
1. Make the First Dragonfly Wing
Start with your chosen wing color and a 3.5 mm crochet hook. Each wing is worked around a foundation chain to create an elongated oval shape.
Follow these steps:
- Make a slip knot and chain 12 (ch 12).
- Starting in the second chain from the hook, work 1 single crochet (sc).
- Work 1 half double crochet (hdc) in the next chain.
- Make 3 double crochet stitches (3 dc) in the next three chains.
- Work 1 hdc in the next chain.
- Make 1 sc in the next chain.
- Work 3 sc into the last chain to turn around the end.
- Continue along the opposite side of the foundation chain, working the corresponding stitches to form the other side of the wing.
- Finish with a slip stitch and leave a yarn tail for joining.
The result should be a narrow, rounded wing with a pointed base. Gently adjust the shape with your fingers so both sides look even.
2. Crochet the Remaining Three Wings
Once the first wing is complete, repeat the same instructions three more times. You’ll need four wings in total to create the dragonfly.
For a colorful design, try using two different shades:
| Wing | Suggested Color | Quantity |
|---|---|---|
| Upper left wing | Purple | 1 |
| Upper right wing | Purple | 1 |
| Lower left wing | Light blue | 1 |
| Lower right wing | Light blue | 1 |
You can also use four different colors if you prefer a more playful look.
Keep all four wings approximately the same length and width. Consistent sizing will make the final dragonfly look balanced.
3. Shape and Arrange the Four Wings
Before joining the pieces, place all four wings on a flat surface.
- Position two wings on the left side.
- Place the other two on the right side.
- Arrange the upper wings slightly higher than the lower wings.
- Bring all four inner ends together at the center.
- Check that the wings form a symmetrical dragonfly shape.
If one wing looks slightly longer than the others, gently adjust its shape before sewing.
4. Crochet the Dragonfly Body
Next, use a contrasting yarn color to make the long body.
- Make a slip knot.
- Chain 18 stitches (ch 18).
- Starting in the second chain from the hook, work 1 slip stitch in each chain across.
- Continue until you reach the end.
- Fasten off, leaving a long yarn tail for attaching the body.
This creates a narrow, firm crocheted cord that sits between the wings and forms the dragonfly’s body.
For a longer dragonfly, add a few extra chains. For a smaller decoration, reduce the starting chain.
5. Make a Small Loop for the Dragonfly Head
To create the small rounded head shown in the finished design, make a short decorative loop using the same yarn as the body.
- Chain 5 stitches.
- Join the first and last chains with a slip stitch to form a small ring.
- Fasten off, leaving a short tail.
- Position the loop at the top of the body.
- Sew it securely in place.
Keep the loop small so it complements the wings without overpowering the design.
6. Check All the Crochet Pieces Before Assembly
Before joining everything, make sure you have all the necessary pieces.
| Crochet Piece | Quantity | Recommended Shape |
|---|---|---|
| Upper wings | 2 | Long oval |
| Lower wings | 2 | Long oval |
| Body | 1 | Narrow crocheted cord |
| Head loop | 1 | Small circle |
The four wings should have similar dimensions, and the body should be long enough to extend below their center.
You can find more crochet on my Facebook page and my Pinterest profile.
Frequently Asked Questions About the Colorful Crochet Dragonfly Pattern
1. How Do You Crochet a Dragonfly Step by Step?
To crochet a dragonfly, start by making four individual wings using a foundation chain and basic crochet stitches. Next, crochet a narrow body using chain and slip stitches. Arrange the four wings in pairs, attach them around the center, and secure the body with a yarn needle. Finally, add a small loop at the top if you want to hang your dragonfly as a decoration or keychain.
2. What Stitches Are Used to Make a Crochet Dragonfly?
This crochet dragonfly uses a combination of basic US crochet stitches. The main stitches include chain (ch), slip stitch (sl st), single crochet (sc), half double crochet (hdc), and double crochet (dc).
| Stitch | Abbreviation | Main Purpose |
|---|---|---|
| Chain | ch | Creates the foundation |
| Slip Stitch | sl st | Joins and secures pieces |
| Single Crochet | sc | Creates firm edges |
| Half Double Crochet | hdc | Adds medium height |
| Double Crochet | dc | Creates longer wing sections |
These stitches are beginner-friendly and help create the elongated shape of the dragonfly wings.
3. What Type of Yarn Is Best for Crocheting Dragonflies?
Cotton and acrylic yarn are both suitable for crochet dragonflies. Cotton is a good choice because it provides clear stitch definition and helps the wings maintain their shape. Acrylic yarn is softer and comes in many bright colors, making it ideal for colorful decorative projects.
| Yarn Type | Benefits | Best Use |
|---|---|---|
| Cotton | Firm texture and clear stitches | Defined wings |
| Acrylic | Soft and colorful | Decorative dragonflies |
| Cotton blend | Combines softness and structure | Everyday crochet projects |
For this pattern, lightweight Sport or DK yarn works well with a 3.0–3.5 mm crochet hook.
4. How Can You Use Crochet Dragonflies for Decorations and Accessories?
Crochet dragonflies are versatile handmade decorations that can be used in many creative ways. Their lightweight design makes them suitable for accessories, gifts, and home decor.
| Crochet Project | How to Use It |
|---|---|
| Keychains | Attach a small metal keyring |
| Hair accessories | Sew onto clips or headbands |
| Wall decorations | Hang several dragonflies together |
| Gift decorations | Attach to handmade gift wrapping |
| Bags | Use as decorative bag charms |
| Bookmarks | Add a long decorative hanging cord |
| Garden decor | Display in a protected decorative arrangement |
Conclusion
This Colorful Crochet Dragonfly Pattern with Stitch Chart – Easy DIY Tutorial is a simple and enjoyable project for anyone who loves making handmade crochet decorations. Using basic stitches, colorful yarn, and a few easy steps, you can create beautiful dragonflies with delicate wings and charming details. Whether you’re a beginner or an experienced crocheter, you can experiment with different colors and sizes to make each dragonfly unique. Use your finished creations as keychains, bag charms, hair accessories, or home decorations. Gather your favorite yarn colors and give this easy crochet dragonfly pattern a try!
